Smart Home Savings: 5 DIY Energy Upgrades Before Winter
 Implementing five key DIY energy upgrades before winter 2025 can significantly reduce utility costs and improve home comfort by targeting common areas of energy loss.
As the chill of winter approaches, many homeowners in the United States begin to dread the inevitable rise in heating bills.
However, proactively tackling energy efficiency can transform your home into a cozy, cost-effective sanctuary.
This article focuses on how to achieve Smart Home Savings: Install These 5 DIY Energy-Efficient Upgrades Before Winter 2025, empowering you to take control of your energy consumption and enjoy a more comfortable living space without breaking the bank.
These practical, do-it-yourself projects are designed to maximize your home’s thermal performance, ensuring you stay warm while keeping your finances healthy.
Understanding your home’s energy footprint
Before diving into specific upgrades, it’s crucial to understand where your home is currently losing energy. A home energy audit, whether professional or DIY, can pinpoint these problem areas.
Many utility companies offer free or low-cost audits, providing a detailed report on your energy usage and suggesting improvements.
For a DIY approach, a simple walk-through with a keen eye and a thermal leak detector can reveal significant drafts and insulation gaps.
This initial assessment forms the foundation for effective energy-saving strategies, ensuring your efforts are directed where they will have the most impact.
Identifying common culprits of energy waste is the first step toward a more efficient home. Drafts around windows and doors, insufficient insulation in attics and walls, and inefficient heating and cooling systems are typical sources of energy loss.
Understanding these areas allows you to prioritize your DIY projects, focusing on those that offer the greatest return on investment in terms of comfort and savings.
A comprehensive understanding of your home’s unique energy characteristics will guide you in making informed decisions about which upgrades to implement first.
The benefits of a home energy audit
Pinpoints specific areas of energy loss.
Provides recommendations for cost-effective improvements.
Helps prioritize DIY projects for maximum impact.
Offers insights into overall home performance.
Once you have a clear picture of your home’s energy strengths and weaknesses, you can approach the upgrade process with confidence and a clear plan.
This foundational knowledge prevents wasted effort and ensures that each DIY project contributes meaningfully to your goal of a more energy-efficient home.
Ultimately, understanding your energy footprint is not just about saving money; it’s about creating a more comfortable and sustainable living environment for years to come.
Sealing air leaks and drafts
One of the most immediate and cost-effective ways to improve your home’s energy efficiency is by sealing air leaks and drafts.
These hidden gaps and cracks around windows, doors, and utility penetrations can account for a significant portion of heat loss in winter and heat gain in summer.
Addressing these issues can lead to noticeable improvements in comfort and substantial reductions in your energy bills.
This DIY task requires minimal specialized tools and can be completed quickly, offering an excellent starting point for any homeowner looking to save energy.
Common areas for air leaks include the spaces around window and door frames, electrical outlets, plumbing stacks, and attic hatches. Identifying these leaks can be as simple as holding a lit incense stick near potential problem spots on a windy day and watching for flickering smoke.
Once identified, sealing these gaps with caulk, weatherstripping, or expanding foam is a straightforward process. The cumulative effect of sealing multiple small leaks can be as impactful as larger, more complex renovations, making this a high-priority upgrade.
Essential materials for air sealing
Caulk: Ideal for stationary joints and cracks in non-moving parts of the house, such as around window frames and baseboards.
Weatherstripping: Perfect for sealing gaps around moving components like doors and operable windows, allowing them to open and close smoothly.
Expanding foam sealant: Best for larger gaps and holes, such as those around pipes or wires entering the house, providing a strong, airtight barrier.
Gaskets: Used for electrical outlets and light switches on exterior walls to prevent drafts from entering through these utility openings.
Proper application of these materials is key to their effectiveness. Ensure surfaces are clean and dry before applying caulk or weatherstripping for optimal adhesion.
For expanding foam, follow manufacturer instructions carefully, as it expands considerably. By systematically sealing these air leaks, you create a tighter building envelope, keeping conditioned air inside and unwanted outdoor air out.
This simple yet powerful upgrade forms a critical layer of defense against energy waste.
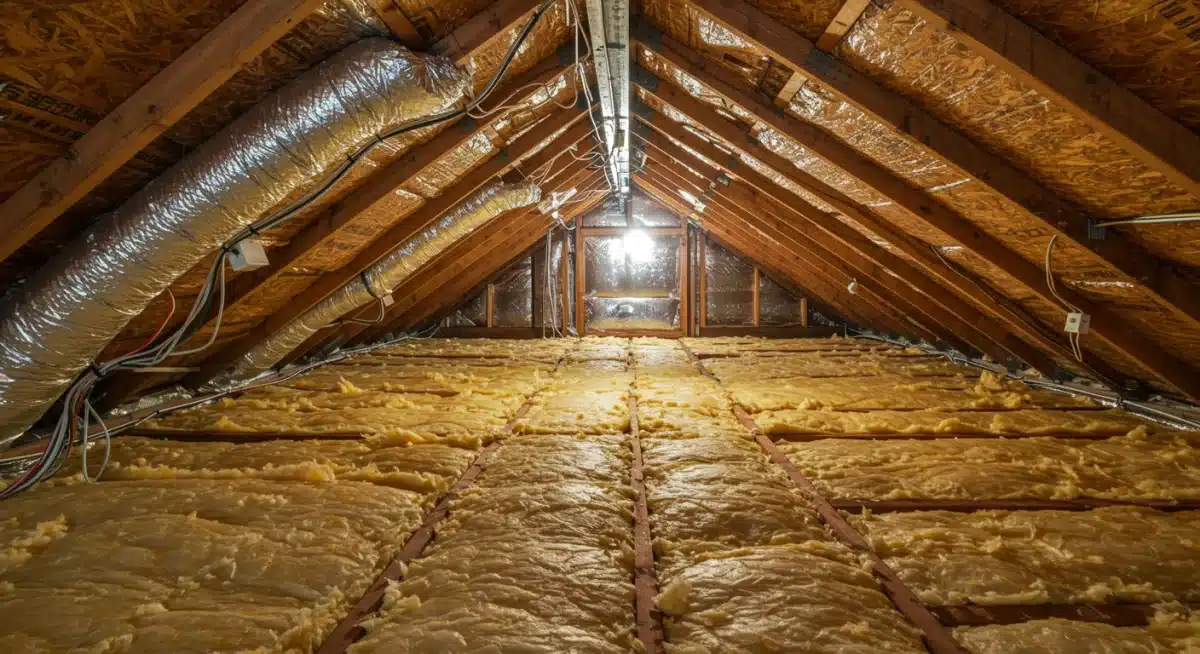
Upgrading insulation in your attic
The attic is often the biggest culprit for heat loss in many homes, making it a prime target for energy-efficient upgrades.
Heat naturally rises, and without adequate insulation, it can easily escape through the roof, leading to higher heating costs. Upgrading your attic insulation is a highly effective DIY project that can significantly reduce you
r energy consumption and improve your home’s overall comfort. This investment typically pays for itself through energy savings within a few years, making it a smart choice for any homeowner.
Before adding new insulation, it’s essential to assess your existing attic insulation. Check the depth and type of insulation you currently have. In many older homes, insulation levels are far below current recommendations.
Look for inconsistencies, areas where insulation has settled or been disturbed, and ensure that ventilation is not blocked.
Proper attic ventilation is crucial for preventing moisture buildup and maintaining insulation effectiveness. Addressing these preliminary steps ensures that your new insulation performs optimally.
Choosing the right insulation type
Batt and roll insulation: Commonly made from fiberglass or mineral wool, these are easy to cut and fit between attic joists. They are a popular choice for DIYers due to their straightforward installation.
Blown-in insulation: Often cellulose or fiberglass, this type requires a special machine but can fill irregular spaces and cover existing insulation effectively. Some home improvement stores offer rentals for the blower machine.
Rigid foam boards: Excellent for sealing and insulating attic hatches or knee walls, providing a high R-value per inch.

When installing new insulation, always prioritize safety. Wear appropriate personal protective equipment, including gloves, a dust mask, and eye protection.
Ensure that insulation does not cover recessed light fixtures unless specifically rated for such contact (IC-rated). Aim for the recommended R-value for your climate zone, which can often be found on energy.gov or local building codes.
A well-insulated attic acts as a thermal barrier, keeping your home warmer in winter and cooler in summer, thus providing year-round energy savings.
Enhancing window and door efficiency
Windows and doors are often weak points in a home’s thermal envelope, allowing considerable heat transfer.
While replacing old, inefficient windows and doors with new, energy-efficient models can be a significant investment, there are several DIY approaches to enhance their performance without a full replacement.
These upgrades can make a substantial difference in reducing drafts and improving insulation, contributing to a more comfortable home and lower energy bills.
Focusing on these areas can yield noticeable improvements, especially in older homes.
One of the simplest and most effective strategies is to use window film. This transparent film, applied to the interior of window panes, creates an insulating layer that helps reduce heat loss in winter and heat gain in summer.
It’s an affordable solution that can be installed by homeowners with basic tools. Similarly, adding insulated drapes or cellular shades can provide another layer of thermal protection, especially during colder nights.
These soft furnishings not only enhance aesthetics but also act as effective barriers against temperature fluctuations.
DIY window and door efficiency tips
Install window film: Creates an extra insulating layer, reducing heat transfer through glass.
Add insulated curtains or shades: Provides a thermal barrier and can be closed at night to trap heat.
Apply caulk around frames: Seals any small gaps between the window/door frame and the wall.
Use door sweeps and door snakes: Blocks drafts from coming in under exterior doors.
Check and replace weatherstripping: Ensures a tight seal when doors and windows are closed.
For doors, beyond weatherstripping and sealing, consider installing a storm door. A storm door creates an air pocket between itself and your main door, adding an extra layer of insulation.
This can be particularly beneficial for older, less insulated doors. Regularly inspecting and maintaining your existing windows and doors for any signs of wear or damage will also help preserve their efficiency.
By implementing these targeted enhancements, you can significantly boost the energy performance of your windows and doors, enjoying greater comfort and reduced energy waste.
Optimizing your water heater settings
Your water heater is a significant energy consumer, often accounting for a substantial portion of your utility bill. Fortunately, optimizing its settings and ensuring it operates efficiently is a straightforward DIY task that can lead to considerable savings.
Many homeowners unknowingly keep their water heater thermostat set too high, leading to wasted energy and potential safety hazards. Adjusting this setting is quick, easy, and requires no special tools, making it an ideal energy-saving project.
The recommended temperature setting for most residential water heaters is 120 degrees Fahrenheit (about 49 degrees Celsius). This temperature is generally sufficient for household needs, prevents scalding, and reduces energy consumption.
For every 10-degree reduction in water temperature, you can save between 3% and 5% on your water heating costs.
If your dishwasher or washing machine requires hotter water, consider a booster heater for those specific appliances rather than heating your entire tank to a higher temperature.
Additional water heater efficiency tips
Insulate your water heater tank: If your water heater tank feels warm to the touch, it’s losing heat. An insulation blanket can reduce standby heat loss by 25-45%, saving 7-16% on water heating costs annually.
Insulate hot water pipes: Insulating the first six feet of hot and cold water pipes connected to the water heater can reduce heat loss and raise water temperature by 2-4 degrees Fahrenheit, allowing for a lower thermostat setting.
Drain sediment annually: Sediment buildup at the bottom of the tank reduces efficiency. Draining a few gallons of water from the tank once a year can remove sediment and extend the life of your unit.
Consider a timer: For electric water heaters, a timer can be installed to heat water only during periods of high demand, further reducing energy consumption.
These simple adjustments and additions can dramatically improve your water heater’s efficiency, leading to lower energy bills and a reduced carbon footprint.
Regular maintenance and mindful settings are key to maximizing the performance of this essential home appliance. By taking these DIY steps, you ensure your water heater is working smarter, not harder, to provide your home with hot water.
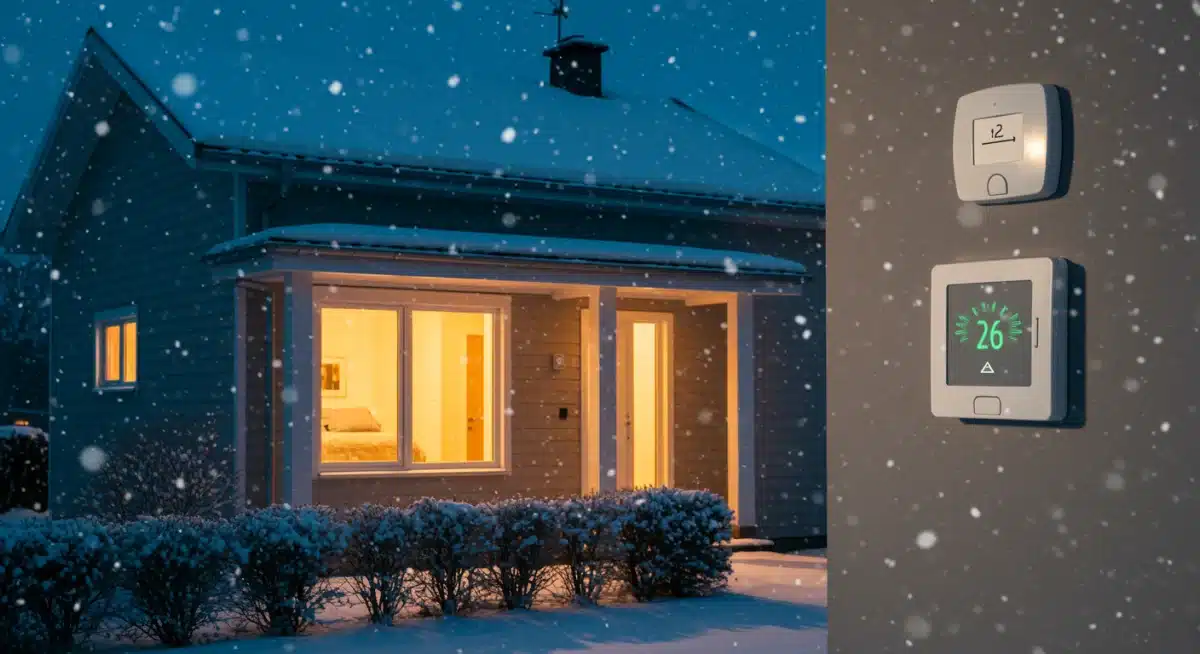
Smart thermostat installation and programming
One of the most impactful DIY energy upgrades you can implement before winter 2025 is installing a smart thermostat.
Unlike traditional thermostats, smart thermostats learn your preferences, can be controlled remotely, and optimize your heating and cooling schedules to save energy.
This technology offers unparalleled convenience and efficiency, allowing you to fine-tune your home’s climate control and significantly reduce your energy consumption without sacrificing comfort.
The initial investment in a smart thermostat is quickly recouped through ongoing energy savings.
Installing a smart thermostat is a relatively straightforward DIY project for most homeowners, often involving simply replacing your old thermostat with the new unit.
Most smart thermostats come with detailed instructions and online support, guiding you through the wiring process. Before purchasing, ensure compatibility with your existing HVAC system. Once installed, the real savings begin through intelligent programming and remote access.
Many smart thermostats also provide detailed energy usage reports, helping you understand and further refine your heating and cooling patterns.
Key benefits of smart thermostats
Remote control: Adjust your home’s temperature from anywhere using your smartphone, ensuring comfort upon arrival and saving energy when away.
Learning capabilities: Many models learn your schedule and temperature preferences, automatically adjusting settings for optimal efficiency.
Geofencing: Uses your phone’s location to detect when you leave or approach home, adjusting temperatures accordingly to save energy.
Energy usage reports: Provides insights into your heating and cooling patterns, helping identify areas for further savings.
Integration with smart home systems: Can be integrated with other smart devices for a cohesive home automation experience.
Programming your smart thermostat effectively is crucial for maximizing savings. Start by setting a comfortable temperature for when you are home and awake.
Then, program setbacks for when you are away or asleep, allowing the temperature to drop in winter or rise in summer.
The beauty of a smart thermostat is its ability to learn and adapt, making these adjustments almost effortless. By embracing this technology, you not only save money but also contribute to a more sustainable lifestyle, enjoying precise climate control that fits your busy schedule.
Maintaining your HVAC system for peak performance
While installing new components is important, regular maintenance of your existing HVAC (Heating, Ventilation, and Air Conditioning) system is equally crucial for energy efficiency.
A well-maintained system operates more effectively, consumes less energy, and has a longer lifespan. Neglecting routine maintenance can lead to decreased performance, higher utility bills, and costly breakdowns, especially during peak heating or cooling seasons.
This DIY aspect of home energy savings is often overlooked but provides significant returns.
One of the simplest yet most effective maintenance tasks is regularly replacing your air filters. Dirty filters restrict airflow, forcing your HVAC system to work harder and consume more energy.
Depending on your system and household conditions (e.g., pets, allergies), filters should be changed every 1-3 months.
This small task can make a big difference in both air quality and system efficiency. Beyond filters, inspecting and cleaning your outdoor condenser unit and indoor evaporator coils can prevent blockages and ensure optimal heat exchange.
Essential HVAC maintenance steps
Change air filters regularly: Improves airflow, system efficiency, and indoor air quality.
Clean outdoor condenser unit: Remove debris, leaves, and dirt that can obstruct airflow and reduce efficiency.
Inspect and clean indoor evaporator coils: Ensure coils are free of dirt and grime for optimal heat absorption.
Check refrigerant levels (professional task): While some checks are DIY, refrigerant levels and leaks should be handled by a certified technician.
Keep vents clear: Ensure all supply and return vents are unobstructed by furniture or drapes to allow for proper air circulation.
Schedule annual professional tune-ups: A professional can identify and address potential issues before they become major problems, ensuring your system runs at peak efficiency.
Taking a proactive approach to HVAC maintenance not only saves you money on energy bills but also extends the life of your expensive equipment.
These routine checks and cleanings can prevent minor issues from escalating into major repairs, providing peace of mind as winter approaches.
By integrating these practices into your home maintenance routine, you ensure your HVAC system is always ready to deliver efficient heating and cooling, contributing significantly to your overall home energy savings.
| Key Upgrade | Benefit |
|---|---|
| Seal Air Leaks | Stops drafts, reduces heat loss, and lowers utility bills immediately. |
| Attic Insulation | Prevents heat from escaping through the roof, enhancing warmth retention. |
| Window & Door Efficiency | Minimizes heat transfer, improving comfort without full replacements. |
| Smart Thermostat | Automates temperature control for optimal energy use and remote access. |
Frequently asked questions about DIY energy upgrades
Sealing air leaks with caulk and weatherstripping, along with improving attic insulation, are generally the most cost-effective DIY upgrades.
These projects require minimal investment but yield significant savings by preventing heat loss and improving overall home comfort during colder months.
It’s advisable to check for air leaks at least once a year, ideally before the heating season begins. Over time, caulk can crack, and weatherstripping can wear out, creating new drafts.
A quick annual inspection ensures your home remains as airtight as possible.
Most smart thermostats are designed for DIY installation and come with clear instructions. If you’re comfortable with basic wiring and following guides, you can likely install it yourself.
However, if you have an older or complex HVAC system, consulting an HVAC professional is recommended.
The ideal temperature for most residential water heaters is 120 degrees Fahrenheit.
This setting provides sufficient hot water for daily needs, minimizes the risk of scalding, and significantly reduces energy consumption compared to higher temperature settings, leading to lower utility bills.
Yes, absolutely. Dirty HVAC filters restrict airflow, forcing your system to work harder and consume more energy to maintain desired temperatures.
Regular filter replacement ensures optimal airflow, improves system efficiency, and contributes to better indoor air quality, ultimately saving energy and money.
Conclusion
Preparing your home for winter 2025 by implementing these five essential DIY energy upgrades is a proactive and financially savvy decision.
From sealing air leaks and enhancing insulation to optimizing water heater settings and installing smart thermostats, each step contributes to a more energy-efficient and comfortable living space.
These projects not only promise significant reductions in your utility bills but also empower you with valuable home maintenance skills.
By investing a little time and effort now, you can enjoy a warmer home and a healthier wallet for winters to come, proving that smart home savings are well within reach for every homeowner.


