Garage Workspace Conversion: $1,000 Guide to 10% More Usable Space
 Are you looking to maximize your home’s potential without breaking the bank? Learning how to convert your garage into a functional workspace can be a game-changer, offering a dedicated area for hobbies, remote work, or creative projects. This comprehensive guide will walk you through transforming your garage for around $1,000, effectively increasing your usable living space by at least 10%.
Assessing Your Garage and Planning the Layout
Before diving into any renovation, a thorough assessment of your existing garage space is crucial. This initial step lays the groundwork for a successful conversion, ensuring that your vision aligns with the practical realities of the structure.
Understanding the current condition and potential limitations will help you plan more effectively and avoid costly surprises down the line.
Consider the dimensions, existing electrical outlets, and any structural elements that might impact your design. A well-thought-out plan will maximize efficiency and comfort, making your new workspace truly functional.
Evaluating current conditions
Start by clearing out your garage as much as possible. This allows you to see the true potential of the space and identify any issues that need addressing.
Look for cracks in the foundation, signs of water damage, or inadequate insulation. These elements will influence your budget and timeline.
Inspect the floor for levelness and cracks.
Check walls and ceiling for water stains or mold.
Assess existing electrical outlets and lighting.
Designing your ideal workspace layout
Once you understand the garage’s condition, begin sketching possible layouts. Think about the primary function of your workspace.
Will it be for woodworking, crafting, a home office, or a combination? This will dictate the placement of workbenches, storage, and equipment. Consider natural light sources and how to best utilize them.
A good layout prioritizes workflow and accessibility. For instance, if you’re building a workshop, ensure easy access to tools and materials. If it’s an office, focus on comfort and minimal distractions. Don’t forget about pathways and clearances.
Concluding this initial phase, a detailed plan, even a simple sketch, is your roadmap. It helps you visualize the end result and break down the project into manageable steps. This preparatory work is invaluable for staying within your budget and achieving a functional, inspiring workspace.
Budgeting for Your $1,000 Garage Conversion
Embarking on a garage conversion project with a strict budget of $1,000 requires careful planning and smart decision-making.
This budget is achievable, but it means prioritizing essential upgrades and being resourceful with materials. The key is to focus on functionality and comfort without overspending on aesthetics that can be added later.
Understanding where to allocate funds most effectively will ensure that every dollar contributes to a significant improvement in your garage’s usability. This section outlines how to stretch your budget to achieve a functional workspace.
Prioritizing essential upgrades
With a $1,000 budget, it’s vital to identify what truly needs to be done versus what would be nice to have. Focus on structural integrity, basic climate control, and fundamental organization. Cosmetic improvements often come at a higher cost and can be deferred.
Insulation and weatherproofing for comfort.
Basic lighting and electrical safety.
Functional shelving and workbench construction.
Finding affordable materials and tools
Resourcefulness is your best friend when on a tight budget. Explore options like reclaimed materials, second-hand tools, and discounted supplies. Local hardware stores often have ‘scratch and dent’ sections, and online marketplaces can be treasure troves for inexpensive items.
Consider DIY solutions for many aspects of the conversion. Building your own workbench from plywood or repurposing old cabinets can save a significant amount. Don’t underestimate the power of a fresh coat of paint to brighten a space without a huge investment.
In summary, adhering to a $1,000 budget means being strategic. Spend wisely on core improvements that impact functionality and comfort, and be creative in sourcing materials. This approach ensures you get the most value for your money, transforming your garage into a practical workspace without financial strain.
Essential Structural and Utility Improvements
Once your budget and layout are set, addressing the structural and utility aspects of your garage is the next critical step.
These improvements ensure your workspace is safe, comfortable, and efficient. Ignoring these fundamental elements can lead to discomfort, inefficiency, or even safety hazards, undermining all your efforts.
Focus on creating a stable, weatherproof, and adequately powered environment. These foundational changes are where a significant portion of your budget will be allocated, but they are non-negotiable for a truly functional space.
Improving insulation and weatherproofing
A garage often lacks proper insulation, making it uncomfortable in extreme temperatures. Adding insulation to walls and the garage door is paramount for climate control.
This doesn’t have to be expensive; roll insulation or foam board can be effective and budget-friendly. Sealing gaps around windows and doors with caulk and weatherstripping will also prevent drafts and moisture.
Proper weatherproofing protects your tools and materials from humidity and temperature fluctuations, extending their lifespan and maintaining their condition. It also contributes significantly to energy efficiency, reducing potential heating or cooling costs.

Enhancing electrical and lighting solutions
Most garages are equipped with minimal electrical outlets and often insufficient lighting. For a functional workspace, you’ll likely need more power sources and brighter illumination.
Installing additional outlets, especially near your workbench or desk, will prevent the need for extension cords, which can be a tripping hazard.
Consider LED lighting fixtures, which are energy-efficient and provide bright, clear light ideal for detailed tasks. Battery-powered LED options can also supplement existing lighting without requiring complex electrical work. Always prioritize safety when dealing with electricity.
These structural and utility improvements form the backbone of your new workspace. By investing in proper insulation, weatherproofing, and adequate electrical and lighting, you create a foundation that supports productivity and comfort.
These efforts ensure your converted garage is not just a space, but a truly functional extension of your home.
Smart Storage and Organization Solutions
An organized workspace is a productive workspace. In a garage conversion, especially one on a budget, smart storage and organization solutions are critical for maximizing the usable area and maintaining a clutter-free environment.
Effective storage doesn’t just look good; it makes tasks easier, reduces wasted time searching for tools, and enhances overall efficiency.
This section explores various ways to organize your new workspace, focusing on cost-effective and space-saving techniques that contribute to the 10% increase in usable space.
Maximizing vertical space with shelving and pegboards
The walls of your garage are often an untapped resource. Installing shelving units, especially those that reach high, can store a significant amount of items without encroaching on floor space. DIY shelves made from plywood or repurposed materials can be incredibly inexpensive.
Install sturdy, open shelving for easy access to frequently used items.
Utilize pegboards for hanging tools, maximizing wall space and visibility.
Consider overhead storage racks for seasonal items or less frequently used equipment.
Creating a functional workbench and tool storage
A robust workbench is often the centerpiece of any functional workspace. You can construct a basic yet sturdy workbench from dimensional lumber and a plywood top for a reasonable cost. Integrating storage directly into the workbench design, such as drawers or shelves underneath, further optimizes space.
For tool storage, think beyond a simple toolbox. Magnetic strips, tool chests, and custom-built organizers can keep your tools neatly arranged and within reach. Labeling bins and drawers ensures everything has its place, making clean-up and retrieval effortless.
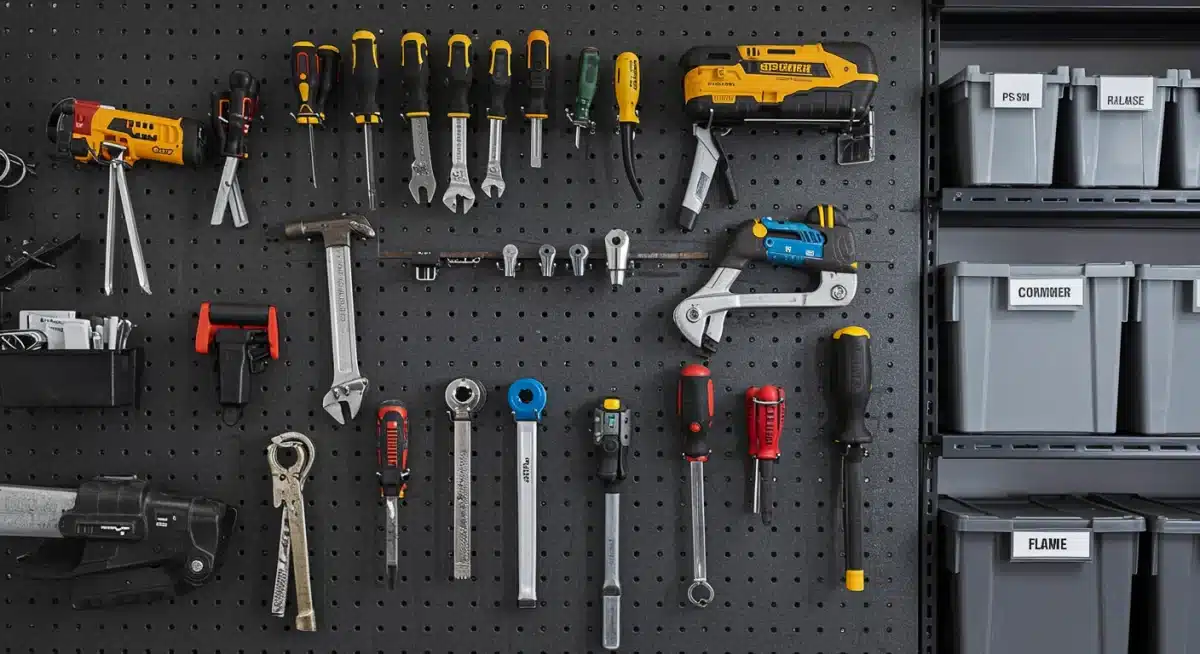
In conclusion, thoughtful storage and organization are paramount for a functional garage workspace. By leveraging vertical space, creating dedicated tool storage, and implementing a system that works for you, you can transform a cluttered garage into an efficient and inspiring area, significantly adding to your home’s usable footprint.
Flooring and Finishing Touches on a Budget
Once the core structural and organizational elements are in place, turning your attention to flooring and finishing touches can elevate the comfort and aesthetic appeal of your garage workspace. These steps, while often considered cosmetic, play a crucial role in making the space feel complete, inviting, and more like a dedicated room rather than just a garage.
Achieving a polished look on a budget requires smart material choices and a DIY approach. The goal is to create a durable, clean, and visually pleasing environment without overspending.
Budget-friendly flooring options
The bare concrete floor of a garage can be cold, dusty, and uncomfortable. Several affordable flooring options can dramatically improve the space. Epoxy paint is a popular choice, offering durability, easy cleaning, and a professional look. It can be applied DIY and comes in various colors.
Another option is interlocking floor tiles, often made of rubber or PVC. These are easy to install, provide cushioning, and can be replaced individually if damaged. For an even more economical solution, heavy-duty floor mats can define your workspace area and offer comfort underfoot.
Adding comfort and aesthetic appeal
Finishing touches are what truly transform a garage into a functional workspace. A fresh coat of paint on the walls can brighten the space and make it feel more inviting. Choose light colors to maximize natural and artificial light. Adding simple trim around windows and doors can give a more finished appearance.
Consider bringing in a comfortable chair, a small rug, or even some plants to soften the industrial feel. These small additions can make a significant difference in how the space feels and functions, making it a place you genuinely enjoy spending time in.
To summarize, investing in budget-friendly flooring and thoughtful finishing touches completes your garage conversion. These elements enhance both the functionality and the aesthetic of your new workspace, making it a comfortable and inspiring place to work, craft, or pursue hobbies, all while staying within your $1,000 budget.
Maintaining and Maximizing Your New Workspace
Converting your garage into a functional workspace is a significant achievement, but the journey doesn’t end there.
To ensure your investment continues to pay off, both in terms of utility and increased usable space, ongoing maintenance and strategic maximization are essential. A well-maintained workspace remains efficient, inspiring, and a valuable asset to your home.
This final section focuses on practices that help preserve your converted garage’s functionality and explore further ways to enhance its value over time, ensuring it truly adds 10% or more to your home’s usable area.
Establishing a routine for cleanliness and organization
Even the most perfectly organized space can quickly fall into disarray without a consistent maintenance routine.
Dedicate a few minutes at the end of each workday or week to put tools away, clear surfaces, and sweep the floor. This prevents clutter from accumulating and makes your next work session more pleasant and productive.
Designate a specific spot for every tool and material.
Perform a quick tidy-up after each use.
Schedule a deeper clean and reorganization periodically.
Future upgrades and adaptations
Your needs may evolve, and your workspace should be able to adapt. Consider future upgrades that can further enhance your garage. This could include adding more specialized lighting, investing in a more advanced tool, or incorporating smart home technology for climate control or security. Plan these upgrades strategically as your budget allows.
When planning your garage workspace, it’s smart to look beyond your current needs and consider how the space could evolve over time. A well-designed garage conversion shouldn’t be locked into a single purpose.
With thoughtful planning, today’s workspace could easily transform into a guest room, an expanded home gym, a creative studio, or a dedicated hobby area. Using modular furniture, movable storage, and adaptable layouts allows the garage to shift functions without requiring major renovations, preserving both flexibility and long-term value.
Designing with future use in mind also helps protect your investment. Choosing neutral finishes, durable flooring, and versatile lighting makes it easier to reconfigure the garage as your lifestyle changes.
Simple decisions — like installing additional outlets, using removable partitions, or opting for wall-mounted storage — can make future transitions seamless and cost-effective.
In conclusion, the long-term success of a converted garage depends as much on ongoing care as it does on the initial transformation.
Regular cleaning, consistent organization, and periodic reassessment of how the space is used will keep your garage functional and efficient.
By planning for future adaptations and maintaining the space thoughtfully, your converted garage becomes a flexible, high-value asset that continues to add usable space, comfort, and enjoyment to your home for years to come.
| Key Conversion Step | Brief Description |
|---|---|
| Planning & Budgeting | Assess garage, plan layout, and allocate $1,000 budget wisely, prioritizing essentials. |
| Insulation & Utilities | Improve climate control with insulation and enhance electrical/lighting for functionality. |
| Storage & Organization | Utilize vertical space with shelving and pegboards; build a functional workbench. |
| Finishing Touches | Apply budget-friendly flooring, paint, and decor to enhance comfort and aesthetics. |
Frequently Asked Questions About Garage Conversion
Can I really convert my garage into a functional workspace for just $1,000?
Yes — with smart planning, a garage conversion on a $1,000 budget is very achievable. The key is to focus on high-impact, low-cost upgrades that improve functionality first. Prioritize essentials like insulation, basic lighting, and DIY storage.
Repurposing items you already own (old cabinets, shelves, or tables), shopping secondhand, and doing the labor yourself can stretch your budget significantly. Start with practicality over polish; you can always upgrade aesthetics later.
What are the most crucial steps for increasing usable garage space by 10%?
The biggest gains come from thinking vertically in your garage. Wall-mounted shelving, pegboards, and ceiling-mounted racks clear valuable floor space.
A compact workbench with built-in drawers or cabinets also helps consolidate tools and materials. Strategic organization — grouping tools by task and keeping frequently used items within reach — makes your garage feel larger, cleaner, and far more efficient.
Do I need a permit to convert my garage into a workspace?
In most cases, basic garage improvements such as adding shelves, painting, installing insulation, or upgrading lighting do not require permits.
However, permits may be necessary if you plan to make major electrical changes, add plumbing, modify structural elements, or convert the garage into a legally habitable room. Always check with your local building department to avoid compliance issues down the line.
How can I make my garage workspace comfortable year-round?
Comfort is essential for a usable garage workspace. Start by insulating the walls and garage door, which dramatically improves temperature control. Seal gaps around doors and windows with weatherstripping to eliminate drafts.
For climate adjustment, a small space heater, portable fan, or compact dehumidifier can make a big difference. Proper ventilation — especially if you work with tools, paint, or chemicals — helps maintain air quality and comfort.
What are the best budget-friendly flooring options for a garage workspace?
There are several affordable flooring solutions that work well in a garage environment:
Epoxy floor paint: Durable, moisture-resistant, and easy to clean — ideal for DIY projects.
Interlocking rubber or PVC tiles: Comfortable underfoot, modular, and simple to install.
Heavy-duty floor mats: A low-cost option that defines work zones, adds comfort, and protects concrete.
Each option improves safety, comfort, and overall usability without pushing your budget over $1,000.
Conclusion
Transforming your garage into a functional workspace on a budget of just $1,000 is not only feasible but also incredibly rewarding.
By following a step-by-step approach that prioritizes planning, smart budgeting, essential structural improvements, and clever organization, you can significantly enhance your home’s usable space by at least 10%.
This project offers a dedicated area for productivity, creativity, or hobbies, proving that significant home improvements don’t always require a hefty investment. Embrace resourcefulness and DIY spirit, and unlock the hidden potential of your garage today.


