DIY Bathroom Renovation: Under $1000 Transformation
 Embarking on a DIY bathroom renovation might seem like a daunting task, especially with a strict budget. However, transforming your bathroom into a fresh, inviting space for under $1000 is not only possible but also incredibly rewarding.
This guide will walk you through practical, budget-friendly strategies and projects to achieve a significant impact without breaking the bank, proving that a stylish update is within everyone’s reach.
Setting Your Budget and Prioritizing Projects
Before diving into any renovation, a clear budget is paramount. For a DIY bathroom renovation under $1000, every dollar counts, making strategic planning essential.
Begin by assessing your current bathroom and identifying areas that need the most attention versus those that can be refreshed with minor tweaks. Prioritizing ensures your limited funds create the biggest visual and functional difference.
Defining Your Renovation Goals
Start by listing everything you dislike about your current bathroom and what you envision for its new look. Do you need more storage? Is the lighting inadequate?
Is the color scheme outdated? Breaking down your goals into smaller, manageable projects will help you stay focused and prevent scope creep, which often leads to budget overruns. A clear vision acts as your roadmap, guiding every decision from paint colors to fixture choices.
Allocating Funds Wisely
Once your goals are defined, allocate a specific portion of your $1000 budget to each project. It’s crucial to be realistic about costs. Research average prices for materials and tools you’ll need.
Always set aside a contingency fund, typically 10-15% of your total budget, for unexpected expenses. This buffer is a lifesaver in DIY projects, preventing stress and financial strain when unforeseen issues arise. Remember, the goal is to maximize impact with minimal expenditure.
Assess current bathroom condition and identify key pain points.
List desired improvements and functional upgrades.
Research material costs and tool rentals for each project.
Create a detailed budget spreadsheet, including a contingency fund.
In conclusion, a successful budget-friendly renovation hinges on meticulous planning and smart prioritization. By clearly defining your goals and allocating funds wisely, you lay a solid foundation for transforming your bathroom without exceeding your $1000 limit.
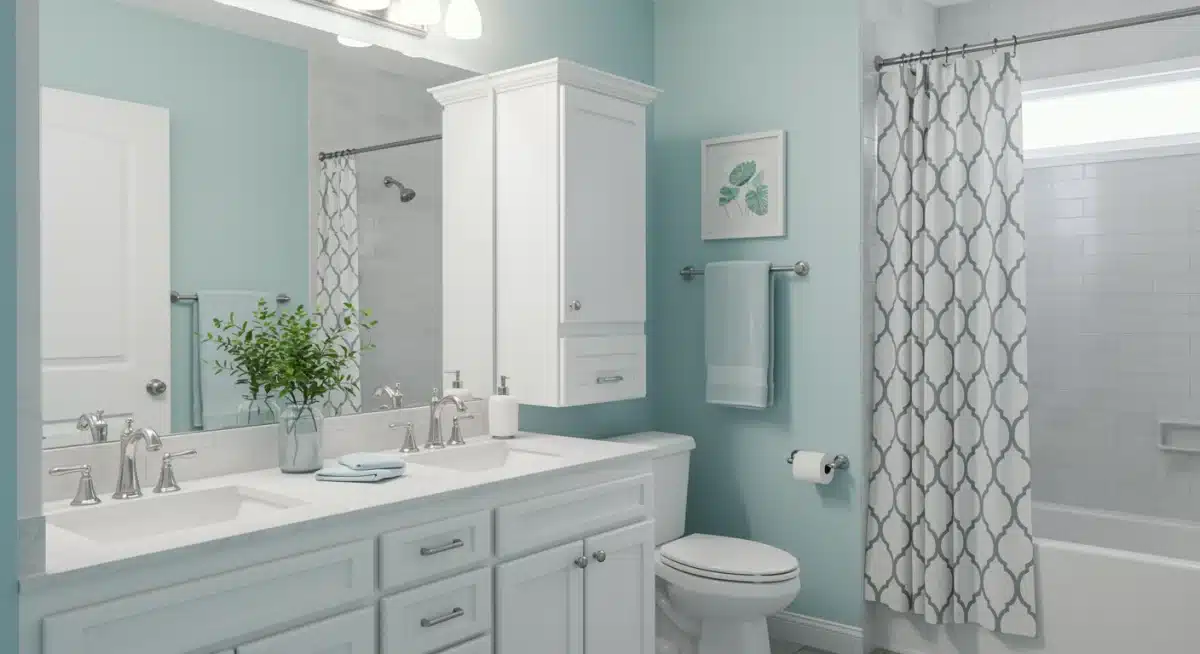
The Power of Paint and Grout Refresh
Often underestimated, a fresh coat of paint and renewed grout can dramatically alter the perception of cleanliness and modernity in any bathroom. These two projects offer an incredible return on investment for a minimal outlay, making them cornerstones of any budget-conscious DIY bathroom renovation.
Choosing the Right Paint and Color Scheme
Paint is perhaps the most impactful and affordable way to refresh a space. For bathrooms, it’s essential to choose paints specifically designed for high-humidity environments, usually labeled as “bathroom paint” or containing mildew-resistant additives. Lighter colors can make a small bathroom feel larger and brighter, reflecting light more effectively. Consider a neutral base with a pop of color in accessories for a timeless look that is easy to update.
Revitalizing Grout and Caulk
Grungy grout lines can make even the cleanest bathroom appear dirty and aged. Cleaning, re-coloring, or re-grouting can make a significant difference. Grout pens are a budget-friendly option for refreshing existing grout, offering a quick and easy way to brighten lines. For more extensive damage, consider removing old grout and applying new. Similarly, replacing old, cracked caulk around tubs, sinks, and showers instantly improves aesthetics and prevents water damage.
Select moisture-resistant paint suitable for bathrooms.
Opt for lighter colors to enhance brightness and space.
Utilize grout pens for quick and easy grout refreshment.
Replace old caulk to prevent leaks and improve appearance.
By focusing on these relatively simple yet highly effective tasks, you can achieve a remarkable visual transformation. The combined effect of fresh paint and bright, clean grout will make your bathroom feel almost new, laying the groundwork for further budget-friendly enhancements.
Updating Fixtures and Hardware on a Dime
Small details can make a significant impact on the overall feel of your bathroom. Replacing outdated fixtures and hardware is a budget-friendly way to modernize your space and tie together your chosen aesthetic. This section explores how to select and install new elements without overspending.
Finding Affordable Faucets and Showerheads
New faucets and showerheads can instantly elevate the look and functionality of your bathroom. Look for sales at home improvement stores, online retailers, or even salvage yards for unique, affordable options. Consider models that are easy to install yourself to save on labor costs. Many modern faucets come with clear instructions, making them a manageable DIY project. Opting for water-efficient models can also lead to long-term savings on utility bills.
Replacing Cabinet Hardware and Lighting
Don’t underestimate the power of new cabinet pulls, towel bars, and toilet paper holders. These small changes can unify your bathroom’s style and make older cabinets feel custom. Similarly, updated lighting fixtures can dramatically improve ambiance and functionality.
Look for stylish yet inexpensive options at big-box stores or online. If rewiring is beyond your comfort level, consider purchasing plug-in sconces or adding LED strip lighting under cabinets for an easy, impactful upgrade.
Another clever trick is to spray paint existing hardware if it’s still in good condition but has an outdated finish. A fresh coat of matte black or brushed nickel spray paint can make old fixtures look brand new, costing just a few dollars. This technique is particularly effective for towel racks, cabinet pulls, and even light fixture bases, provided they are properly prepped and painted.
- Shop for sales and clearance items for faucets and showerheads.
- Consider spray painting existing hardware for a fresh look.
- Install new towel bars and cabinet pulls to modernize the space.
- Upgrade light fixtures for improved ambiance and style.
By thoughtfully selecting and updating fixtures and hardware, you can inject new life into your bathroom. These relatively inexpensive changes collectively contribute to a cohesive and modern aesthetic, demonstrating that a significant transformation doesn’t require a large budget.
Smart Storage Solutions and Vanity Upgrades
Clutter can quickly make a bathroom feel small and uninviting. Implementing smart storage solutions and upgrading your vanity are crucial steps in a DIY bathroom renovation, helping to organize your space and enhance its functionality and style, all while staying within your $1000 budget.
Maximizing Vertical Space and Open Shelving
In smaller bathrooms, vertical space is your best friend. Install floating shelves above the toilet or in unused corners to store towels, toiletries, and decorative items.
Open shelving can make a space feel larger and more airy compared to bulky closed cabinets. For an even more economical approach, consider repurposing old crates or baskets as stylish storage units. Ensure shelves are securely mounted, especially in a humid environment.
Cost-Effective Vanity Transformations
Replacing an entire vanity can be expensive, but a refresh can be achieved for much less. If the existing vanity is structurally sound, consider painting it. A fresh coat of paint in a contemporary color can completely change its appearance.
Replace the countertop with an affordable option like a pre-fabricated laminate or a budget-friendly solid surface material if your budget allows. Alternatively, a simple peel-and-stick countertop film can mimic higher-end materials for a fraction of the cost. Don’t forget to update the sink and faucet for a cohesive new look.
Another ingenious way to upgrade a vanity is by adding decorative trim or molding to plain cabinet doors, giving them a custom, high-end appearance. This small detail, paired with new hardware, can dramatically elevate the vanity’s style. For those with a pedestal sink, adding a small, rolling storage cart or a narrow cabinet beside it can provide much-needed storage without taking up too much floor space, maintaining the open feel.
- Install floating shelves to utilize vertical wall space.
- Repurpose existing furniture for unique storage solutions.
- Paint your existing vanity for a quick and affordable update.
- Consider peel-and-stick films for countertop makeovers.
By focusing on smart storage and creative vanity upgrades, you can significantly improve both the aesthetics and functionality of your bathroom.
These projects not only declutter your space but also contribute to a more polished and inviting atmosphere, proving that resourceful solutions can lead to stunning results.
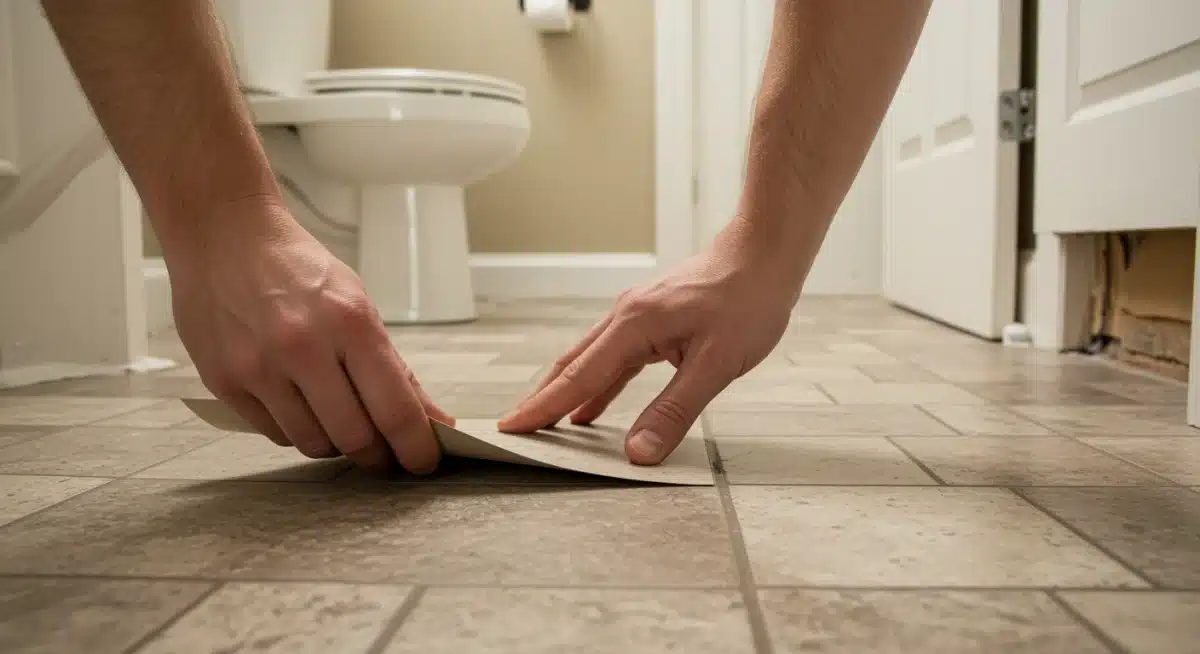
Flooring and Wall Treatments on a Budget
Transforming the surfaces of your bathroom, from floors to walls, can have a profound impact on its overall aesthetic.
While traditional tiling can be costly and labor-intensive, there are numerous budget-friendly alternatives that offer durability and style for your DIY bathroom renovation.
Affordable Flooring Alternatives
Traditional ceramic or porcelain tiles can be expensive, both in material and installation. For a budget under $1000, consider options like peel-and-stick vinyl tiles or planks.
These are incredibly easy for DIYers to install, come in a vast array of styles, and are water-resistant. Another excellent choice is luxury vinyl plank (LVP) flooring, which offers the look of wood or stone at a fraction of the cost and is highly durable for bathroom environments.
These options significantly reduce labor costs as you can install them yourself in a weekend.
Creative Wall Treatments Beyond Tile
Beyond paint, there are several creative and inexpensive ways to update your bathroom walls. Consider wainscoting using MDF panels or beadboard, which can be painted for a classic or modern look. These materials are much cheaper than tile and add architectural interest.
Another popular option is peel-and-stick wallpaper or wall decals, which offer a wide range of patterns and textures and are removable, making them perfect for renters or those who like to frequently change their decor.
For a more rustic or industrial aesthetic, consider using reclaimed wood planks (properly sealed for moisture resistance) on an accent wall.
Even a simple stencil applied to a freshly painted wall can create a custom look without the expense of wallpaper.
Remember to always prioritize materials that can withstand the humidity of a bathroom to ensure longevity and prevent future issues.
Explore peel-and-stick vinyl tiles or luxury vinyl planks for flooring.
Install wainscoting or beadboard for architectural interest.
Use peel-and-stick wallpaper or decals for stylish wall accents.
Consider stenciling for a custom, painted wall design.
By embracing these budget-friendly flooring and wall treatment options, you can achieve a sophisticated and durable finish without the high costs associated with traditional materials. These DIY-friendly solutions empower you to create a personalized bathroom that looks far more expensive than it actually was.
Accessorizing and Decorating on a Budget
Once the major structural and surface changes are complete, the final touches in accessorizing and decorating can bring your DIY bathroom renovation to life.
These elements add personality and cohesion, often for very little cost, making them essential for a truly transformed space.
Strategic Mirror and Art Placement
Mirrors are not just functional; they can also create the illusion of more space and light. Instead of a basic builder-grade mirror, consider framing your existing mirror or finding an interesting, inexpensive framed mirror at a thrift store or discount retailer.
A unique mirror can become a focal point. Similarly, well-chosen artwork can add character and color. Look for printable art online, frame old postcards, or create your own simple pieces to personalize the space without spending a fortune.
Linens, Plants, and Personal Touches
New towels, bath mats, and shower curtains can instantly update the look and feel of your bathroom. Choose colors and patterns that complement your new design scheme.
Introduce greenery with humidity-loving plants like ferns or pothos; they add natural beauty and improve air quality.
Personal touches, such as decorative soap dispensers, unique storage baskets, or scented candles, complete the transformation, making the space feel inviting and uniquely yours.
These small details are where your personality can truly shine, tying together all your renovation efforts.
Even minor updates like replacing an old shower curtain with a fresh, modern one or adding a plush bath mat can significantly impact the visual appeal. Consider adding a small, inexpensive rug that introduces texture and warmth.
For plants, research low-maintenance options that thrive in humid environments. Grouping different sizes of plants can create an appealing visual dynamic.
Remember to shop sales and clearance sections for these items, as retailers frequently rotate their home decor stock, offering great deals.
Upgrade your mirror or frame the existing one for a fresh look.
Add affordable artwork or DIY pieces to personalize the space.
Invest in new towels, bath mats, and a shower curtain.
Incorporate live plants for natural beauty and improved air.
Through thoughtful accessorizing and decorating, you can elevate your budget-friendly bathroom renovation to a new level. These final touches not only enhance the aesthetic appeal but also make the space feel more comfortable and reflective of your personal style, proving that luxury can be achieved without a hefty price tag.
Maintaining Your Revitalized Bathroom
Completing a DIY bathroom renovation under $1000 is a significant achievement, but the work doesn’t stop there.
Proper maintenance is crucial to preserving your hard work, extending the life of your new finishes, and ensuring your transformed space continues to look its best for years to come.
This section outlines simple yet effective maintenance strategies.
Regular Cleaning and Preventative Measures
Consistent cleaning is the first line of defense against wear and tear.
Use appropriate cleaning products for your new surfaces – mild, non-abrasive cleaners for painted walls and updated fixtures. Regularly clean grout lines to prevent mold and mildew buildup, which can quickly undo your refreshing efforts.
Ensure proper ventilation by using your exhaust fan during and after showers to reduce humidity, protecting paint and preventing moisture-related issues.
Addressing Minor Issues Promptly
Small problems can escalate quickly if ignored. Promptly address any leaks, drips, or loose fixtures. Re-caulk areas as needed, especially around the tub and shower, to prevent water from seeping into walls and floors.
Tighten any wobbly cabinet handles or towel bars. Early intervention saves time, money, and prevents more extensive repairs down the line, safeguarding your renovation investment.
Consider implementing a weekly cleaning schedule that includes wiping down surfaces, cleaning the toilet, and scrubbing the sink.
A monthly deep clean can focus on tougher areas like shower glass and floor grout. For painted surfaces, a gentle wipe with a damp cloth is usually sufficient.
For faucets and showerheads, use a soft cloth and non-abrasive cleaner to prevent scratching and maintain their finish. By staying proactive, you can keep your bathroom looking as pristine as the day you finished your DIY project.
Clean surfaces regularly with appropriate, mild cleaners.
Ensure good ventilation to control humidity and prevent mold.
Fix leaks and drips immediately to prevent water damage.
Re-caulk as necessary to maintain watertight seals.
By integrating these simple maintenance practices into your routine, you can ensure your budget-friendly DIY bathroom renovation remains beautiful and functional.
A little proactive care goes a long way in preserving the fresh look and feel of your updated space, allowing you to enjoy your hard work for years to come.
| Key Renovation Area | Budget-Friendly Strategy |
|---|---|
| Walls & Grout | Fresh paint, grout pens, or re-caulk for instant refresh. |
| Fixtures & Hardware | Spray paint existing, replace with affordable new pieces. |
| Vanity & Storage | Paint vanity, add floating shelves, or use repurposed items. |
| Flooring | Peel-and-stick vinyl tiles or luxury vinyl planks. |
Frequently Asked Questions About Budget Bathroom Renovations
The most impactful changes typically include fresh paint, updating grout and caulk, replacing outdated hardware and light fixtures, and adding strategic storage solutions.
These projects offer a significant visual upgrade for minimal cost and effort, making your budget go further.
Yes, absolutely. Options like peel-and-stick vinyl tiles or luxury vinyl planks are affordable and DIY-friendly. These materials are cost-effective to purchase and install yourself, saving on labor and keeping you well within your $1000 budget for a new and durable floor.
Painting your existing vanity is a highly effective and budget-friendly solution. You can also replace hardware like knobs and pulls, or even apply a peel-and-stick film to the countertop for a refreshed look. These methods avoid the high cost of a full vanity replacement.
Beyond replacing light fixtures, consider adding LED strip lighting under cabinets or around mirrors for ambient light.
Using brighter, energy-efficient bulbs in existing fixtures can also enhance illumination. Simple plug-in sconces are another easy and inexpensive way to boost light.
Basic tools like screwdrivers, a utility knife, caulk gun, paint brushes and rollers, and a measuring tape are crucial. For flooring, a tile cutter or heavy-duty scissors for vinyl are helpful. Renting specialized tools for specific tasks can also be a cost-effective choice.
Conclusion
Undertaking a DIY bathroom renovation for under $1000 is a testament to the power of thoughtful planning, creative problem-solving, and hands-on effort. As we’ve explored, significant transformations don’t always require a hefty budget.
From the immediate impact of fresh paint and revitalized grout to the functional elegance of updated fixtures and smart storage, every project contributes to a cohesive and inviting space.
By prioritizing areas that yield the greatest visual return, embracing affordable material alternatives, and committing to proper maintenance, you can achieve a bathroom that not only looks professionally designed but also reflects your personal style and ingenuity.
Your dream bathroom is indeed within reach, proving that with a little effort and smart choices, a stunning home upgrade is entirely attainable for everyday Americans.


