DIY Window Box: Build & Plant Under $50 for Home Charm
 Looking to add a touch of charm and curb appeal to your home without breaking the bank? A DIY window box: build and plant a window box for under $50 and add charm to your home project is the perfect solution. This guide will walk you through creating a beautiful, budget-friendly window box that will instantly elevate your home’s exterior.
planning your perfect DIY window box project
Before you even pick up a saw, careful planning is the cornerstone of a successful and affordable DIY window box project. This initial stage involves considering the aesthetics, dimensions, and materials that will best suit your home and budget.
A well-thought-out plan ensures that you stay within your $50 limit while achieving a professional-looking result that truly enhances your home’s facade.
Understanding the visual impact and structural requirements of your window box is crucial. Think about the style of your home – is it rustic, modern, traditional? Your window box design should complement this existing aesthetic.
Moreover, the dimensions need to be precise to fit your window opening and accommodate the plants you envision. This foundational planning will save you time, money, and potential frustration down the line.
choosing the right materials for under $50
Staying under $50 requires smart material choices. Pressure-treated pine is often an affordable and durable option for the box itself, offering resistance to rot and insects. For fasteners, galvanized screws are essential to prevent rust, which can quickly degrade your window box’s structural integrity.
Consider repurposing materials where possible, such as old fence pickets or pallet wood, if you have access to them. This not only saves money but also adds a unique, reclaimed character to your project.
Wood: Pressure-treated pine or cedar scraps are ideal for longevity and cost-effectiveness.
Fasteners: Galvanized screws or exterior-grade deck screws to resist moisture.
Drainage: Gravel or small stones, along with drainage holes, are critical for plant health.
Paint/Stain: Exterior-grade paint or stain for protection and aesthetics; look for discounted ‘oops’ paints.
The total cost of these materials, especially if sourced wisely from hardware store sales or leftover bins, can easily fall within the $50 budget. Always prioritize quality where it matters most, such as with the wood and fasteners, to ensure your DIY window box stands the test of time and weather.
Concluding this planning phase, remember that careful consideration of materials and design will pave the way for a smooth construction process. A solid plan means fewer unexpected expenses and a more satisfying final product, perfectly aligning with your goal to build a charming window box on a budget.
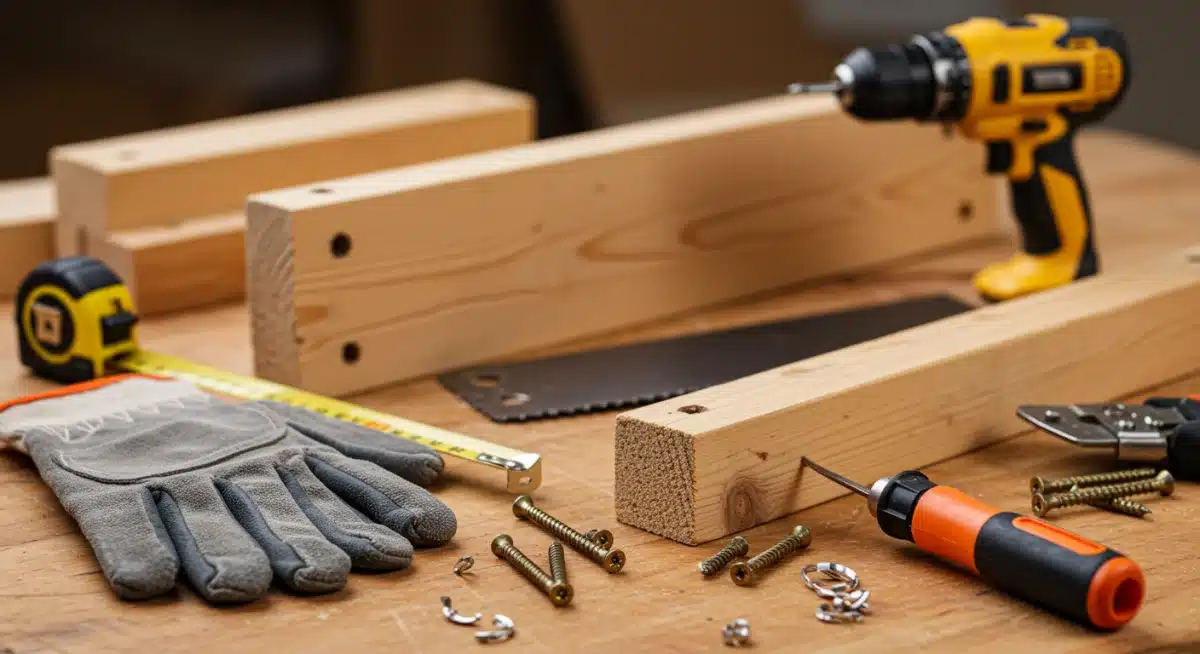
gathering tools and cutting your wood pieces
With your plan in hand and materials selected, the next step is to gather the necessary tools and accurately cut your wood pieces.
This stage requires precision and safety, ensuring that each component of your DIY window box fits together seamlessly. Having the right tools readily available will streamline the building process, making it an enjoyable and efficient endeavor.
Even if you don’t own every tool, many can be rented or borrowed, keeping your project within the $50 budget. Safety should always be your top priority, so wear appropriate personal protective equipment, such as safety glasses and gloves, especially when operating power tools. Accurate measurements and clean cuts are vital for a sturdy and aesthetically pleasing window box.
essential tools for construction
You don’t need a professional workshop to build a great window box. Basic tools will suffice for most designs. A tape measure, pencil, and a speed square are fundamental for accurate marking. For cutting, a handsaw or a miter saw will get the job done. A drill and appropriate drill bits are necessary for pre-drilling holes and driving screws. Having these tools organized and accessible will make the construction process much smoother.
Measuring Tape: For precise length measurements.
Pencil: For marking cut lines and screw points.
Speed Square: Ensures perfectly straight and square cuts.
Saw: Hand saw, circular saw, or miter saw for cutting wood.
Drill: With various bits for pilot holes and driving screws.
Many of these tools are common household items, further reducing your overall expenditure. If you need to purchase any, consider affordable options or look for used tools to maximize your budget. Remember, the goal is functionality and precision, not necessarily the most expensive brand.
Once your tools are ready, carefully measure and mark your wood according to your design plan. Double-check all measurements before making any cuts to avoid waste. Cut each piece cleanly, paying attention to the grain of the wood.
Labeling each piece as you cut it can also prevent confusion during assembly. This meticulous preparation ensures that your DIY window box will come together easily and correctly, contributing significantly to its overall charm and stability.
assembling your sturdy window box frame
With all your wood pieces precisely cut and your tools at the ready, it’s time to assemble the frame of your DIY window box.
This is where your vision truly starts to take shape, transforming individual pieces of wood into a functional and attractive structure. A sturdy frame is paramount, as it needs to hold the weight of soil, plants, and water securely for years to come.
The assembly process involves joining the cut wood pieces using screws, ensuring that all connections are tight and square. Paying close attention to detail during this stage will prevent any wobbles or structural weaknesses in your finished window box.
This methodical approach not only guarantees durability but also contributes to the aesthetic appeal of your home’s new addition.
step-by-step assembly guide
Begin by laying out your bottom piece and attaching the two side pieces to its ends, ensuring they are flush. Use wood glue in addition to galvanized screws for extra strength. Pre-drilling pilot holes is crucial to prevent the wood from splitting, especially near the edges.
Next, attach the front and back panels to the bottom and side pieces, creating the main box structure. Use clamps to hold pieces firmly in place while drilling and screwing.
Attach Sides to Bottom: Apply wood glue, then screw the side pieces to the ends of the bottom piece.
Add Front and Back Panels: Secure these panels to the bottom and side pieces with glue and screws.
Reinforce Corners: Consider adding small corner braces inside for enhanced stability if desired.
Drill Drainage Holes: Essential for plant health; drill several 1/2-inch holes in the bottom.
Once the main box is assembled, inspect all joints to ensure they are secure and flush. Any gaps can be filled with exterior-grade wood filler, which can then be sanded smooth once dry. This attention to detail in assembly will result in a professional-looking window box that is both robust and ready for its finishing touches.
The final step in assembly is to drill several drainage holes in the bottom of the box. Proper drainage is absolutely critical for the health of your plants, preventing root rot and waterlogging. Aim for at least four to six 1/2-inch holes, depending on the length of your window box.
This completes the structural build, leaving you with a solid foundation for painting and planting, all while staying within your budget for a charming DIY window box.
painting and preparing for installation
After successfully assembling your DIY window box, the next phase focuses on painting or staining it to match your home’s exterior and preparing it for installation.
This step is not just about aesthetics; it also provides crucial protection against the elements, ensuring your window box remains beautiful and functional for many seasons. Choosing the right finish and applying it carefully will enhance the overall charm and longevity of your project.
A well-prepared and painted window box can withstand rain, sun, and temperature fluctuations, guarding against rot and wear.
This stage is also an opportunity to personalize your window box further, selecting colors or stains that complement your home’s existing palette and reflect your personal style. Remember, a little effort here goes a long way in maintaining the appeal of your under-$50 investment.
finishing touches: painting or staining
Before applying any finish, lightly sand the entire window box to ensure a smooth surface and better adhesion. Wipe away any dust with a damp cloth. For painting, apply an exterior-grade primer first, especially if using pressure-treated wood, which can sometimes resist paint adhesion.
Follow with two coats of exterior latex paint, chosen for its durability and weather resistance. If staining, apply a quality exterior stain and sealant in one product for convenience and protection.
Sand Surfaces: Smooth any rough edges and prepare for finish.
Apply Primer (if painting): Essential for adhesion and longevity on wood.
Paint/Stain: Use exterior-grade products for weather resistance. Apply multiple thin coats.
Sealant: A clear coat of exterior sealant adds an extra layer of protection, especially for stained boxes.
Allow ample drying time between coats and before installation. Rushing this process can lead to a less durable finish that may peel or chip prematurely. A properly finished window box not only looks great but also provides a robust shell against the outdoor environment, maintaining its charm season after season.
Regarding installation, consider using heavy-duty L-brackets or specially designed window box hangers. These should be securely fastened to your home’s exterior, preferably into wall studs or solid masonry, to support the significant weight of the filled window box.
Ensure the brackets are level and spaced appropriately for your box’s length. This careful installation guarantees safety and stability, completing the structural aspect of your charming DIY window box, ready for planting.
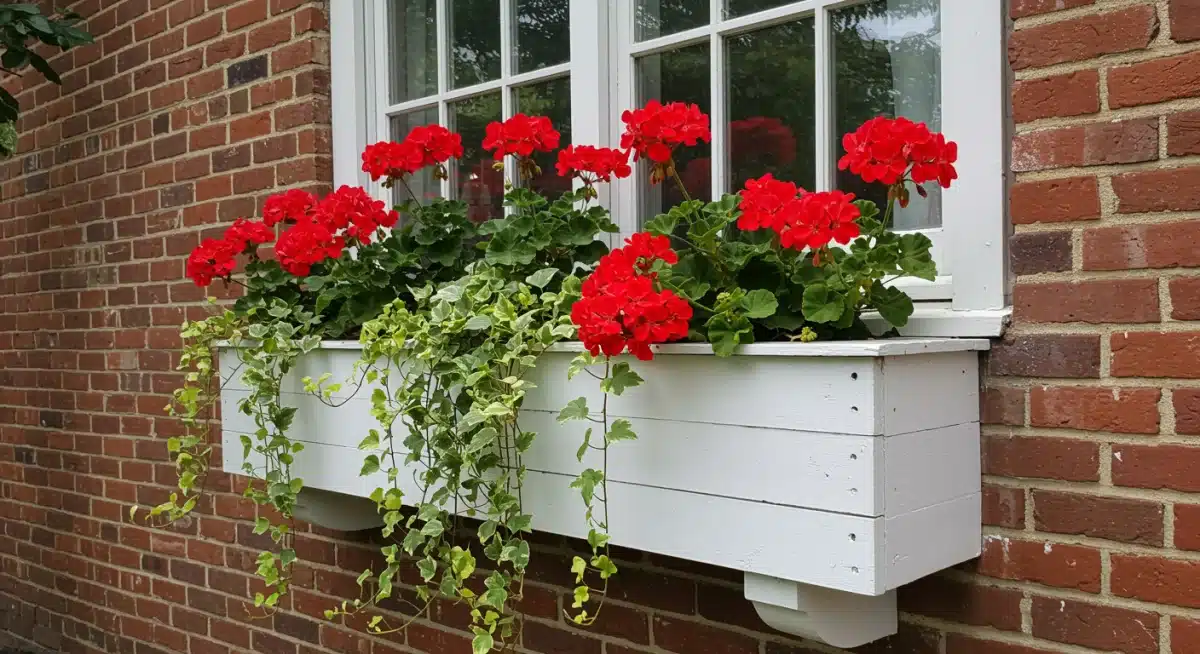
selecting and planting your vibrant florals
Now comes the most exciting part of your DIY window box project: selecting and planting your vibrant florals. This is where you infuse life and color into your carefully crafted box, transforming it into a stunning focal point for your home.
The right plant choices, combined with proper planting techniques, will ensure a lush, healthy display that thrives throughout the season, all while keeping your budget in mind.
Choosing plants that are well-suited to your local climate and the specific conditions of your window (e.g., sun exposure) is key to their success. Mixing different textures, heights, and colors will create a dynamic and visually appealing arrangement.
Remember, the goal is to maximize impact while still adhering to your under-$50 budget for the entire project, including plants.
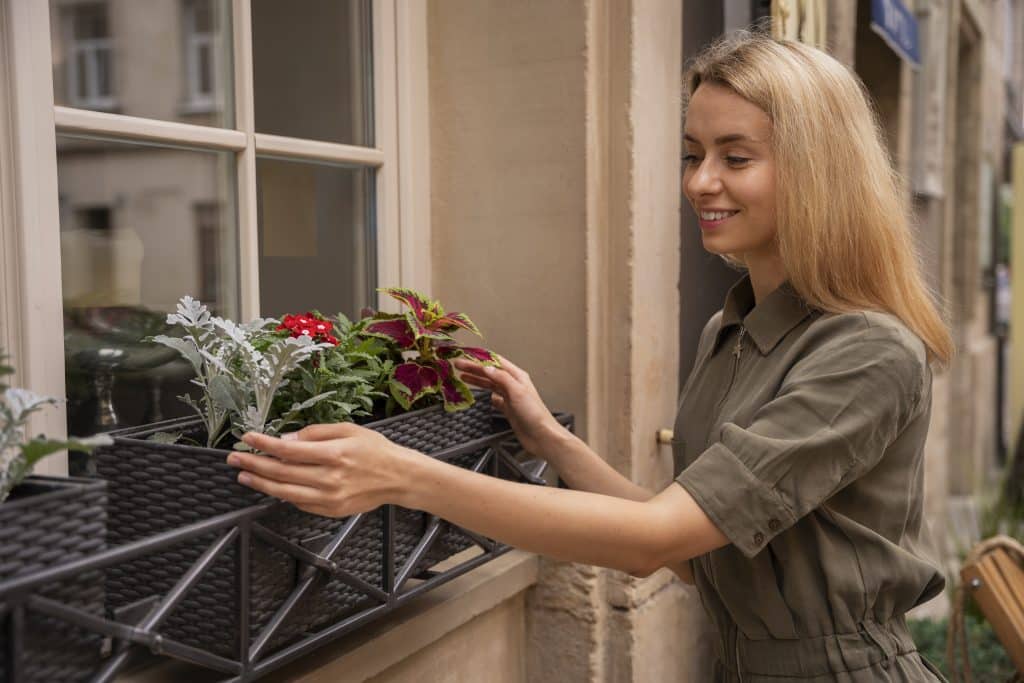
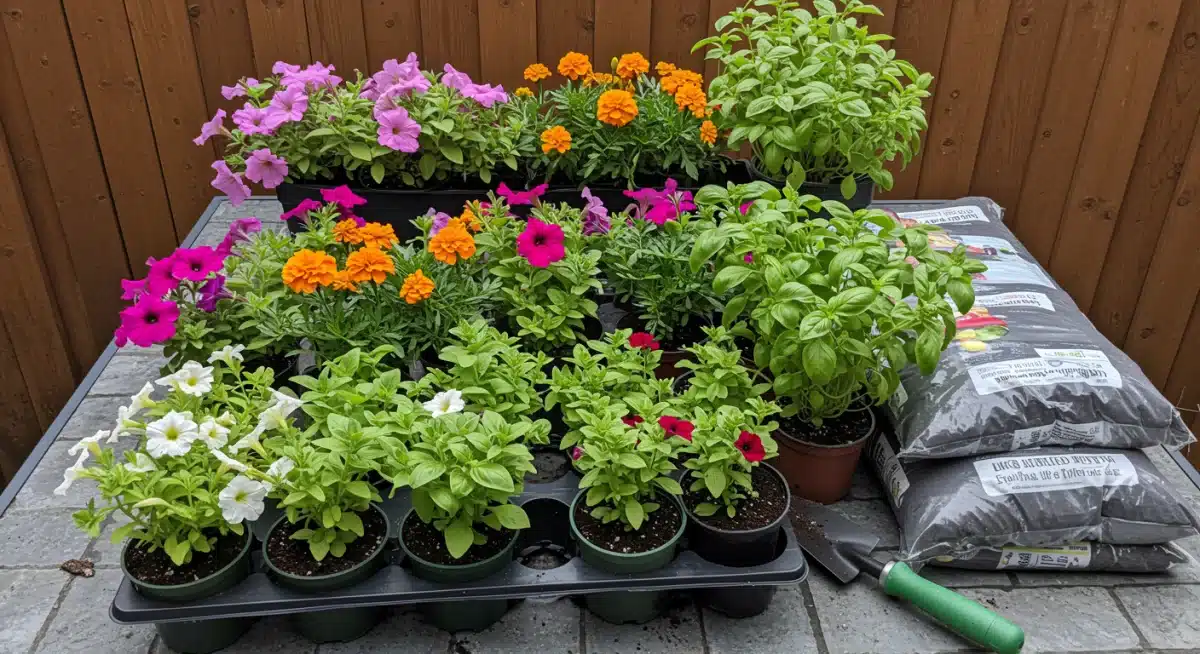
budget-friendly plant choices and planting tips
To stay within budget, look for annuals that offer continuous blooms and good value. Petunias, impatiens, marigolds, and geraniums are excellent choices, often available in multi-packs at garden centers.
Consider trailing plants like ivy or sweet potato vine to spill over the edges, adding a cascading effect. Don’t forget to check local nurseries for end-of-season sales or smaller starter plants, which are more affordable.
Thrillers: Taller, upright plants for the center or back (e.g., geraniums, salvia).
Fillers: Bushy, mounding plants to fill out the middle (e.g., petunias, impatiens).
Spillers: Trailing plants to cascade over the sides (e.g., ivy, calibrachoa).
Potting Mix: Use a good quality, lightweight potting mix for optimal drainage and aeration.
Before planting, place a layer of gravel or small stones at the bottom of your window box to further aid drainage. Then, fill the box with a high-quality potting mix, leaving about an inch or two from the top.
Arrange your plants in their pots first to visualize the layout before committing. Gently remove plants from their containers, loosen any bound roots, and plant them at the same depth they were in their original pots. Water thoroughly after planting.
To maintain your vibrant display, consistent watering is essential, especially during hot, dry periods. Fertilize regularly with a balanced liquid fertilizer to encourage continuous blooms.
Deadhead spent flowers to promote new growth and keep your window box looking fresh and charming all season long. By following these planting and care tips, your DIY window box will be a testament to your green thumb and budget-savvy approach, adding undeniable charm to your home.
maintaining your beautiful window box
Once your DIY window box is built, planted, and beautifully installed, the journey doesn’t end there. Proper maintenance is essential to ensure your vibrant display thrives throughout the growing season and beyond.
Regular care will keep your plants healthy, your window box looking its best, and protect your investment, preserving the charm it adds to your home.
Diligent maintenance involves more than just watering; it encompasses feeding, pruning, and monitoring for pests or diseases.
By dedicating a small amount of time each week to these tasks, you’ll be rewarded with a continuously stunning floral arrangement that enhances your home’s curb appeal without requiring a significant financial outlay for replacements.
seasonal care and common challenges
Watering is perhaps the most critical aspect of window box maintenance. Due to their limited soil volume, window boxes dry out much faster than garden beds. Check the soil moisture daily, especially during hot or windy weather, and water when the top inch of soil feels dry.
Fertilize every two to four weeks with a diluted liquid fertilizer to provide essential nutrients for continuous blooming. Deadheading, which is removing spent flowers, encourages the plant to produce more blooms instead of seeds.
Watering: Daily checks, especially in heat; water until it drains from the bottom.
Fertilizing: Bi-weekly or monthly with a balanced liquid feed.
Deadheading/Pruning: Remove spent flowers and trim leggy growth to encourage bushiness.
Pest Control: Regularly inspect for pests and treat with organic solutions if necessary.
Pests and diseases can occasionally emerge. Regularly inspect your plants for any signs of trouble, such as discolored leaves, holes, or sticky residue.
Address issues promptly with appropriate organic pest control methods, if possible, to protect both your plants and the environment. Over the winter, depending on your climate, you may choose to bring tender plants indoors, or clean out the box and store it, preparing it for the next spring planting.
By consistently providing these maintenance tasks, your DIY window box will remain a source of pride and beauty.
This proactive approach ensures that the charm you added to your home for under $50 continues to flourish, proving that a little care goes a long way in sustainable home beautification. Enjoy the lasting appeal of your hard work and green thumb!
budget breakdown: keeping it under $50
The promise of building and planting a beautiful DIY window box for under $50 might seem ambitious, but with careful planning and smart shopping, it’s entirely achievable.
This section details how to allocate your budget effectively, ensuring you get the most value for every dollar spent without compromising on quality or aesthetic appeal. Adhering to this budget breakdown is key to a successful, affordable project.
Understanding where your money goes and finding ways to save on each component is crucial. From sourcing materials to selecting plants, every decision impacts your overall expenditure. This strategic financial approach proves that enhancing your home’s charm doesn’t require a hefty investment, just a bit of ingenuity and resourcefulness.
smart spending strategies for each component
The largest portion of your budget will typically go towards wood. Look for sales on pressure-treated pine or cedar fence pickets, which are often cheaper per linear foot than dimensional lumber.
Scour the ‘cull’ or ‘scrap’ bins at hardware stores for usable pieces at deep discounts. For fasteners, buy small packs of galvanized screws rather than large boxes if you only need a few, or use existing screws if you have them.
Wood (approx. $15-25): Search for discounted pressure-treated pine or cedar scraps.
Fasteners (approx. $5-10): Small packs of galvanized screws or use existing supply.
Paint/Stain (approx. $5-10): Look for ‘oops’ paints or small sample sizes of exterior paint/stain.
Potting Mix (approx. $5-8): Buy a small bag, often available in 1-cubic-foot sizes.
Plants (approx. $10-15): Focus on multi-packs of annuals, nursery sales, or starter plants.
For paint or stain, check the ‘oops’ paint section at your local home improvement store; you can often find high-quality exterior paints at a fraction of the cost.
A small can is usually sufficient for a single window box. Potting mix can be bought in smaller bags, and consider making your own compost if you have the resources, further reducing costs.
When it comes to plants, multi-packs of annuals are your best friend, offering several plants for a low price. Visiting local farmers’ markets or plant swaps can also yield budget-friendly options.
By making conscious choices at each step, from material acquisition to plant selection, you can comfortably stay within the $50 budget.
This detailed breakdown demonstrates that a charming DIY window box is an accessible project for anyone looking to add beauty to their home without overspending. Your carefully planned expenditure will result in a stunning and cost-effective enhancement to your home’s exterior.
| Key Project Phase | Brief Description |
|---|---|
| Planning & Materials | Select budget-friendly wood and fasteners, considering home style and window dimensions. |
| Construction | Assemble the box with precision, ensuring drainage holes and structural integrity. |
| Finishing & Installation | Paint or stain for protection and aesthetics; securely mount to the house. |
| Planting & Care | Choose budget-friendly plants, plant carefully, and maintain with regular watering and feeding. |
Frequently Asked Questions about DIY Window Boxes
Pressure-treated pine is an excellent budget-friendly choice for a DIY window box. It resists rot and insects, offering good durability without the high cost of cedar or redwood. Look for scraps or fence pickets for even greater savings, ensuring longevity for your charming home addition.
Proper drainage is crucial. Drill several 1/2-inch to 1-inch holes in the bottom of your window box before filling it. Additionally, placing a layer of gravel or small stones at the bottom before adding potting mix further aids drainage, preventing root rot and ensuring healthy plant growth.
For a budget-friendly window box, annuals like petunias, impatiens, marigolds, and geraniums are ideal. They offer continuous blooms and are often available in multi-packs at lower prices. Incorporate trailing plants like ivy for visual interest, creating a lush and charming display.
Use heavy-duty L-brackets or specialized window box hangers. These should be screwed directly into wall studs or solid masonry for maximum support, especially considering the weight of soil and wet plants. Ensure the brackets are level and spaced evenly for stability and aesthetic appeal.
Absolutely! Building a DIY window box is a beginner-friendly project. With basic tools like a saw, drill, and tape measure, and by following simple instructions, anyone can construct a charming and functional window box. Start with a straightforward design and take your time for best results.
conclusion
Embarking on a DIY window box: build and plant a window box for under $50 and add charm to your home project is a rewarding endeavor that significantly enhances your home’s curb appeal without straining your finances.
From meticulous planning and smart material choices to careful construction, vibrant planting, and diligent maintenance, each step contributes to a beautiful and lasting addition to your home.
This guide has demonstrated that with a little creativity and effort, anyone can transform their windows into captivating focal points, proving that home beautification can indeed be both affordable and deeply satisfying. Enjoy the vibrant charm your new window box brings to your everyday life.


