Build a Compost Bin: Nutrient-Rich Soil in 6 Months
 Building a compost bin efficiently converts organic household and yard waste into valuable, nutrient-rich soil amendment, fostering healthier gardens and significantly reducing landfill contributions within six months.
Are you looking for a practical way to reduce household waste and simultaneously enrich your garden soil? Learning how to build a compost bin offers an incredibly rewarding solution.
This DIY project not only diverts organic materials from landfills but also provides your plants with a natural, nutrient-dense boost, all achievable within approximately six months.
Understanding the Basics of Composting
Composting is nature’s recycling process, where organic materials decompose into a dark, crumbly, earth-smelling substance called humus or compost.
This rich amendment improves soil structure, aeration, and water retention, while also providing essential nutrients for plant growth.
Understanding the fundamental components and conditions necessary for successful composting is the first step toward building an effective system.
At its core, composting relies on a delicate balance of ‘greens’ (nitrogen-rich materials) and ‘browns’ (carbon-rich materials), along with adequate moisture and oxygen.
Microorganisms, such as bacteria and fungi, are the unsung heroes of this process, breaking down organic matter into its simplest forms. Without these tiny workers, our compost piles would simply be static piles of waste.
The essential ingredients for a healthy compost pile
Greens: These provide nitrogen, fueling microbial growth. Examples include fresh grass clippings, fruit and vegetable scraps, coffee grounds, and tea bags.
Browns: These supply carbon, which provides energy for the microbes and adds bulk to the pile. Think dried leaves, straw, wood chips, shredded newspaper, and cardboard.
Water: Moisture is crucial for microbial activity. The pile should feel like a wrung-out sponge – damp, but not soggy.
Air: Aeration is vital for aerobic decomposition, preventing foul odors and promoting faster breakdown. Turning the pile regularly introduces oxygen.
Maintaining the right balance between these elements is key. A general rule of thumb is to aim for a 2:1 or 3:1 ratio of browns to greens by volume.
Too many greens can lead to a slimy, smelly pile, while too many browns can slow down decomposition significantly.
Regular monitoring and adjustment of these factors will ensure a thriving compost environment, leading to nutrient-rich soil for your garden in a timely manner.
Choosing the Right Location for Your Bin
Selecting the right spot for your bin is more important than many beginners realize. The location you choose directly affects how efficiently organic materials break down, how your yard looks, and even how comfortable nearby neighbors feel.
A well-placed bin supports steady decomposition while minimizing odors, mess, and maintenance issues.
When deciding on placement, think about sunlight, drainage, access to water, and how easy it will be to reach the bin regularly.
The ideal location balances convenience with environmental conditions, helping the process stay active without creating new problems.
Key Considerations for Bin Placement
Shade:
A shaded or partially shaded area helps retain moisture, especially in warm climates. Too much direct sunlight can dry out materials and slow microbial activity.
Drainage:
Choose well-drained ground to prevent water from pooling at the base. Excess moisture can create oxygen-poor conditions that lead to unpleasant smells. Avoid low spots where water tends to collect.
Proximity to water:
Having a hose or water source nearby makes it much easier to maintain proper moisture levels, particularly during dry periods or when adding a lot of dry materials.
Accessibility:
The bin should be easy to reach for adding kitchen scraps and yard waste—and just as easy to access when turning or maintaining the pile. Consider how far you’ll need to carry materials on a regular basis.
Distance from home and neighbors:
Even when managed well, it’s best to place the bin a reasonable distance from windows, patios, and property lines to avoid any potential concerns.
Beyond functionality, visual impact also matters. Many homeowners prefer to place the bin behind a shed, fence, or in a discreet corner of the yard where it stays out of direct view while remaining accessible.
A thoughtfully chosen location plays a major role in long-term success, making the entire process easier and more enjoyable.
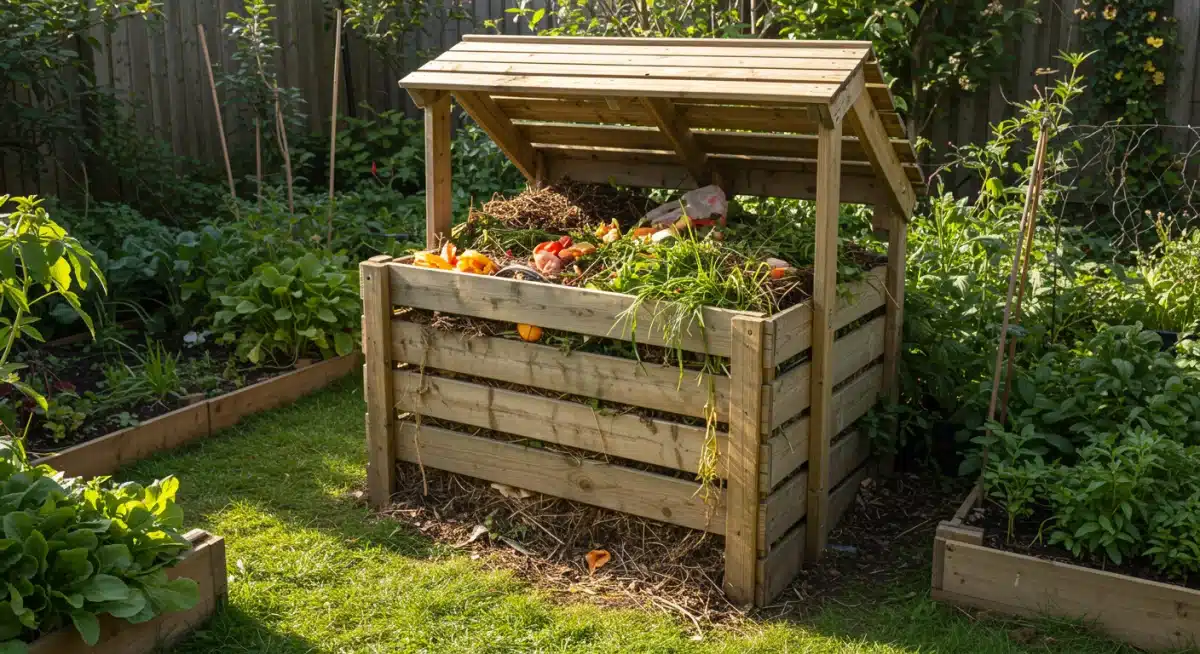
DIY Bin Designs: Simple and Effective
Once you understand the basics and have chosen a location, the next step is building the bin itself. There’s no single “correct” design—the best option depends on your budget, available materials, and how much organic waste you generate.
Many effective bins can be made using recycled or inexpensive materials, making this both an eco-friendly and budget-conscious project. The main goal is to contain materials while allowing airflow and easy turning.
Popular DIY Bin Options
Wire mesh bin:
One of the simplest and most affordable designs. Form a cylinder or square using hardware cloth or chicken wire and secure it with wire or zip ties.
This option offers excellent airflow and is easy to move, making it ideal for small yards or beginners.
Pallet bin:
Using reclaimed wooden pallets is a sturdy and popular option. Pallets can be wired or bolted together to create a three- or four-sided structure.
This design handles larger volumes well and allows good air circulation.
Plastic bin from repurposed containers:
Old trash cans or plastic barrels can be converted by drilling holes in the sides and bottom for airflow and drainage.
A lid helps retain moisture and heat, making this a compact and tidy solution for urban or small spaces.
When choosing a design, consider how you’ll turn materials and remove the finished soil. Some setups allow one side to be removed, while others require lifting the bin off the pile.
Whichever design you select, make sure it’s sturdy enough to withstand weather and repeated use.
A well-placed, well-built bin sets the foundation for efficient breakdown and healthy soil—making your DIY project both practical and rewarding.
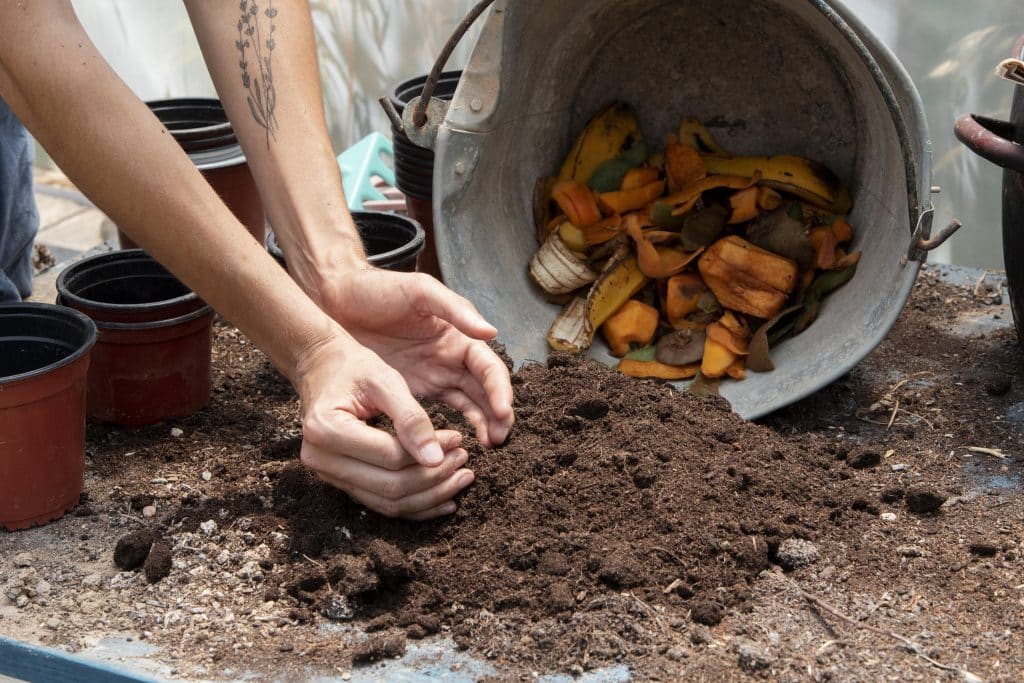
Filling Your Bin: What to Add and What to Avoid
Once your bin is built and ready, the most rewarding phase begins—adding organic materials that will gradually break down into rich, usable soil.
Knowing what to include and, just as importantly, what to keep out is essential for maintaining a healthy system that breaks down efficiently without attracting pests or producing unpleasant odors. Balance is the key to success.
Think of your bin as a living ecosystem. Every material you add affects microbial activity, which directly influences how quickly and effectively everything breaks down.
Using a variety of inputs and layering them correctly helps keep the process active and problem-free.
Materials That Work Well (the “good” inputs)
Kitchen scraps: Fruit and vegetable peels, cores, wilted produce, coffee grounds, tea bags, and crushed eggshells
Yard waste: Grass clippings, dry leaves, small twigs, straw, hay, and sawdust from untreated wood
Paper products: Shredded newspaper, plain cardboard (unwaxed and uncolored), and paper towels not exposed to harsh chemicals
Other natural materials: Hair, pet fur from herbivores only, and cotton or other natural-fiber rags
These materials break down efficiently and help create a nutrient-rich end result when properly balanced.
Materials to Avoid (the “problem” inputs)
Meat, fish, and bones: Attract pests, create strong odors, and break down very slowly
Dairy products and oily foods: Can cause odor issues and draw rodents and insects
Diseased plants: May spread pathogens if temperatures don’t get high enough to neutralize them
Weeds with seeds: Seeds can survive and later spread into garden beds
Pet waste from carnivores or omnivores: May contain harmful pathogens unsuitable for home systems
Chemically treated wood or plants: Pesticides and preservatives can contaminate the final soil
Keeping these materials out helps maintain a clean, efficient breakdown process.
Smart Layering for Better Results
Layering materials is similar to assembling a lasagna. Start with coarse, dry materials at the bottom to promote drainage and airflow.
Alternate layers of moist, nitrogen-rich inputs with dry, carbon-rich ones. Cutting or shredding larger items speeds up the breakdown process and improves overall efficiency.
By carefully managing what goes into your bin and how it’s layered, you’ll create an effective system that turns everyday organic waste into valuable garden soil—setting you up for healthy, productive planting in the months ahead.
Maintaining Your Compost Pile for Optimal Decomposition
Building a compost bin is only the first step; proper maintenance is essential to ensure your organic materials break down efficiently and transform into nutrient-rich soil within the desired timeframe. A well-maintained compost pile is a living system that requires regular attention to thrive.
Consistent monitoring of moisture, aeration, and temperature will significantly accelerate the composting process and prevent common issues.
Think of yourself as the conductor of a tiny orchestra of microorganisms. Their performance depends entirely on the conditions you provide.
Neglecting these conditions can lead to slow decomposition, odors, or a pile that simply sits there without much activity. With a little effort, your compost bin will consistently produce excellent results.
Essential maintenance practices for your compost bin
Maintaining a compost pile involves a few key actions that ensure optimal conditions for microbial activity. These practices are straightforward but critical for success.
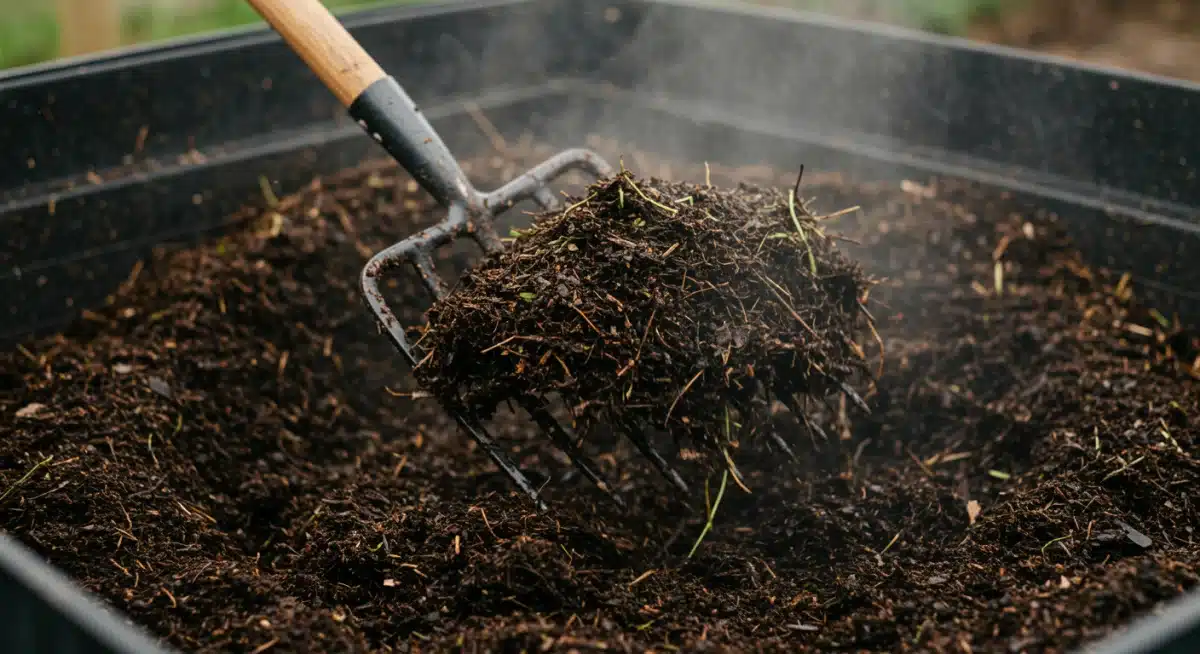
Turning the compost pile
Regular turning (aeration) is perhaps the most important maintenance task. It introduces oxygen, which is vital for aerobic bacteria that break down organic matter quickly and without odor.
Aim to turn your pile every few days to once a week, especially in the initial stages when decomposition is most active.
Use a pitchfork or a specialized compost aerator to mix the materials thoroughly, moving the outer, cooler materials into the center and vice versa.
Monitoring moisture levels
The compost pile should be consistently damp, like a thoroughly wrung-out sponge. If it’s too dry, microbial activity slows down. If it’s too wet, it can become anaerobic and smelly.
Check the moisture level regularly by squeezing a handful of material. If it crumbles, add water; if it’s soggy, add more dry browns and turn the pile to aerate. Adjusting moisture is key to keeping the decomposition process on track.
Balancing greens and browns
As you add new materials, strive to maintain the ideal carbon-to-nitrogen ratio. If your pile starts to smell like ammonia (too much nitrogen), add more browns.
If it’s slow and sluggish (too much carbon), add more greens. This ongoing adjustment ensures the microorganisms have the perfect diet for rapid decomposition.
Consistent management will lead to nutrient-rich soil for your garden in just 6 months, making your decision to build a compost bin truly worthwhile.
Troubleshooting Common Decomposition Problems
Even with careful planning and a well-built bin, it’s normal to encounter a few challenges along the way.
Don’t get discouraged—most issues are easy to identify and fix. Learning how to recognize common problems and apply simple solutions is part of mastering the process and ensuring your efforts result in rich, healthy soil for your garden.
Your pile provides clear signals through smell, appearance, and temperature. Paying attention to these clues allows you to correct issues quickly and keep the breakdown process efficient and balanced.
Addressing Typical Pile Issues
Foul odor (rotten egg or ammonia smell)
This usually indicates a lack of oxygen or an excess of nitrogen-rich materials.
Solution: Turn the pile thoroughly to introduce air. If the smell is sharp or ammonia-like, add more carbon-rich materials such as dried leaves or shredded cardboard. Also check moisture levels—excess water can worsen odors.
Pile isn’t heating up
A cool pile suggests low microbial activity, often caused by too little nitrogen, moisture, or overall volume.
Solution: Add more nitrogen-rich inputs like fresh grass clippings or kitchen scraps. Lightly water the pile if it’s dry, and make sure it’s large enough—around 3×3×3 feet helps retain heat. Turning the pile also helps activate decomposition.
Pests (rodents, flies, insects)
These are usually attracted by exposed food scraps or inappropriate materials.
Solution: Avoid adding meat, dairy, oily foods, or pet waste. Bury food scraps deep within the pile and consider using a bin with a secure lid or fine mesh to deter pests.
Pile is too dry
Microorganisms need moisture to function properly.
Solution: Add water gradually while turning the pile to distribute moisture evenly, especially when adding dry materials.
Pile is too wet or slimy
Excess moisture can reduce airflow and slow decomposition.
Solution: Mix in dry, absorbent materials like straw, shredded paper, or dry leaves. Turn the pile more frequently to improve airflow and help excess moisture evaporate.
By addressing these common challenges early, you keep your system productive and efficient. Regular observation and quick adjustments ensure a steady transformation of organic waste into nutrient-rich soil, making the entire process smoother and far more rewarding.
Harvesting and Using Your Nutrient-Rich Compost
After approximately six months of diligent care, you’ll be ready to harvest the fruits of your labor: beautiful, dark, crumbly, and earth-smelling compost.
This nutrient-rich soil amendment is a gardener’s treasure, capable of transforming the health and productivity of your plants.
Knowing when and how to harvest, and then how to best utilize your homemade compost, completes the cycle of your decision to build a compost bin.
The transition from raw organic waste to finished compost is a testament to natural processes and your consistent efforts.
This final product is not just a soil additive; it’s a living ecosystem of beneficial microorganisms, ready to invigorate your garden beds, containers, and lawn.
Signs of finished compost
Color: It should be dark brown or black.
Texture: Crumbly and uniform, with few recognizable original materials (except for very tough items like twigs, which can be screened out or returned to the pile).
Smell: Earthy and pleasant, like fresh soil, not foul or acrid.
Temperature: The pile should be cool throughout, indicating that the active decomposition phase is complete.
Methods for harvesting compost
The easiest way to harvest depends on your bin design. For open bins or those with removable sides, you can simply scoop the finished compost from the bottom or sides.
If your bin is a continuous system, where you add new materials to the top and harvest from the bottom, you can often pull out finished compost without disturbing the active composting layers above.
If you have a single batch system, you might need to move the partially decomposed material aside to access the finished product underneath.
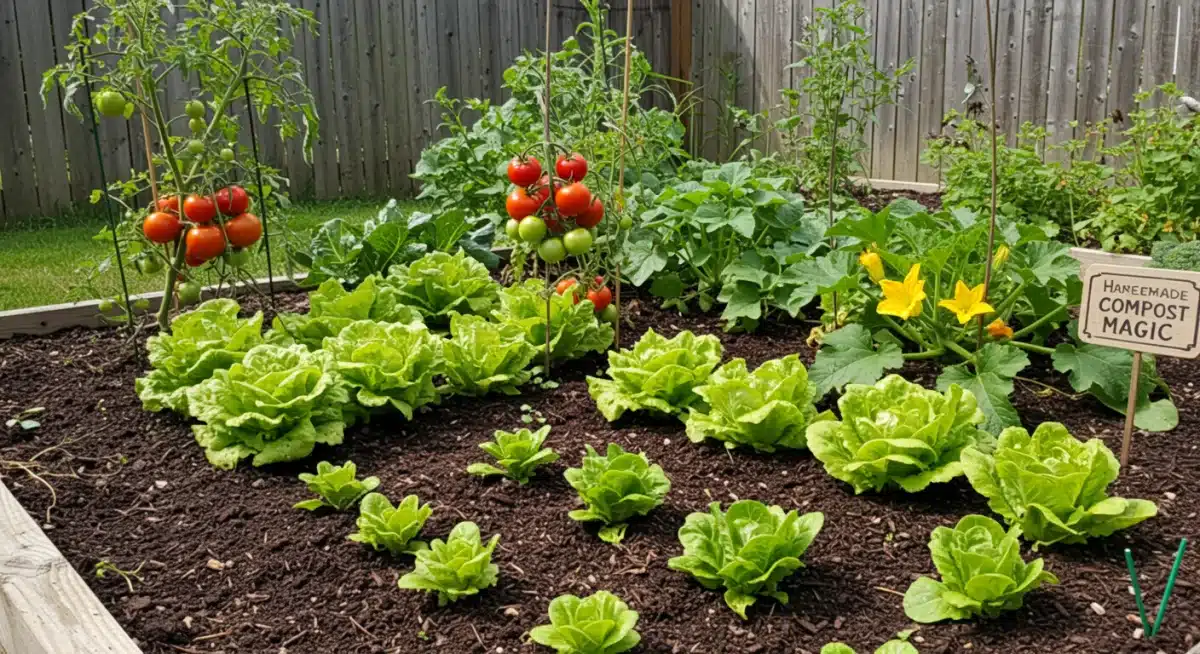
Using your homemade compost
Soil amendment: Mix compost into your garden beds before planting or as a top dressing. It improves soil structure, water retention, and nutrient availability.
Potting mix: Blend compost with other ingredients like perlite, vermiculite, and peat moss (or coconut coir) to create a custom potting mix for containers.
Mulch: Apply a layer of compost around plants to suppress weeds, retain moisture, and slowly release nutrients.
Lawn dressing: Spread a thin layer of compost over your lawn to improve turf health and vigor.
Compost tea: Steep compost in water to create a liquid fertilizer that can be used for foliar feeding or watering plants.
By effectively harvesting and utilizing your homemade compost, you close the loop on organic waste, contributing to a healthier environment and a more vibrant garden.
The satisfaction of seeing your plants thrive because of your efforts to build a compost bin is truly unparalleled, making all the work worthwhile.
| Key Aspect | Brief Description |
|---|---|
| Compost Basics | Balance ‘greens’ (nitrogen) and ‘browns’ (carbon) with moisture and air for microbial decomposition. |
| Bin Location | Choose a shaded, well-drained spot near a water source, accessible yet discreet. |
| Maintenance | Regularly turn the pile for aeration, maintain consistent moisture, and balance material inputs. |
| Harvest & Use | Use finished, earthy-smelling compost as soil amendment, mulch, or for potting mixes. |
Frequently Asked Questions About Composting
With proper management, including the right mix of greens and browns, consistent moisture, and regular turning, you can typically achieve nutrient-rich compost in about six months.
Factors like material size and ambient temperature can influence this timeline, sometimes speeding it up or slowing it down.
Avoid meat, fish, dairy products, and oily foods as they attract pests and create foul odors. Also, steer clear of diseased plants, weeds with seeds, and pet waste from carnivores/omnivores to prevent spreading pathogens or unwanted growth in your garden.
Ideally, turn your compost pile every few days to once a week, especially during the active decomposition phase. Regular turning introduces oxygen, which is crucial for aerobic bacteria, speeding up the breakdown process and preventing anaerobic odors.
Finished compost should be dark brown or black, with a crumbly, uniform texture. Most original materials should be unrecognizable. It should have a pleasant, earthy smell, similar to rich forest soil, indicating it’s ready for use in your garden.
Absolutely! Many compact compost bin designs, like repurposed plastic containers with drilled holes or small tumblers, are perfect for urban settings.
These allow you to manage kitchen scraps and some yard waste efficiently, even with limited outdoor space, contributing to sustainable living.
Conclusion
Embarking on the journey to build a compost bin is a profound step towards sustainable living, offering tangible benefits for both your home and the environment.
By transforming everyday organic waste into nutrient-rich soil, you actively reduce landfill contributions and provide your garden with an invaluable, all-natural boost.
The process, while requiring a bit of commitment, is incredibly rewarding, culminating in a thriving garden and a deeper connection to ecological cycles.
Embrace composting, and watch your waste become a powerful resource, enriching your soil and your life in just six months.


