Build a Chicken Coop: Under $200, Fresh Eggs in 3 Months
 Are you dreaming of waking up to fresh, homegrown eggs every morning without breaking the bank? You’re in the right place! This comprehensive guide will show you how to build a chicken coop for under $200 and start collecting fresh eggs in 3 months, transforming your backyard into a mini-farm and providing your family with a sustainable food source.
The dream of fresh eggs: why now is the time to build
The allure of fresh eggs, laid by happy hens right in your backyard, is undeniable. Beyond the undeniable taste difference, raising chickens offers a connection to your food source, teaching valuable lessons about sustainability and self-sufficiency.
The current economic climate also makes a strong case for taking control of your food supply, and what better way to start than with a reliable source of protein?
Many aspiring chicken keepers are deterred by the perceived cost and complexity of building a suitable coop. However, with smart planning and a resourceful approach, a functional and comfortable chicken coop doesn’t have to be an expensive endeavor.
The satisfaction of building something with your own hands, combined with the daily reward of fresh eggs, makes this project incredibly fulfilling. It’s a journey that begins with a vision and ends with a sustainable, rewarding hobby.
Benefits of backyard chickens
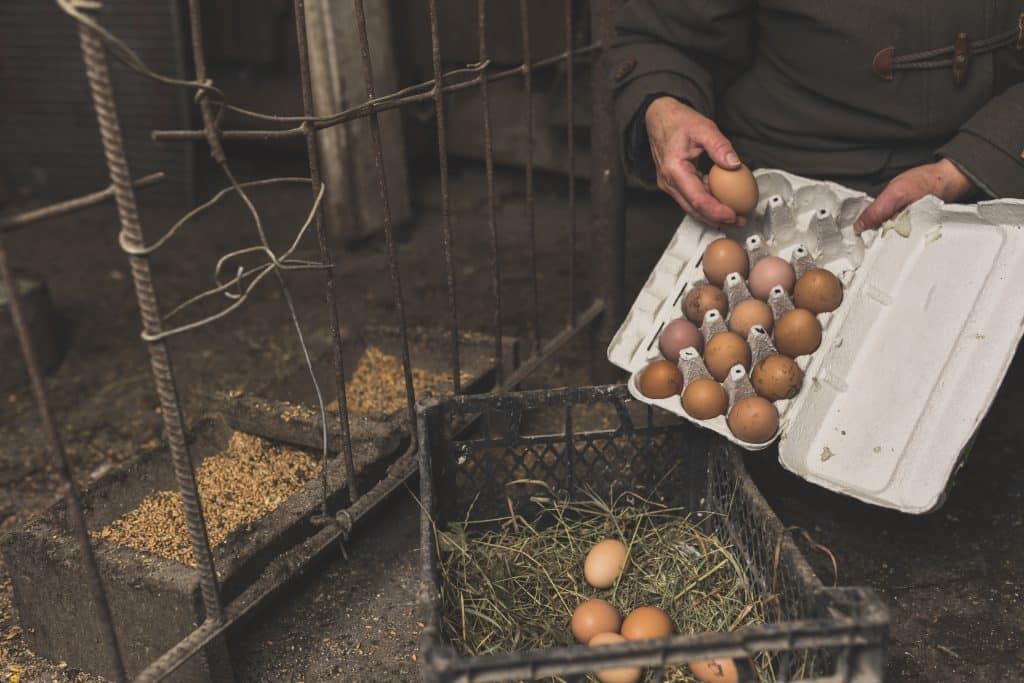
Fresh, organic eggs: Enjoy eggs with richer yolks and superior flavor, free from commercial additives.
Natural pest control: Chickens are excellent foragers, helping to reduce insect populations in your yard.
Garden fertilization: Chicken manure is a potent, natural fertilizer for your garden beds.
Educational experience: A fantastic way to teach children about where food comes from and animal care.
Embracing backyard chickens is more than just a trend; it’s a return to simpler, more sustainable living. The initial investment in time and materials is quickly outweighed by the myriad benefits, from the tangible reward of fresh eggs to the intangible joy of interacting with your flock.
This guide is designed to empower you to take that first step, demonstrating that a budget-friendly coop is not only possible but also a rewarding DIY project.
Planning your budget coop: materials and design
The cornerstone of building a chicken coop for under $200 lies in meticulous planning and strategic material sourcing. Before you even pick up a hammer, consider the size of your flock, local climate, and available space.
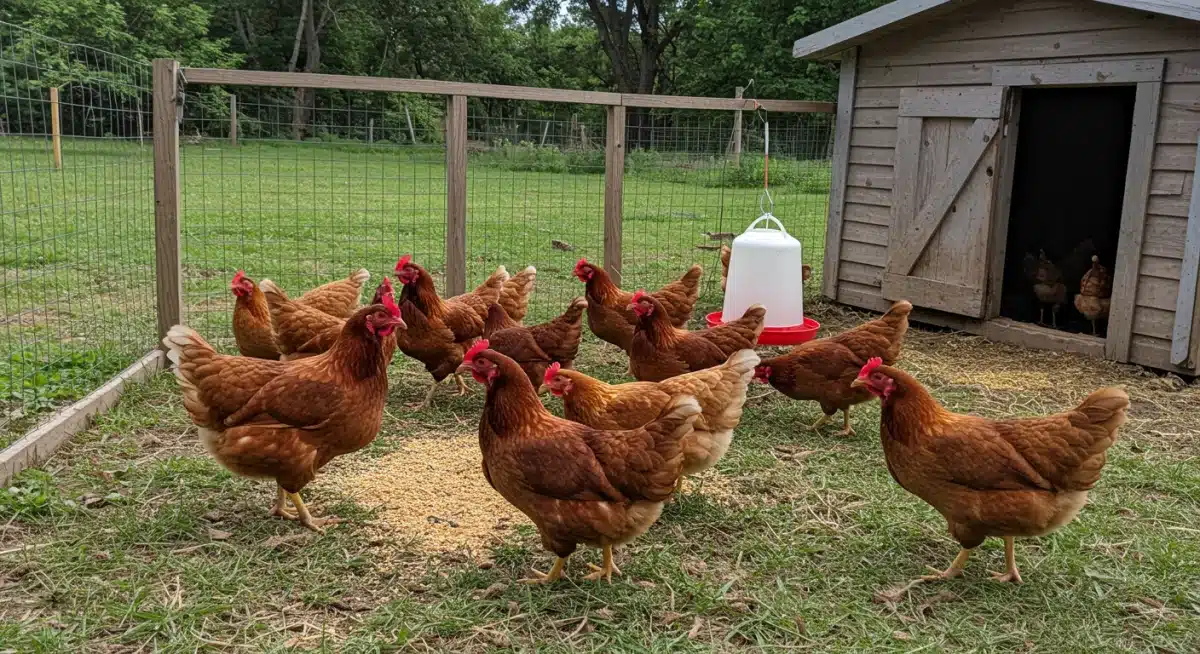
A small flock of 3-5 hens, ideal for most backyard setups, requires less space and fewer materials, making the budget goal more attainable.
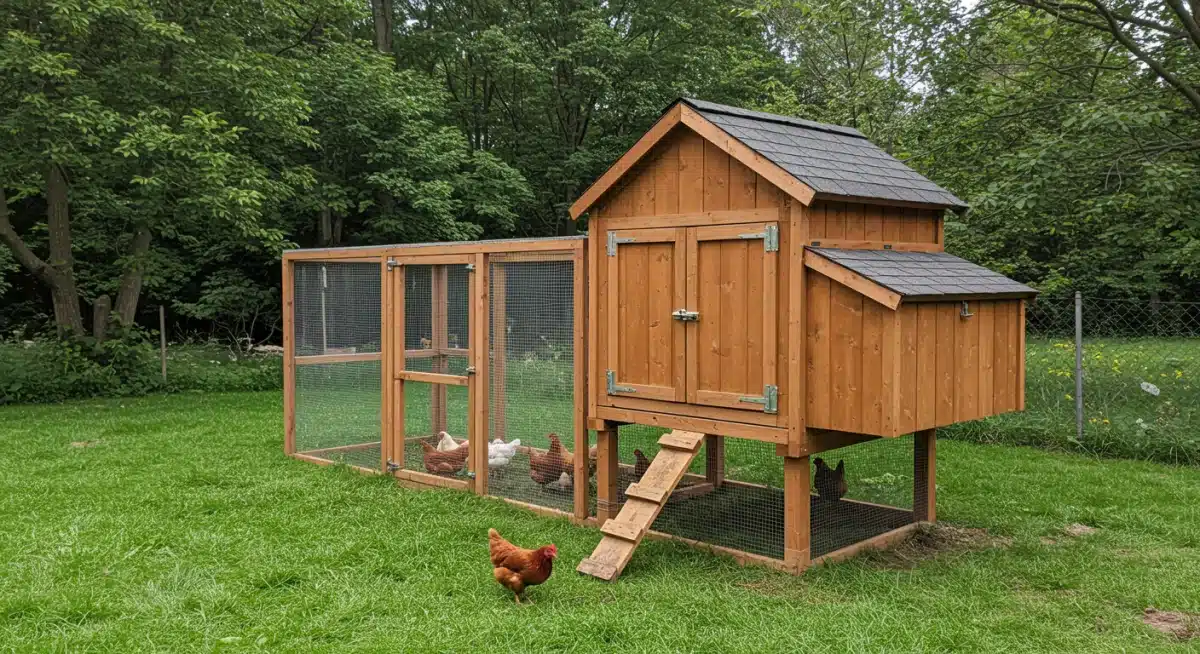
Start by sketching out a basic design. Chickens need about 2-4 square feet of coop space per bird, plus 8-10 square feet of run space. Focus on functionality: ventilation, predator protection, nesting boxes, and roosting bars are essential.
Elaborate aesthetics can come later, if at all, when working with a tight budget. Scour online resources for free plans or adapt existing simple designs to fit your needs and budget constraints.
Sourcing affordable materials
This is where your resourcefulness truly shines. Forget expensive lumber from big box stores; think reclaimed, recycled, and repurposed. Websites like Craigslist, Facebook Marketplace, and local freecycle groups are treasure troves for discarded materials.
Construction sites often have scrap wood they’re willing to give away. Even pallets can be dismantled and used for framing or siding, though be cautious about their origin to avoid treated wood.
Reclaimed wood: Look for old fences, pallets, or discarded lumber from renovation projects.
Hardware cloth: Essential for predator proofing. Buy in bulk or look for sales. Used hardware stores can sometimes offer deals.
Roofing materials: Old corrugated metal sheets, tarps, or even shingle scraps can work.
Nesting boxes: Repurpose old plastic crates, buckets, or wooden boxes.
Roosting bars: Sturdy branches or 2×2 lumber scraps are perfect.
By prioritizing free or heavily discounted materials, you significantly reduce the overall cost. Don’t be afraid to get creative; an old dog house can be a coop’s foundation, and a discarded trampoline frame can become a sturdy run. Remember, the goal is functional and safe, not necessarily pretty. A well-planned, budget-conscious approach to materials will keep your project firmly under the $200 mark.
Essential coop features for happy hens
A successful chicken coop, regardless of its cost, must provide for the basic needs of your flock. These aren’t luxuries; they are fundamental requirements for healthy, productive hens. Neglecting any of these can lead to stressed birds, reduced egg production, and increased vulnerability to predators and disease. Prioritizing these elements ensures your hens thrive, making your investment worthwhile.
First and foremost is protection from predators. Raccoons, foxes, hawks, and even neighborhood dogs pose a significant threat.
This means sturdy walls, a secure roof, and, most critically, hardware cloth (not chicken wire, which is too flimsy) covering all openings and extending into the ground to prevent digging predators. Ventilation is equally vital. Stale, humid air can lead to respiratory issues, especially in warmer climates. Ensure good airflow without creating drafts directly on the roosting birds.
Key design elements
Predator-proof design: Use 1/2-inch hardware cloth, secure latches, and bury a skirt of hardware cloth around the perimeter.
Adequate ventilation: Vents near the roofline and lower to allow air circulation without direct drafts.
Nesting boxes: One 12x12x12 inch box per 3-4 hens, placed in a dark, quiet area.
Roosting bars: Provide 8-12 inches of roosting space per hen, elevated off the ground.
Easy cleaning access: A large door or removable tray for quick and efficient cleaning.
Weather protection: A waterproof roof and walls to shield from rain, snow, and extreme temperatures.
Beyond these structural elements, consider the coop’s orientation. Facing the coop away from prevailing winds can help with temperature regulation. A south-facing opening can maximize winter sun exposure.
A well-designed coop anticipates these needs, ensuring your chickens are comfortable, safe, and productive, leading to a steady supply of fresh eggs. Thoughtful consideration of these features during the planning and build phase will prevent future headaches and ensure your flock’s well-being.
Step-by-step construction: from frame to finish

Once you’ve finalized your design and gathered your materials, it’s time to start building. This phase is where your vision truly comes to life.
Remember that patience and attention to detail will result in a sturdier, more secure coop. Don’t rush through any steps, especially when it comes to structural integrity and predator proofing.
Begin by constructing the base and frame. Use your reclaimed lumber or pallets to create a solid foundation that can support the weight of the coop and your birds.
Square and level are your watchwords here; a crooked frame will make subsequent steps much more difficult. Secure all joints with screws rather than nails for greater strength and durability. If your coop will be moved, consider adding skids or wheels to the base during this stage.
Building sequence
After the frame, move on to installing the walls. Plywood scraps, old fence pickets, or even salvaged siding can be used. Ensure there are no gaps that predators could exploit. Next, tackle the roof structure, making sure it has a slight pitch for water runoff. Once the roof frame is in place, cover it with your chosen roofing material, ensuring it’s waterproof and securely fastened.
The next critical step is predator proofing. This involves installing hardware cloth over all windows and ventilation openings. Extend the hardware cloth a foot or two into the ground around the perimeter of the run to deter digging predators.
Install secure latches on all doors and access points. Finally, add the interior elements: roosting bars, nesting boxes, and feeders/waterers. Ensure everything is easy to access for cleaning and egg collection. A fresh coat of non-toxic paint or sealant can extend the life of your coop.
Predator proofing and ventilation: non-negotiables
These two aspects are arguably the most critical for the health and safety of your flock, and they should never be compromised, even on a budget.
A coop that fails in either predator proofing or ventilation is a death trap for chickens, negating all your hard work and investment. Understanding their importance and implementing them correctly is paramount.
Predators are relentless and ingenious. From raccoons with their dexterous paws to coyotes and foxes, they will exploit any weakness in your coop’s defenses. Chicken wire, while cheap, is only good for keeping chickens in, not predators out.
Its large openings and flimsy gauge make it easy for predators to chew through or reach through. Hardware cloth, with its smaller, thicker mesh, is the only reliable barrier for openings.
Key predator proofing strategies
Hardware cloth over chicken wire: Always opt for 1/2-inch or 1/4-inch hardware cloth for all openings.
Burying a hardware cloth skirt: Extend hardware cloth at least 12-18 inches into the ground around the coop and run perimeter to prevent digging.
Secure locks: Use sturdy, predator-proof latches on all doors, not just simple hooks.
Solid construction: Ensure no gaps or weak points in walls or roof that a determined predator could exploit.
Ventilation, on the other hand, is crucial for preventing respiratory illnesses, frostbite in winter, and heatstroke in summer. Chickens produce a lot of moisture and ammonia, which can quickly build up in a poorly ventilated coop.
Adequate airflow removes these harmful elements and helps regulate temperature. Vents should be positioned high to allow hot, stale air to escape and low to draw in fresh air, creating a convection current. Crucially, these vents must also be predator-proofed with hardware cloth. A well-ventilated coop promotes a healthy, comfortable environment, leading to happier hens and more eggs.
Introducing your flock and collecting eggs
With your budget-friendly coop complete and secure, the exciting next step is to introduce your new flock. Choosing the right breeds is important; consider factors like egg production, temperament, and suitability for your climate.
Many hatcheries offer sexed chicks, ensuring you only get hens, which is crucial for egg laying. Ordering chicks online or purchasing from a local farm supply store are common options.
Chicks will need a brooder for their first 6-8 weeks, providing a warm, safe environment before they transition to the coop.
Once they are fully feathered and old enough, typically around 8 weeks, you can move them into their new home. Allow them a few days to adjust to the coop before introducing them to the run. This transition period is vital for their well-being and helps them acclimate to their new surroundings.
Egg collection and hen care
Most laying breeds will start producing eggs around 18-24 weeks of age. This means that if you start with day-old chicks, you can expect your first fresh eggs in approximately 3-5 months, perfectly aligning with our 3-month goal if you acquire pullets (young hens close to laying age).
Daily egg collection: Collect eggs at least once a day to prevent breakage, eating by hens, and keep them clean.
Nutritious feed: Provide a high-quality layer feed, especially when hens start laying.
Fresh water: Always ensure access to clean, fresh water.
Grit and oyster shell: Essential for digestion and strong eggshells.
Regular cleaning: Keep the coop clean to prevent disease and pests.
Observing your flock daily will help you understand their behaviors and spot any potential issues early. Happy, healthy hens are productive hens.
With consistent care, proper nutrition, and a safe, comfortable coop, you’ll soon be enjoying a steady supply of delicious, fresh eggs from your very own backyard. The joy of collecting that first warm egg is a reward unlike any other, a testament to your hard work and dedication.
Maintaining your budget coop and flock health
Building your coop was just the beginning; consistent maintenance is key to its longevity and the health of your flock.
A well-maintained coop not only provides a better environment for your chickens but also prevents costly repairs down the line. Regular checks and cleaning routines will save you time and money in the long run, ensuring your initial $200 investment continues to pay dividends in fresh eggs.
Daily tasks include checking on your birds, ensuring they have fresh food and water, and collecting eggs. Weekly tasks should involve spot cleaning the coop, removing droppings from roosting bars, and refreshing bedding. A deeper clean, involving replacing all bedding and scrubbing surfaces, should be done monthly or bi-monthly, depending on flock size and coop design. This prevents the buildup of ammonia and reduces the risk of parasites and diseases.
Long-term coop care
Inspect for wear and tear: Regularly check the coop structure for loose boards, damaged roofing, or compromised hardware cloth.
Pest control: Monitor for mites, lice, and other pests, treating promptly if found. Diatomaceous earth can be a natural deterrent.
Weatherproofing: Reapply sealant or paint as needed to protect wood from the elements.
Ventilation checks: Ensure vents remain clear and unobstructed for optimal airflow.
Beyond the coop itself, monitoring your flock’s health is paramount. Observe their activity levels, appetite, and droppings. Any changes can be an indicator of illness.
Providing a dust bath area, either within the run or a designated spot, helps chickens naturally clean themselves and deter external parasites.
By dedicating a small amount of time each week to maintenance and observation, you can ensure your budget coop remains a safe and productive home for your happy, egg-laying hens for years to come. This proactive approach is fundamental to successful backyard chicken keeping.
| Key Point | Brief Description |
|---|---|
| Budget Planning | Strategically source free/reclaimed materials to keep costs under $200. |
| Essential Features | Prioritize predator proofing, ventilation, nesting boxes, and roosting bars. |
| Construction Process | Follow a step-by-step build, focusing on security and structural integrity. |
| Flock Integration | Introduce chicks, provide care, and expect fresh eggs within 3-5 months. |
Frequently asked questions about building a chicken coop
For a small flock, aim for 2-4 square feet of indoor coop space per chicken and 8-10 square feet of outdoor run space per chicken. Overcrowding leads to stress, aggression, and health issues, so it’s always better to provide more space if possible for their well-being.
No, chicken wire is generally not sufficient for predator proofing. Its large openings and thin gauge make it easy for raccoons and other predators to chew through or reach through. Always use 1/2-inch or 1/4-inch hardware cloth for secure protection against most common predators.
Most laying hens typically start producing eggs between 18 to 24 weeks of age. If you start with day-old chicks, this means you can expect your first eggs in about 3 to 5 months. Factors like breed, nutrition, and light exposure can influence the exact timing of their first lay.
Reclaimed materials are ideal for a budget coop. Look for free pallets, old fence panels, discarded plywood, or scrap lumber from construction sites. Used hardware stores can also be a source for affordable hardware cloth and roofing materials. Creativity with repurposing is key.
Install vents near the roofline to allow hot, stale air to escape and lower vents to draw in fresh air, creating a natural convection current. Position vents away from roosting bars to avoid direct drafts on the birds. All vents must be covered with hardware cloth for predator protection.
Conclusion
Embarking on the journey to build a chicken coop for under $200 and start collecting fresh eggs in 3 months is an achievable and incredibly rewarding endeavor. It requires careful planning, resourceful material sourcing, and a commitment to providing a safe, comfortable environment for your flock.
By focusing on essential features like predator proofing and proper ventilation, you can create a functional coop that supports healthy, productive hens without breaking the bank. The satisfaction of enjoying fresh, homegrown eggs, knowing they came from your own backyard and your own hands, is a testament to the value of sustainable living.
Take the leap, embrace the DIY spirit, and soon you’ll be reaping the delicious benefits of your efforts.


