Create Custom Shelving: DIY Storage for Any Space & Budget
 Create custom shelving to perfectly utilize every inch of your home, offering personalized storage solutions that align with both your functional needs and aesthetic preferences, all while adhering to your budget.
Are you tired of cluttered spaces and off-the-shelf storage that just doesn’t quite fit? Learning to create custom shelving can revolutionize your home organization, offering tailored solutions that maximize every inch of your living area while reflecting your unique style and respecting your budget.
This guide will walk you through the essential steps and creative ideas to transform your storage dreams into a tangible reality.
Why Custom Shelving is a Game-Changer for Home Organization
Custom shelving offers unparalleled flexibility, allowing you to design storage solutions that perfectly conform to the specific dimensions and aesthetic of any room.
Unlike mass-produced options, custom shelves can address awkward nooks, sloped ceilings, or unusual wall lengths, turning previously unusable spaces into valuable storage real estate.
This bespoke approach ensures every item has a designated home, reducing clutter and enhancing the overall flow and functionality of your environment.
Beyond mere utility, custom shelving also provides an opportunity to infuse personality and design flair into your home.
From rustic reclaimed wood to sleek modern laminate, the material choices are vast, enabling you to match or contrast existing decor. The ability to choose finishes, colors, and hardware means your storage can become a focal point, rather than just a utilitarian addition.
Maximizing Small and Awkward Spaces
Small apartments and homes often present unique storage challenges. Custom shelving shines in these scenarios, creating vertical storage where floor space is limited.
Think about the unused space above doorways, around windows, or even under staircases. These areas can be transformed into efficient storage units with a bit of planning and custom design.
Utilizing vertical wall space to its fullest potential.
Designing solutions for irregular wall shapes or corners.
Integrating shelves seamlessly into existing architectural features.
Creating multi-functional units that serve more than one purpose.
Enhancing Home Aesthetics and Value
Well-designed custom shelving can significantly elevate the visual appeal of your home. When storage is integrated thoughtfully, it contributes to a sense of order and sophistication.
This not only makes your home more enjoyable to live in but can also add tangible value, appealing to potential buyers who appreciate functional and aesthetically pleasing spaces.
In conclusion, custom shelving moves beyond simple storage; it’s about optimizing space, enhancing beauty, and adding value to your home.
It empowers you to take control of your environment, crafting solutions that truly work for your lifestyle.
Planning Your Custom Shelving Project: Design and Measurement
The foundation of any successful custom shelving project lies in meticulous planning. Before you even think about cutting wood or drilling holes, you need a clear vision and precise measurements.
This stage is crucial for ensuring your shelves fit perfectly and serve their intended purpose, saving you time, money, and frustration down the line.
Start by considering what you intend to store. Are these shelves for heavy books, delicate collectibles, pantry items, or clothing?
The weight and size of the items will dictate the materials, support structure, and depth of your shelves. A clear understanding of functionality will guide your design choices.
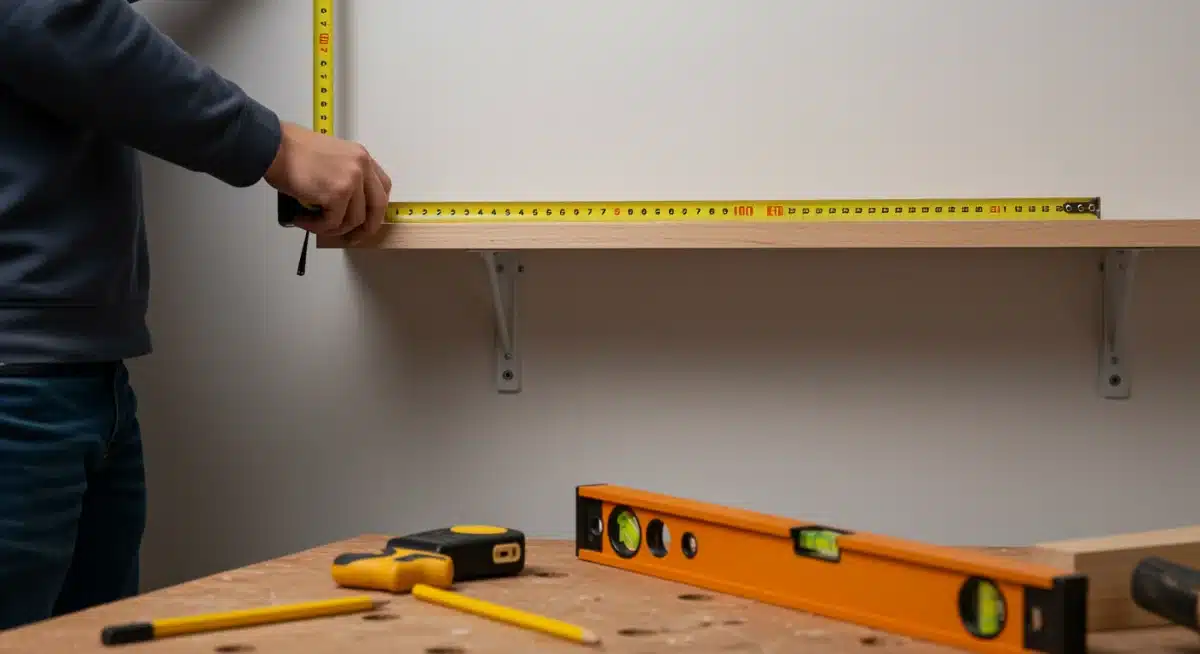
Accurate Measurements are Key
Measuring accurately is non-negotiable. Use a reliable tape measure and double-check all dimensions.
Measure the width, height, and depth of the space where the shelves will be installed. If you’re building recessed shelves, account for wall stud locations.
For built-in units, measure from wall to wall, floor to ceiling, and consider any obstructions like outlets or light switches.
Measure width at multiple points (top, middle, bottom) in case walls aren’t perfectly straight.
Measure height similarly, noting any ceiling irregularities.
Determine desired shelf depth based on items to be stored, adding a little extra for clearance.
Mark stud locations with a stud finder for secure mounting.
Designing for Functionality and Style
Once you have your measurements, it’s time to sketch out your design. Don’t worry about being an artist; simple diagrams will suffice.
Think about the number of shelves, their spacing, and how they will be supported. Will they be fixed, adjustable, or floating? Consider the aesthetic you’re aiming for – minimalist, industrial, traditional, or modern.
For example, if you’re creating a bookshelf, adjustable shelves are ideal for accommodating different book sizes. For a display unit, varied shelf heights can add visual interest.
Always prioritize functionality first, then integrate your desired style. This iterative process of planning and design ensures the final product is both beautiful and practical.
In essence, thorough planning and precise measurements are the cornerstones of a successful custom shelving project, ensuring your DIY efforts result in perfectly fitted and highly functional storage.
Choosing the Right Materials for Durability and Aesthetics
The selection of materials is a critical step in creating custom shelving that is both durable and visually appealing.
Your choice will impact not only the longevity and strength of your shelves but also their overall look and feel within your home.
Considerations include the weight capacity needed, the desired aesthetic, and your project budget.
Wood is a popular choice due to its versatility and natural beauty. Solid hardwoods like oak, maple, or cherry offer exceptional strength and can be stained or painted to match any decor.
Plywood, especially Baltic birch or cabinet-grade plywood, provides a stable and strong option for larger shelves or built-in units, often at a more affordable price point than solid wood.
MDF (Medium-Density Fiberboard) is another budget-friendly option, excellent for painting, but less durable than plywood or solid wood and susceptible to moisture damage.
Exploring Different Wood Types
Each wood type brings unique characteristics to your custom shelving. Pine is inexpensive and easy to work with, perfect for painted shelves or a rustic look.
Oak offers a classic, durable finish. For a sleek, modern aesthetic, consider maple or birch. When selecting wood, look for straight, knot-free pieces for easier construction and a cleaner finish.
Solid Wood: Best for heavy loads, classic appearance, and long-term durability.
Plywood: Strong, stable, good for wider shelves, and more economical than solid wood.
MDF: Smooth finish for painting, budget-friendly, but less structural integrity and moisture resistant.
Particle Board: Most affordable, but weakest and prone to sagging; best for light-duty, short shelves.
Alternative Materials and Support Systems
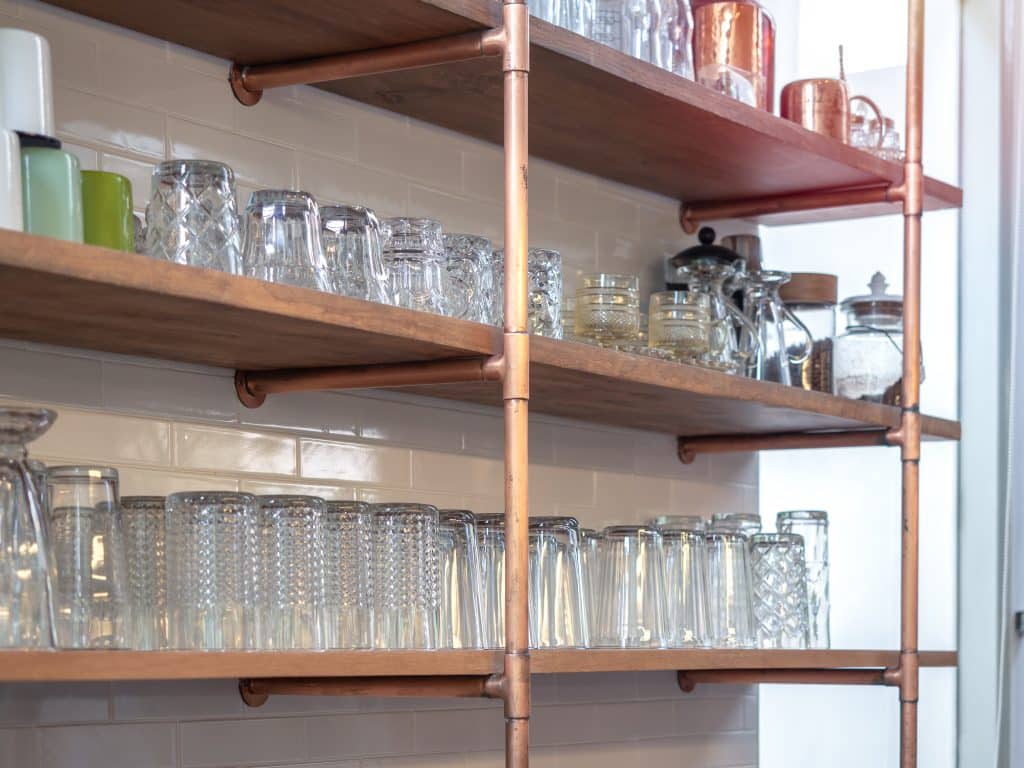
Beyond wood, other materials can be incorporated to create unique custom shelving. Metal, for instance, offers an industrial or minimalist look and provides excellent strength, often used for brackets or entire shelving units.
Glass shelves can add an airy, modern touch, particularly in bathrooms or for displaying decorative items, though they require specific support systems.
For support, consider various brackets: L-brackets for traditional wall mounting, hidden brackets for floating shelves, or standards and adjustable clips for flexible shelf heights.
The type of wall (drywall, plaster, concrete) will also dictate the appropriate anchors and fasteners needed to ensure your shelves are securely installed and can bear the intended weight.
Ultimately, the best material choice for your custom shelving project will balance functional requirements with your desired aesthetic and budget, ensuring a beautiful and lasting storage solution.
Essential Tools and Techniques for DIY Shelving Success
Embarking on a custom shelving project requires a basic set of tools and an understanding of fundamental DIY techniques.
Even if you’re a beginner, mastering a few key skills will allow you to achieve professional-looking results. Having the right equipment not only makes the job easier but also safer and more precise.
Start with safety. Always wear appropriate personal protective equipment (PPE), including safety glasses and gloves, especially when cutting or sanding. A clean and well-lit workspace is also crucial for preventing accidents and ensuring accuracy.
Must-Have Tools for the Job
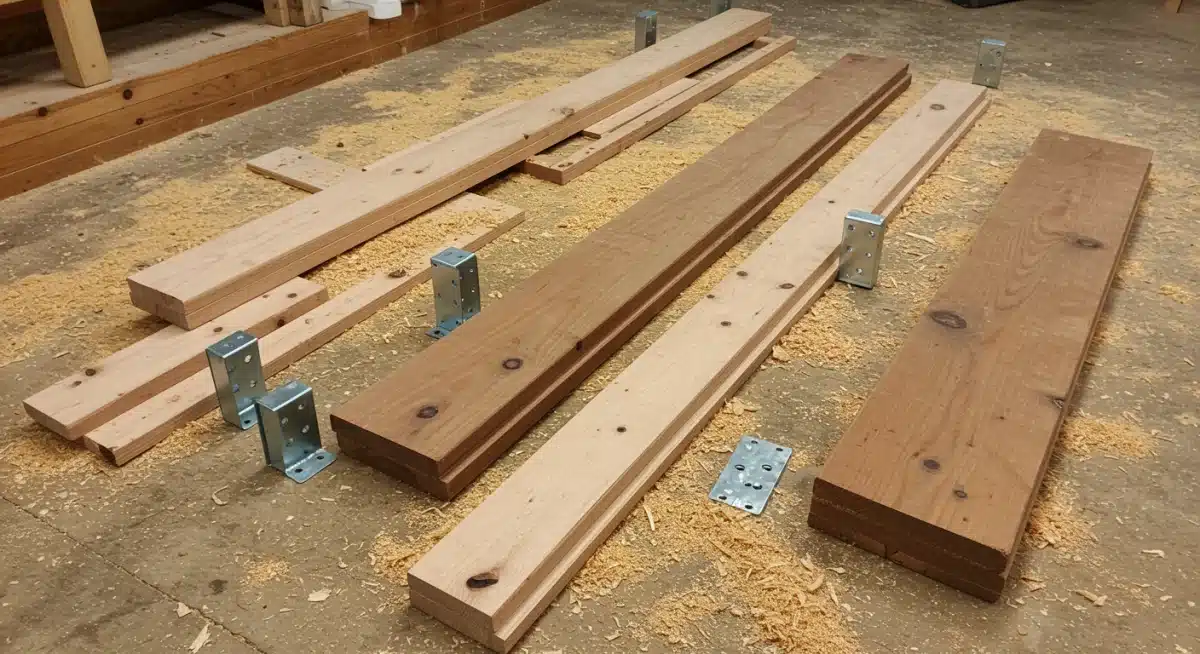
For most custom shelving projects, you’ll need a combination of measuring, cutting, drilling, and fastening tools. A good tape measure, a level, and a stud finder are indispensable for accurate layout and secure mounting.
For cutting, a circular saw or miter saw will handle most wood cuts, while a jigsaw is useful for intricate shapes or notches.
Measuring & Marking: Tape measure, pencil, straight edge, level, stud finder.
Cutting: Circular saw (for straight cuts), miter saw (for precise angle cuts), jigsaw (for curves or notches).
Drilling & Fastening: Cordless drill/driver, various drill bits, screwdriver set, impact driver.
Finishing: Sandpaper (various grits), wood filler, paint brushes or rollers, clamps.
Key DIY Techniques to Master
Precision in cutting and joining is paramount for custom shelving. When cutting wood, ensure your saw blade is sharp and make slow, steady passes to avoid splintering.
For joining shelves, methods like pocket holes (using a Kreg Jig) offer strong, hidden joints. Alternatively, dado joints or simple butt joints reinforced with screws and wood glue are effective.
Proper wall mounting is another critical technique. Always locate wall studs for maximum support. If studs aren’t available where you need them, use appropriate wall anchors designed for the weight capacity of your shelves and the type of wall material. Test the stability of your shelves before loading them with items.
With the right tools and a grasp of these basic techniques, you’re well-equipped to tackle a wide range of custom shelving projects, ensuring your creations are both sturdy and aesthetically pleasing.
Creative Custom Shelving Ideas for Every Room
The beauty of custom shelving lies in its adaptability to any space and need. Moving beyond the standard rectangular shelf, you can design storage solutions that are truly integrated into your home’s architecture and lifestyle.
Each room presents unique opportunities for innovative shelving designs that enhance both utility and decor.
Consider the specific function of each room. In a living room, shelves might be primarily for display, while in a kitchen, they’ll need to be highly functional for storing dishes and pantry items.
In a bedroom, they could serve as a stylish alternative to a nightstand or an integrated wardrobe system. This functional analysis will spark creative design ideas.
Living Room and Bedroom Solutions
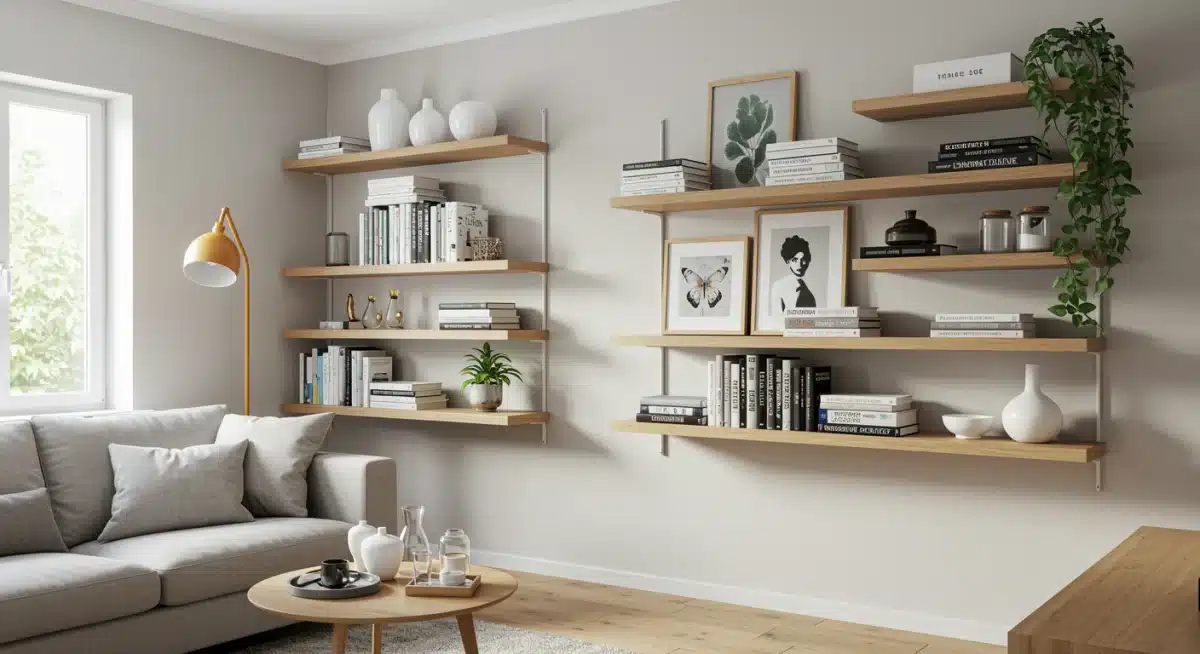
In the living room, floating shelves can create a sleek, modern look, perfect for showcasing art, books, or family photos without visible supports.
Built-in shelving around a fireplace or television can transform an entire wall into a cohesive display and storage unit.
For bedrooms, consider corner shelves to utilize often-wasted space, or integrated shelving units that combine with a desk or bed frame for a minimalist approach.
Floating Shelves: Minimalist, modern, ideal for display.
Built-in Units: Seamless integration, custom fit around architectural features.
Niche Shelving: Utilizing wall cutouts for discreet storage.
Picture Ledge Shelves: Shallow shelves perfect for displaying framed art and small decor.
Kitchen, Bathroom, and Office Innovations
Kitchens benefit greatly from custom shelving. Open shelving can make a small kitchen feel larger and provides easy access to frequently used items.
Custom pantry shelving can be designed to fit specific container sizes, maximizing storage efficiency. In bathrooms, narrow shelves above the toilet or recessed into shower walls offer practical storage for toiletries without encroaching on limited space.
For home offices, custom shelving can be designed to accommodate binders, books, and office equipment, creating an organized and productive workspace. Consider a desk with integrated shelving units to keep everything within reach.
These tailored solutions not only solve storage problems but also contribute significantly to the overall design coherence of your home.
By thinking creatively about the needs and characteristics of each room, you can design custom shelving that is both highly functional and a beautiful addition to your home’s interior.
Finishing Touches: Painting, Staining, and Installation Tips
Once your custom shelves are constructed, the finishing touches are what truly elevate them from raw materials to polished home features.
Proper finishing not only protects the wood but also allows you to achieve the desired aesthetic. Installation, equally important, ensures your shelves are secure, level, and ready to bear their load.
Before applying any finish, prepare the surface thoroughly. Sanding is crucial for a smooth and even result. Start with a coarser grit sandpaper (e.g., 80 or 100) to remove any imperfections, then progressively move to finer grits (e.g., 150, 220) for a silky-smooth finish.
Always sand with the grain of the wood. After sanding, wipe away all dust with a tack cloth before proceeding.
Choosing Your Finish: Paint vs. Stain
The choice between paint and stain depends on the material and the look you want to achieve. Paint offers a wide range of colors and can hide wood imperfections, making it ideal for MDF or less attractive wood types.
Use a primer first for better adhesion and a more durable finish. Apply several thin coats, sanding lightly between each for the best results.
Painting: Provides a uniform color, hides imperfections, versatile color options.
Staining: Enhances natural wood grain, offers various wood tones, requires pre-stain conditioner for even absorption.
Clear Coat/Polyurethane: Protects wood, provides durability, can be applied over stain or bare wood.
Secure and Level Installation
Proper installation is paramount for the safety and stability of your shelves. Always use a level to ensure your shelves are perfectly horizontal. Mark your anchor points precisely, making sure to hit wall studs whenever possible.
For drywall, use heavy-duty toggle bolts or self-drilling anchors designed for the weight you anticipate your shelves will hold.
For floating shelves, ensure the brackets are securely mounted into studs or with appropriate heavy-duty anchors.
When installing multiple shelves, use a spacing guide or jig to ensure consistent vertical distances. Take your time during installation; a few extra minutes spent on precision can prevent future headaches and ensure your custom shelving looks and functions perfectly for years to come.
By paying attention to these finishing and installation details, you can ensure your DIY custom shelving project results in sturdy, beautiful, and long-lasting additions to your home.
Budget-Friendly Approaches to Custom Shelving
Creating custom shelving doesn’t have to break the bank. With smart material choices, clever sourcing, and a willingness to DIY, you can achieve bespoke storage solutions that are kind to your wallet.
The key is to prioritize where you spend and where you can save, focusing on functionality and aesthetic impact without overspending.
One of the biggest cost-saving strategies is to embrace reclaimed or repurposed materials. Old wooden crates, pallets, or even discarded furniture pieces can be transformed into unique shelving units with a bit of creativity and elbow grease.
These not only save money but also add character and a touch of sustainability to your home.
Smart Material Choices for Cost Savings
When purchasing new materials, opt for cost-effective options that still offer good durability. Pine is significantly cheaper than hardwood and can be stained or painted to look high-end.
Plywood, especially thinner grades or project panels, can be a great value. Instead of solid wood planks, consider using MDF for shelves that will be painted, as it offers a smooth finish at a lower price point.
Reclaimed Wood: Free or low-cost, unique character, sustainable.
Pine or Common Lumber: Affordable, easy to work with, versatile for painting or staining.
MDF or Particle Board: Budget-friendly for painted shelves, but less durable for heavy loads.
Salvaged Hardware: Look for brackets or supports at flea markets or second-hand stores.
DIY vs. Pre-made Components
While the goal is custom shelving, you don’t have to build every single component from scratch. Mixing DIY elements with pre-made components can save time and money.
For example, purchase ready-made shelf brackets and focus your DIY efforts on cutting and finishing the shelf boards. Or, adapt an inexpensive pre-made bookshelf by adding custom trim or a unique paint finish to give it a built-in look.
Another approach is to design modular shelving units that can be expanded or reconfigured over time.
This allows you to build your custom storage gradually, spreading out the cost. By being resourceful with materials and smart about your construction methods, you can create custom shelving that looks expensive but is surprisingly affordable.
In summary, achieving budget-friendly custom shelving involves strategic material selection, embracing repurposing, and intelligently combining DIY efforts with readily available components to create personalized storage without financial strain.
Maintenance and Longevity of Your Custom Shelving
Once your custom shelving is installed and admired, proper maintenance is key to ensuring its longevity and continued good looks.
Regular care will protect your investment and keep your storage solutions functional and beautiful for years to come. Neglecting maintenance can lead to premature wear, structural issues, or a diminished appearance.
The type of maintenance required largely depends on the materials and finishes you’ve chosen. Wood shelves, whether painted, stained, or clear-coated, will benefit from different care routines than, say, metal or glass shelves.
Understanding these nuances will help you apply the most effective and appropriate care.
Protecting Your Investment: Cleaning and Care
For wood shelves, regular dusting with a soft, dry cloth is usually sufficient. For painted surfaces, a damp cloth with mild soap can be used for deeper cleaning, but avoid excessive moisture.
Stained or clear-coated wood can be cleaned with a wood-specific cleaner or a damp cloth, followed by drying. Avoid harsh chemicals or abrasive cleaners, which can damage the finish.
Dust Regularly: Prevents buildup and protects finishes.
Wipe Spills Immediately: Especially important for wood to prevent water damage or staining.
Avoid Harsh Cleaners: Use mild soap and water or specialized cleaners for specific materials.
Protect from Direct Sunlight: Can cause fading or warping over time, especially for wood.
Addressing Wear and Tear: Repairs and Upgrades
Over time, even the most robust custom shelving may experience minor wear and tear. Scratches, dings, or chipped paint can be touched up with matching paint or stain.
For deeper damage, wood filler can be used before sanding and refinishing.
Periodically check the stability of your shelves and tighten any loose screws or brackets to ensure they remain secure.
If your needs change, custom shelving offers the flexibility for upgrades.
You might add more shelves, adjust spacing, or even repaint for a fresh look. This adaptability ensures your initial investment continues to serve your evolving storage requirements.
By committing to regular cleaning and prompt repairs, you can ensure your custom shelving remains a valuable and attractive asset in your home.
Consistent maintenance and a proactive approach to minor repairs will significantly extend the life of your custom shelving, keeping it looking great and functioning optimally for many years.
| Key Aspect | Brief Description |
|---|---|
| Planning & Design | Accurate measurements and functional design are crucial for a successful custom shelving project. |
| Material Selection | Choose materials (wood, plywood, MDF) based on durability, aesthetics, and budget requirements. |
| Tools & Techniques | Essential tools and basic DIY skills ensure precision, safety, and professional results. |
| Budget & Maintenance | Save money with smart material choices and ensure longevity through proper care and repairs. |
Frequently Asked Questions About Custom Shelving
For heavy-duty custom shelving, solid hardwoods like oak or maple are excellent choices due to their inherent strength. Cabinet-grade plywood (e.g., Baltic birch) also offers significant load-bearing capacity.
Avoid particle board or thin MDF for heavy items, as they are prone to sagging and damage under substantial weight. Ensure your support brackets are also rated for heavy loads.
To ensure level and secure shelves, always use a high-quality level during installation. Mark your pilot holes precisely and aim to mount brackets directly into wall studs whenever possible.
If studs aren’t available where you need them, use appropriate heavy-duty wall anchors (toggle bolts or self-drilling anchors) rated for the anticipated weight. Double-check stability before loading the shelves.
Creating custom shelving in a rental property requires careful consideration and, often, landlord approval. Opt for non-permanent solutions like freestanding units, tension-rod shelves, or modular systems that don’t require drilling into walls.
If you must drill, use minimal holes and be prepared to patch and paint them perfectly upon moving out to avoid losing your security deposit.
Floating shelves appear to emerge directly from the wall with no visible supports, creating a minimalist look.
They are typically mounted using hidden brackets or rods inserted into the wall and the shelf itself.
Traditional shelves, conversely, are supported by visible brackets underneath or integrated into a larger unit, offering more visible support and often higher weight capacity.
To achieve a professional look, focus on precision in cutting and joining, thorough sanding, and a flawless finish. Use wood filler for any gaps or imperfections, apply primer before painting, and use multiple thin coats of paint or stain.
Ensure all edges are smooth and clean. Meticulous measuring and careful installation also contribute significantly to a polished final product.
Conclusion
The journey to create custom shelving is a rewarding one that transforms chaotic spaces into organized havens, tailored precisely to your needs and aesthetic preferences.
By embracing careful planning, selecting appropriate materials, mastering essential DIY techniques, and applying thoughtful finishing touches, you can craft storage solutions that not only enhance functionality but also elevate the overall design of your home.
Whether you’re aiming for a minimalist display or robust utility, custom shelving empowers you to reclaim your space, reflect your style, and enjoy the satisfaction of a well-executed project.


