Repurpose Old Furniture: Dresser to Kitchen Island DIY
 Transform an inexpensive old dresser into a functional and stylish kitchen island by following five straightforward steps, offering a budget-friendly and personalized solution for your home.
Have you ever looked at a forgotten piece of furniture and wondered if it could have a second life? The concept of upcycling is gaining immense popularity, and for good reason.
Imagine finding a sturdy, old dresser for as little as $50 and transforming it into a stunning, custom kitchen island.
This guide will show you how to repurpose old furniture, specifically a dresser, into a stylish and functional kitchen centerpiece in just five steps, proving that creativity doesn’t have to break the bank.
The allure of upcycling: why repurpose old furniture?
Upcycling, the process of transforming old or discarded materials into something new and often more valuable, offers a compelling alternative to buying new.
It’s not just about saving money; it’s about sustainability, creativity, and imbuing your home with unique pieces that tell a story.
In an era where mass-produced items often lack character, giving new life to an old dresser provides an opportunity to create a bespoke kitchen island that perfectly fits your aesthetic and functional needs.
Beyond the personal satisfaction of a DIY project, repurposing furniture significantly reduces waste. Landfills are overflowing with items that could easily be given a new purpose.
By choosing to upcycle, you’re making an environmentally conscious decision, contributing to a circular economy, and lessening your carbon footprint.
This approach aligns perfectly with a growing desire among homeowners to live more sustainably without sacrificing style or functionality.
Economic and environmental benefits
The financial advantages of repurposing are undeniable. A new kitchen island can cost hundreds, if not thousands, of dollars.
Finding a solid wood dresser at a thrift store, yard sale, or online marketplace for $50 or less dramatically cuts down the primary material cost.
The remaining expenses typically involve paint, hardware, and a countertop, which are far more manageable. Environmentally, every piece of furniture diverted from a landfill is a victory.
It conserves natural resources that would otherwise be used to manufacture new items and reduces the energy consumption associated with production and transportation.
Cost savings: Significantly cheaper than buying a new kitchen island.
Environmental impact: Reduces landfill waste and conserves resources.
Unique design: Creates a one-of-a-kind piece tailored to your style.
Personal satisfaction: The joy of creating something beautiful and functional with your own hands.
The decision to repurpose old furniture is a win-win situation. It allows you to express your individual style, save money, and act responsibly towards the environment.
This project, transforming a dresser into a kitchen island, is an excellent example of how a small investment of time and effort can yield a significant return in terms of both utility and aesthetic appeal.
Ultimately, upcycling an old dresser into a kitchen island is more than just a renovation project; it’s a statement.
It speaks to a mindful approach to consumption and a celebration of craftsmanship. The character and history embedded within an old piece of furniture can add a warmth and authenticity to your kitchen that new, sterile items simply cannot replicate.
This initial step of understanding the ‘why’ behind upcycling sets the stage for the practical ‘how-to’ that follows.
Step 1: finding your perfect dresser and planning the conversion
The foundation of a successful kitchen island conversion lies in selecting the right dresser. Not all dressers are created equal, and discerning the potential of a $50 find requires a keen eye for structural integrity and suitable dimensions.
Your ideal candidate should be sturdy, preferably made of solid wood, and possess a design that lends itself well to a kitchen environment.
Look for dressers with good bones, even if the exterior is scuffed or outdated, as these imperfections can often be remedied with a little TLC.
When searching, consider the dresser’s size and proportion relative to your kitchen space. A kitchen island should provide ample workspace without obstructing traffic flow.
Measure your kitchen carefully, noting the available footprint for the island, and keep these dimensions in mind during your search. A dresser that’s too wide or too shallow could either overpower the space or fail to provide adequate utility.
What to look for in a dresser
Prioritize dressers with solid wood construction over particle board or MDF, as solid wood offers greater durability and stability, essential for a hardworking kitchen island.
Check the drawers to ensure they slide smoothly and that the overall frame is free from significant wobbles or damage.
Minor cosmetic flaws like scratches, peeling veneer, or outdated hardware are easily fixable and often contribute to the dresser’s low price point.
Solid wood construction: Ensures durability and stability.
Appropriate dimensions: Fits your kitchen space without overcrowding.
Good structural integrity: No major wobbles, cracks, or broken joints.
Functional drawers: Smooth-gliding drawers are a bonus for kitchen storage.
Once you’ve secured your dresser, the planning stage begins. This involves visualizing the final product and mapping out the necessary modifications.
Decide whether you want to keep all the drawers, convert some to open shelving, or even remove some entirely to create a seating area.
Consider the height – most kitchen islands are 36 inches tall, so you might need to add castors or a base to achieve the desired height. Sketching out your ideas can be incredibly helpful in this phase.
Think about the desired aesthetic: will it be painted, stained, or a combination? What kind of countertop will you use?
Butcher block is a popular and relatively affordable option, but laminate, tile, or even a sealed plywood top can work depending on your budget and style.
This meticulous planning ensures that the transformation proceeds smoothly and that the end result is exactly what you envisioned for your kitchen.
Careful selection and thoughtful planning are the cornerstones of this project. Taking the time to find the right dresser and meticulously plan its conversion will save you headaches down the line and ensure that your repurposed kitchen island is both beautiful and highly functional.
Step 2: preparing the dresser for its new role
With your perfect dresser in hand, the next crucial step is preparation. This phase involves cleaning, repairing, and sanding the piece to create a smooth, stable canvas for its transformation.
Skipping these steps can compromise the longevity and appearance of your finished kitchen island, so it’s essential to be thorough.
Start by thoroughly cleaning the dresser, inside and out. Use a degreaser or an all-purpose cleaner to remove any grime, dust, or old polishes that might interfere with paint or stain adhesion. Pay close attention to crevices and corners where dirt tends to accumulate. Once clean, allow it to dry completely before moving on to repairs.
Essential repairs and sanding techniques
Inspect the dresser for any loose joints, wobbly legs, or damaged sections. Tighten screws, re-glue joints with wood glue, and use wood filler for any significant dents, gouges, or holes.
If the dresser has a veneer that’s peeling, you’ll need to either re-glue it or carefully remove it entirely, depending on its condition and your desired finish. For extensive damage, don’t hesitate to seek advice from a local hardware store or experienced DIYer.
Thorough cleaning: Removes dirt, grime, and old finishes.
Structural repairs: Tighten, re-glue, and fill any damage for stability.
Sanding for adhesion: Creates a smooth surface for paint or stain.
Dust removal: Essential for a flawless finish.
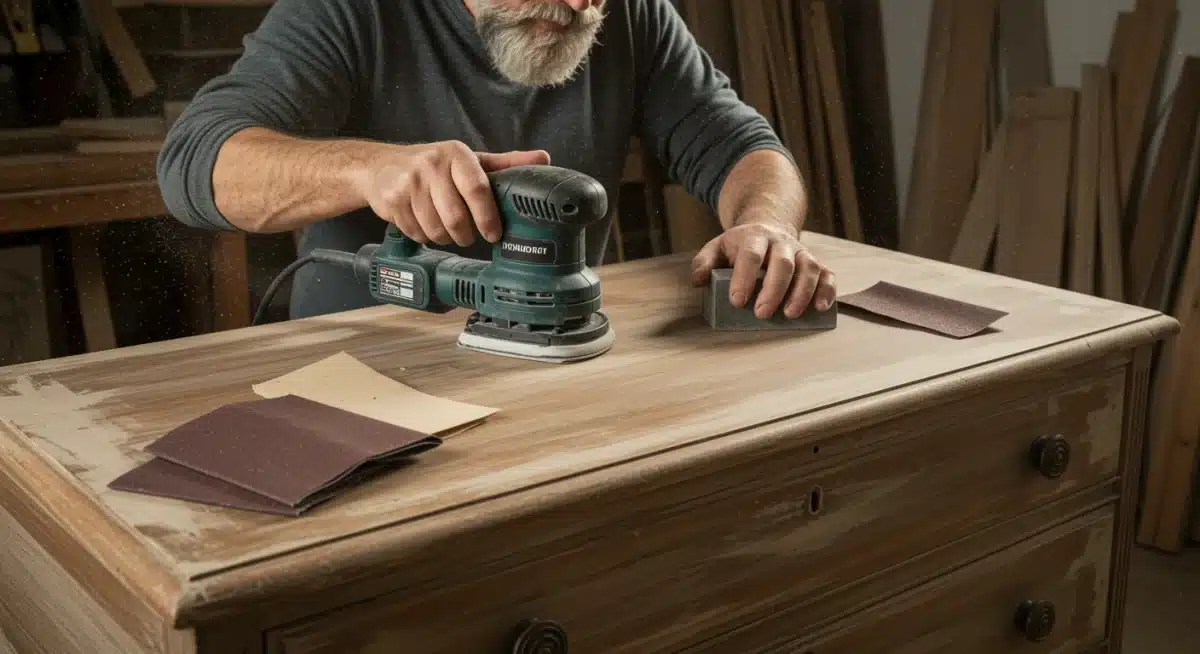
Sanding is perhaps the most labor-intensive but critical part of preparation. Begin with a medium-grit sandpaper (around 100-120 grit) to remove existing finishes, rough spots, and minor imperfections.
If the dresser has a thick, glossy finish, you might need to start with a coarser grit (80 grit) and then work your way up. Always sand with the grain of the wood to avoid visible scratches.
After the initial sanding, move to a finer grit (150-180 grit) to smooth out the surface further. For a truly professional finish, a final pass with 220-grit sandpaper will create a silky-smooth texture, ideal for paint or stain application.
Remember to wear a dust mask and eye protection, and work in a well-ventilated area. Once sanding is complete, thoroughly wipe down the dresser with a tack cloth or a damp cloth to remove all dust particles. Any remaining dust can cause a bumpy or uneven finish, so this step cannot be overlooked.
Proper preparation ensures that the subsequent steps of painting or staining will adhere correctly and result in a durable, beautiful finish. It’s the groundwork that makes all the difference in transforming an old, tired dresser into a stunning kitchen island ready for years of use.
Step 3: painting, staining, and customizing the base
Once your dresser is prepped and pristine, it’s time to infuse it with personality through paint, stain, or a combination of both.
This step is where your vision for the kitchen island truly comes to life, dictating its aesthetic and how it integrates with your existing kitchen decor.
The choice between paint and stain largely depends on the current state of the wood and the look you aim to achieve.
If the dresser wood is not particularly attractive or has been heavily repaired, painting is often the best option. A fresh coat of paint can cover imperfections and completely change the character of the piece.
For a durable kitchen island, choose a high-quality, washable paint, such as a semi-gloss or satin finish, which can withstand spills and frequent cleaning.
Don’t forget to apply a good primer first, especially if you’re painting over a dark finish or an unknown wood type, to ensure proper adhesion and vibrant color.
Choosing your finish and hardware
Alternatively, if your dresser boasts beautiful wood grain, staining can enhance its natural beauty. Stains penetrate the wood, highlighting its texture and character. Apply stain evenly with a brush or cloth, wiping off excess for an even color.
Follow up with several coats of a protective topcoat, such as polyurethane or a clear varnish, to seal and protect the wood from moisture and wear, which is crucial for a kitchen environment.
Paint options: High-quality, washable paints (semi-gloss, satin) for durability.
Stain options: Enhances natural wood grain, requires protective topcoat.
Primer use: Essential for adhesion, especially with paint.
New hardware: Updates the look and improves functionality.
Consider customizing the base beyond just color. You might want to remove some drawers and create open shelving for cookbooks, decorative baskets, or easy-access kitchen tools. This adds both visual interest and practical storage. If you need to increase the height, adding sturdy wooden feet or heavy-duty castors can achieve this while also making the island mobile, a highly desirable feature in many kitchens.
Finally, don’t underestimate the power of new hardware.
Swapping out old knobs and pulls for modern, rustic, or industrial ones can instantly update the dresser’s appearance and tie it into your kitchen’s style.
Whether you choose sleek stainless steel, antique brass, or ceramic pulls, the hardware acts as jewelry for your new island, completing its transformation and adding a touch of sophistication.
This stage is all about personal expression. Take your time, experiment with colors and finishes, and don’t be afraid to make it truly your own.
The goal is to create a piece that not only serves a functional purpose but also enhances the overall aesthetic of your kitchen.
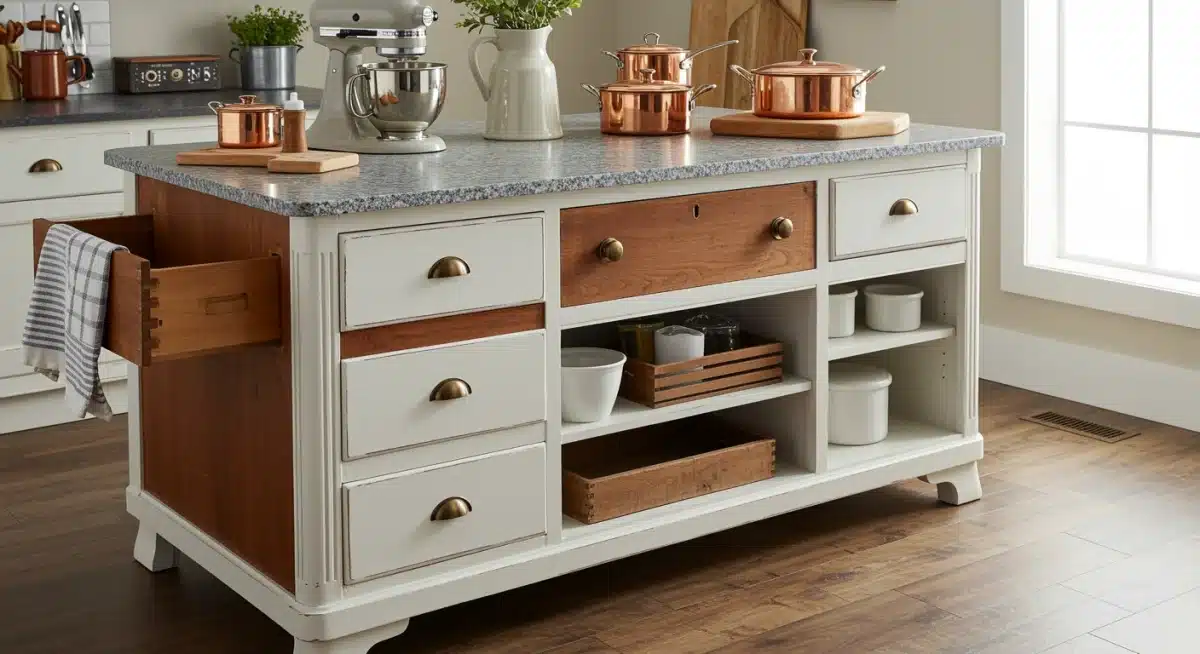
Step 4: installing a functional and stylish countertop
The countertop is arguably the most critical element of your repurposed dresser kitchen island, as it defines its primary function and significantly impacts its aesthetic.
Choosing and installing the right countertop material involves considering durability, ease of cleaning, and how it complements your kitchen’s existing surfaces. This is where your $50 dresser truly begins its journey to becoming a fully functional kitchen island.
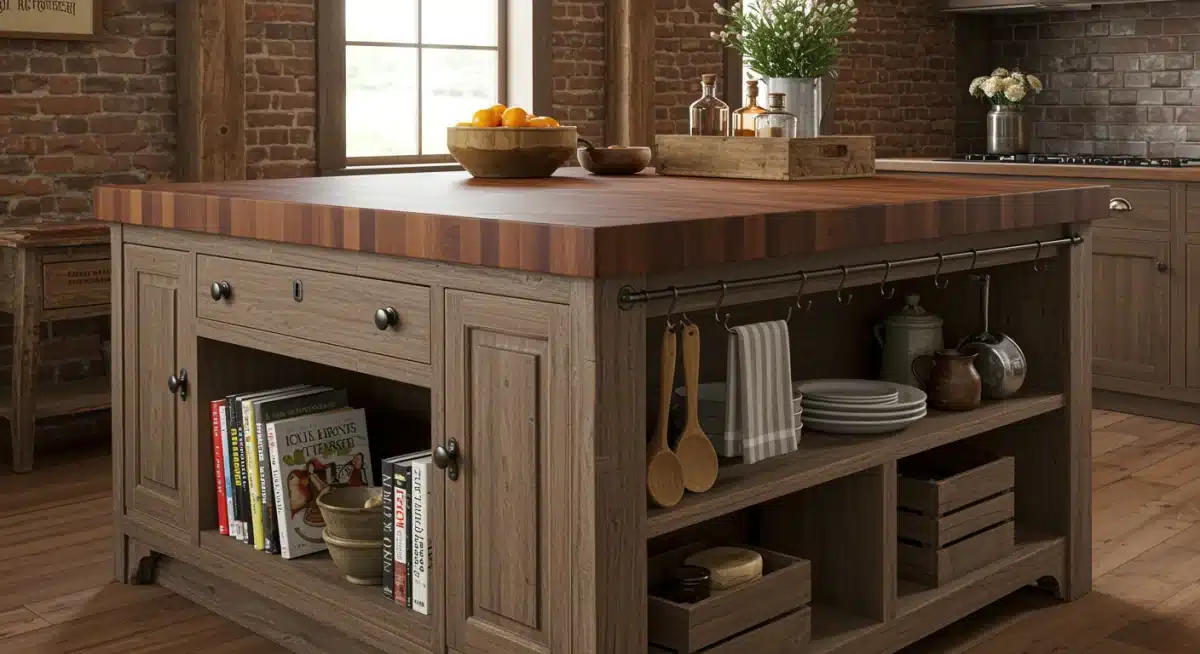
Butcher block is a popular and excellent choice for DIY kitchen islands due to its warmth, durability, and relatively affordable price point.
It’s also forgiving for minor scratches and can be easily sanded and re-sealed over time. Other options include laminate for a budget-friendly and low-maintenance surface, or even tiling for a custom, artisanal look, though tiling requires more skill and effort.
Countertop material considerations
Regardless of the material, accurate measurement is paramount. Measure the top surface of your dresser precisely, adding an overhang of 1-2 inches on all sides for comfortable use and aesthetic appeal.
When cutting the countertop, use appropriate tools and ensure clean, straight lines. If you’re not comfortable cutting larger pieces, many lumber yards or hardware stores offer cutting services for a small fee.
Butcher block: Durable, warm, easily repairable, popular choice.
Laminate: Budget-friendly, low maintenance, wide variety of styles.
Tile: Custom look, durable, but more complex installation.
Secure attachment: Crucial for safety and stability.
Once cut, the countertop needs to be securely attached to the dresser base. For butcher block or solid wood tops, use ‘L’ brackets or wood screws from underneath the dresser’s top frame into the countertop.
Ensure the screws are not too long to avoid piercing through the top surface. For heavier materials like stone or concrete (if you opt for a more ambitious project), additional reinforcement or professional installation might be necessary.
After installation, the countertop usually requires sealing. Butcher block, for instance, needs to be regularly oiled with food-grade mineral oil or sealed with a polyurethane finish to protect it from moisture and stains.
Laminate and tile surfaces are generally sealed during manufacturing or grouting, but check the manufacturer’s recommendations. Proper sealing not only extends the life of your countertop but also makes it safe and hygienic for food preparation.
The countertop transforms your dresser from a mere storage unit into a true kitchen workstation. Its selection and installation demand attention to detail, ensuring that the island is not only beautiful but also highly practical for all your culinary endeavors.
Step 5: adding final touches and maximizing functionality
With the main structure and countertop in place, the final step involves adding those crucial finishing touches that elevate your repurposed dresser from a DIY project to a fully integrated and highly functional kitchen island.
This stage is all about maximizing its utility and ensuring it looks perfectly at home in your kitchen space.
Consider how you’ll use the island most frequently. If it’s for food prep, ensure you have easy access to knives and cutting boards.
If it’s a breakfast bar, think about comfortable seating. One popular addition is a towel bar or hooks installed on the sides for dish towels, oven mitts, or even small utensils. These simple additions can dramatically improve daily convenience.
Enhancing storage and mobility
If you retained some drawers, organize them thoughtfully. Drawer dividers can help keep cutlery, linens, or small kitchen gadgets tidy.
For any open shelving you created, consider adding decorative baskets or bins to contain items like potatoes, onions, or extra dishcloths, maintaining a neat appearance while providing practical storage. This also allows for a blend of open and concealed storage, offering flexibility.
Utility hooks: For towels, mitts, or utensils.
Drawer organization: Dividers for tidiness.
Open shelving solutions: Baskets for organized storage.
Mobility options: Heavy-duty castors for flexible placement.
Adding castors (wheels) to the bottom of your island, if you haven’t already, can be a game-changer. Heavy-duty locking castors allow you to move the island for cleaning, reconfigure your kitchen layout for entertaining, or simply reposition it to suit different tasks.
This flexibility is a huge advantage, especially in smaller kitchens where space is at a premium. Ensure the castors are robust enough to support the full weight of the island, including anything stored within or on top of it.
Finally, step back and assess the overall look. Does it blend seamlessly with your kitchen, or does it stand out as a unique focal point?
Minor decorative elements, such as a small plant, a fruit bowl, or a stylish placemat, can complete the look and make the island feel like an integral part of your home.
This final stage transforms a functional piece into an inviting and aesthetically pleasing addition to your kitchen.
By thoughtfully considering these final touches, you ensure that your repurposed dresser kitchen island is not just a beautiful centerpiece but also a highly efficient and adaptable workspace that caters to all your culinary and entertaining needs.
Maintaining your repurposed kitchen island
Once your beautifully repurposed dresser kitchen island is complete, proper maintenance is key to ensuring its longevity and continued appeal.
Just like any piece of furniture in a high-traffic area, especially one exposed to food and moisture, it requires regular care to keep it looking its best. A little attention goes a long way in preserving your DIY masterpiece.
The maintenance routine will largely depend on the materials you used. For butcher block countertops, regular oiling is essential.
Use food-grade mineral oil or a specialized butcher block conditioner at least once a month, or more frequently if it starts to look dry.
This prevents the wood from cracking, repels water, and enhances its natural beauty. Wipe up spills immediately to prevent staining and water damage, regardless of the countertop material.
Cleaning and protecting finishes
For painted or stained wooden surfaces, gentle cleaning is usually sufficient. Use a soft cloth dampened with mild soap and water to wipe down the exterior.
Avoid harsh chemical cleaners, abrasive scrubbers, or excessive moisture, as these can strip the finish or damage the wood. If your island has open shelving or drawers, periodically empty and clean them to prevent dust buildup and keep stored items fresh.
Butcher block care: Regular oiling and immediate spill cleanup.
Painted/stained surfaces: Mild soap and water, avoid harsh chemicals.
Hardware maintenance: Tighten screws and clean periodically.
Structural checks: Periodically inspect for wobbles or loose joints.
Hardware, such as knobs, pulls, and hinges, should also be cleaned periodically. A quick wipe with a damp cloth is usually enough.
If any hardware becomes loose over time, simply tighten the screws to maintain functionality. For castors, ensure they roll smoothly and are free of debris, and lubricate them if necessary to prevent squeaking or sticking.
It’s also a good practice to periodically check the overall structural integrity of the island. Over time, joints can loosen with use. A quick inspection and tightening of any wobbly components will prevent larger issues down the line.
By being proactive with maintenance, you can ensure your kitchen island remains a sturdy, attractive, and functional centerpiece in your home for many years to come, a testament to the enduring value of repurposing.
Consistent care not only protects your investment but also ensures that your repurposed kitchen island continues to be a source of pride and convenience in your daily life.
It’s a small effort that yields significant returns in terms of beauty and durability.
| Key Step | Brief Description |
|---|---|
| Find & Plan | Select a sturdy dresser ($50 budget) and plan its conversion to an island, considering dimensions and desired features. |
| Prepare Base | Clean, repair, sand thoroughly, and remove dust to create a smooth, stable surface for finishing. |
| Finish Base | Paint or stain the dresser, add primer and protective coats, and update hardware to match your style. |
| Install Countertop | Measure, cut, and securely attach a durable countertop like butcher block, then seal it for protection. |


