Build a Bookshelf: Organize & Decorate for Under $60
 Building a bookshelf for under $60 is an achievable DIY project that offers both practical storage for your books and a significant enhancement to your home’s aesthetic, proving that functional decor doesn’t require a large budget.
Are you tired of cluttered spaces and unorganized books? Do you dream of a stylish display for your literary treasures without emptying your wallet? You’re in the right place.
This guide will show you how to build a bookshelf for under $60, transforming your home into a more organized and aesthetically pleasing sanctuary. It’s time to roll up your sleeves and create something beautiful and functional.
Why build a bookshelf for under $60?
Many people assume that adding significant furniture pieces to their home requires a substantial financial investment. However, this is often not the case, especially with a project like building a bookshelf.
The appeal of creating your own storage solution for under $60 lies in the unique blend of cost-effectiveness, customization, and the immense satisfaction of a DIY accomplishment. It’s about smart budgeting without compromising on style or functionality.
Beyond the financial savings, building your own bookshelf offers unparalleled opportunities for personalization.
Unlike mass-produced furniture, a DIY bookshelf can be tailored to fit your exact space, match your existing decor, and accommodate your specific collection of books and display items. This level of customization ensures that the final piece isn’t just a storage unit, but an integral part of your home’s character.
The economic advantage of DIY
The cost of pre-made bookshelves, even basic ones, can quickly add up, especially if you need specific dimensions or materials.
By choosing to build your own, you gain control over material selection and labor costs, which in this case, is free. This allows you to allocate your budget more efficiently, focusing on durable yet affordable materials that deliver maximum value.
Material Savings: Sourcing raw materials like pine planks or plywood remnants is significantly cheaper than buying finished furniture.
No Labor Costs: Your effort is the investment, saving you hundreds in assembly or delivery fees.
Tool Investment: Basic tools for this project are often multi-purpose and can be reused for future DIY endeavors.
Furthermore, the process of building something with your own hands can be incredibly rewarding. It’s an opportunity to learn new skills, challenge yourself, and develop a deeper appreciation for the items in your home.
The pride of pointing to a beautifully organized bookshelf and saying, “I built that,” is a feeling that store-bought furniture simply cannot replicate. This hands-on approach ensures that your home reflects your personality and ingenuity.
Planning your budget-friendly bookshelf design
Before you even think about cutting wood, careful planning is crucial, especially when working with a strict budget of under $60.
This phase involves sketching out your design, taking precise measurements, and making informed decisions about materials.
A well-thought-out plan will not only prevent costly mistakes but also ensure that your final bookshelf is both sturdy and aesthetically pleasing.
Consider the space where your bookshelf will reside. Will it be a tall, narrow unit for a cozy corner, or a wider, lower one to fit beneath a window?
Think about the weight of the books it will hold and any decorative items you plan to display. These considerations will influence the dimensions and the type of wood you choose, ensuring structural integrity.
Essential design considerations
Your design doesn’t have to be complex to be effective. Simple, clean lines often work best for a budget build, as they minimize cuts and material waste.
Think about the number of shelves you’ll need and the spacing between them. Adjustable shelves can be a great feature, but fixed shelves are simpler to construct and often more stable for heavy loads.
Measurements: Accurately measure the height, width, and depth of your desired space.
Shelf Spacing: Determine ideal spacing for your book collection (e.g., taller shelves for art books, standard for novels).
Aesthetics: Consider how the bookshelf will integrate with your existing room decor.
Material selection is perhaps the most critical aspect of staying under budget. Pine is an excellent choice for its affordability and workability.
Plywood, especially construction-grade plywood, can also be very cost-effective and surprisingly durable when finished properly.
Look for reclaimed wood or discounted lumber at local hardware stores or lumberyards to maximize your savings. Remember, minor imperfections can often be sanded out or even embraced as part of the rustic charm.
Gathering materials and tools for under $60
The success of building a bookshelf on a budget hinges on smart shopping and utilizing existing resources.
Aiming for under $60 means being strategic about every purchase, from lumber to fasteners. This section will guide you through acquiring everything you need without overspending, ensuring you have the right components for a sturdy and attractive finished product.
Start by inventorying any tools you already own. Many basic DIY projects require common household tools like a tape measure, a pencil, and a hand saw. If you need to purchase tools, consider buying used or borrowing from friends or family.
For materials, explore local hardware stores, lumberyards, and even online marketplaces for deals on wood and hardware. Sometimes, stores offer “cull wood” or off-cuts at significantly reduced prices.
Smart material sourcing
Pine 1×10 or 1×12 boards are typically the most cost-effective option for shelves and sides. For the back panel, a thin sheet of plywood or even hardboard can provide stability without adding much to the cost.
Don’t forget fasteners like wood screws or nails; buying them in bulk can be cheaper than small packs. Sandpaper, wood glue, and a can of paint or stain will be your finishing touches.
Lumber: Look for common pine boards, plywood, or reclaimed wood.
Fasteners: Wood screws (1.5-2 inches) or nails, depending on your preference and tools.
Adhesives: Wood glue for added strength.
Finishing supplies: Sandpaper (various grits), paint, or wood stain.
When selecting wood, always check for straightness and minimal warping. While small flaws can be corrected, severely warped boards will make assembly difficult and can compromise the structural integrity of your bookshelf.
Don’t be afraid to ask store associates for advice on the most economical and suitable materials for your project. With careful selection, you can ensure your materials are both affordable and high quality, leading to a durable and attractive bookshelf.
Step-by-step assembly of your DIY bookshelf
With your design planned and materials gathered, it’s time for the most exciting part: assembling your bookshelf. This process will transform your raw materials into a functional and decorative piece for your home.
Taking your time and following each step carefully will ensure a professional-looking result and a sturdy structure that will last for years.
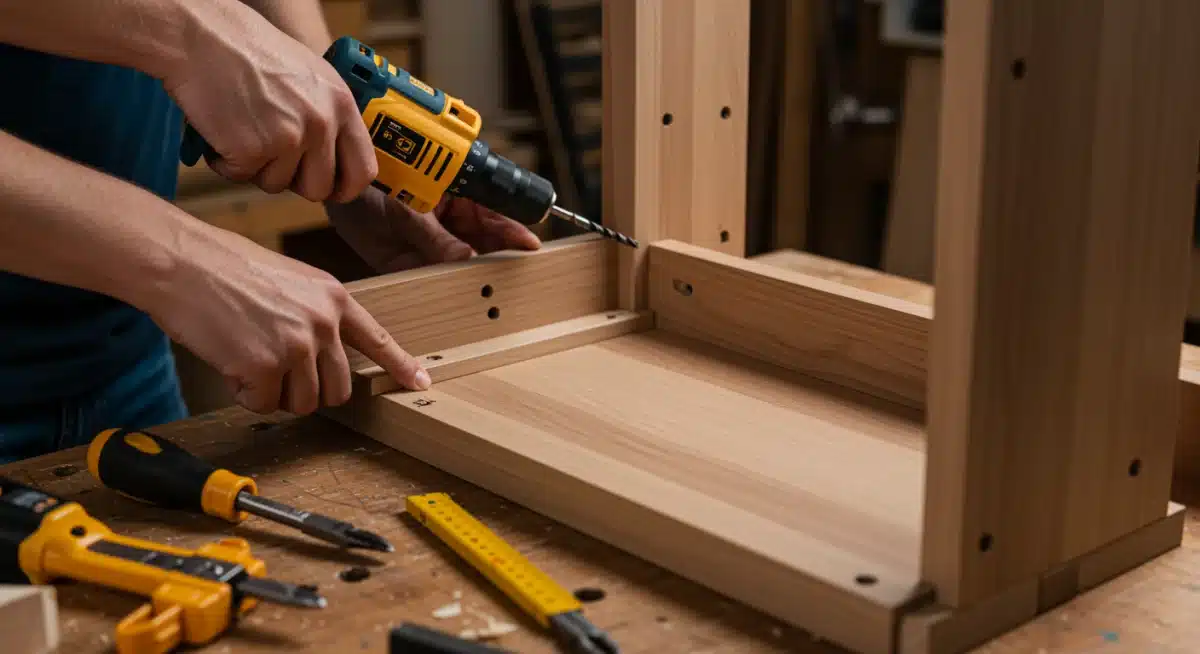
Begin by cutting all your wood pieces to the precise dimensions outlined in your plan. Accuracy here is paramount, so double-check each measurement before making a cut.
A miter box or a circular saw with a guide can help achieve straight, clean cuts. Once all pieces are cut, a light sanding will remove any splinters and prepare the wood for assembly and finishing.
Assembly stages for a sturdy build
Start by attaching the side panels to the bottom shelf. Use wood glue on the edges for added strength, then secure with screws or nails.
Pre-drilling pilot holes for screws is highly recommended to prevent wood splitting, especially near edges. Repeat this process for the top shelf, ensuring everything is square and level before moving on to the intermediate shelves.
Cut and Sand: Precisely cut all wood pieces and sand them smooth.
Assemble Base: Attach side panels to the bottom and top shelves.
Install Shelves: Secure intermediate shelves at desired heights.
Add Back Panel: Fasten the back panel for stability.
For the intermediate shelves, mark their positions clearly on the inside of the side panels. Again, use wood glue and secure with screws or nails.
If you opted for adjustable shelves, install shelf pins at this stage. Finally, attach the back panel. This can be a thin piece of plywood or hardboard, nailed or screwed to the back edges of the entire structure.
The back panel significantly enhances the bookshelf’s stability and prevents it from racking. Take a step back and admire your progress; the structure is now complete.
Finishing touches: painting, staining, and decorating
Once your bookshelf is fully assembled, the finishing touches are what truly bring it to life and integrate it seamlessly into your home decor.
This stage allows for immense creativity, whether you prefer a classic stained look, a vibrant painted finish, or a minimalist natural wood appearance.
The right finish not only protects the wood but also elevates the aesthetic appeal of your new storage solution.
Before applying any finish, give the entire bookshelf a final, thorough sanding. Start with a medium-grit sandpaper (around 120-150) to smooth any rough spots, then move to a finer grit (200-220) for a silky-smooth surface.
Wipe away all dust with a tack cloth or a damp rag. This preparation is critical for an even and professional-looking finish, ensuring the paint or stain adheres properly.
Choosing your perfect finish
For a painted finish, apply a primer first, especially if using a light color on dark wood. This helps achieve true color and better adhesion.
Apply paint in thin, even coats, allowing each coat to dry completely before applying the next. For a stained finish, apply the stain evenly with a brush or rag, wiping off excess according to the product instructions.
Always test stain colors on a scrap piece of the same wood to ensure you like the result.
Sanding: Smooth all surfaces thoroughly for an even finish.
Primer/Stain Application: Apply primer for paint or chosen stain evenly.
Top Coat: Finish with a protective clear coat for durability.
Decorate: Arrange books and decorative items thoughtfully.
After the paint or stain has fully dried, consider adding a protective top coat, such as polyurethane or a clear varnish. This will guard against scratches, moisture, and general wear and tear, significantly extending the life of your bookshelf.
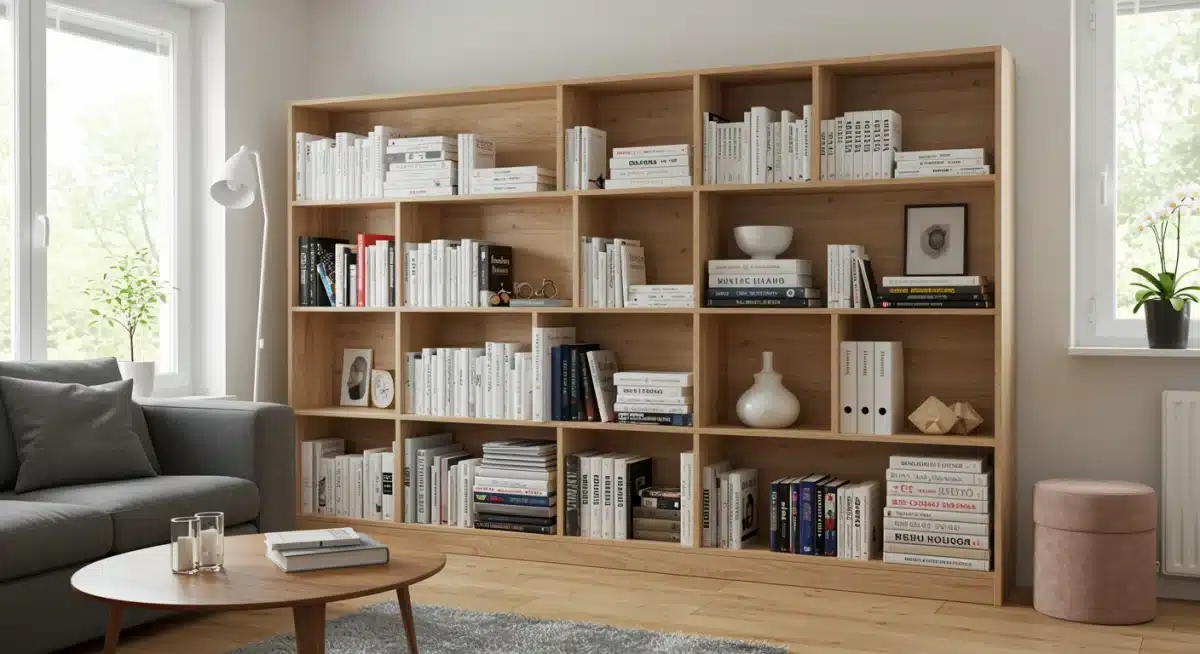
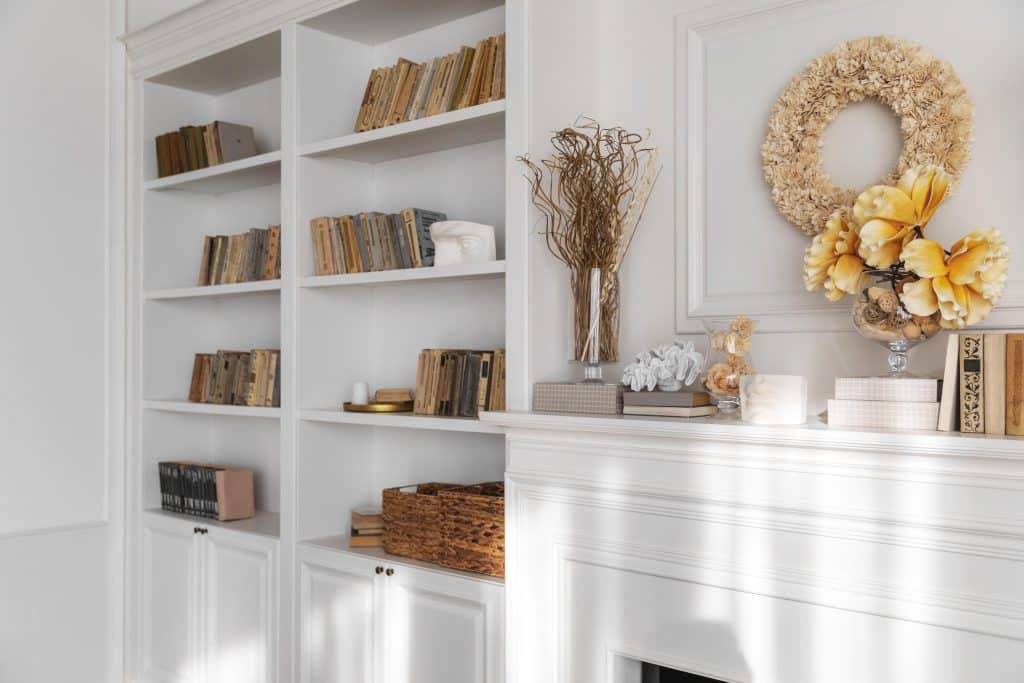
Finally, it’s time to decorate! Arrange your books, add potted plants, framed photos, or small sculptures to personalize your new display. Remember, a well-decorated bookshelf is not just storage; it’s a focal point that reflects your personality and style.
Organizing and styling your new bookshelf
Once your beautiful, budget-friendly bookshelf is built and finished, the next exciting step is to fill it. Organizing and styling your bookshelf goes beyond simply stacking books; it’s an art form that can transform a functional storage unit into a captivating display.
A thoughtfully arranged bookshelf can enhance the overall aesthetic of your room, making it feel more inviting and personalized.
Start by decluttering your book collection. Decide which books you truly want to display and which can be stored elsewhere or perhaps donated.
This initial purge helps create a more curated look. When arranging, don’t be afraid to mix things up. Varying the orientation of books – some stacked horizontally, others vertically – adds visual interest and breaks up the monotony of uniform rows.
Creative styling techniques
Introduce decorative elements to complement your books. Small plants, framed photographs, unique trinkets, or even empty decorative boxes can add texture, color, and personality.
Group items in odd numbers, like threes, as this often creates a more pleasing visual balance. Leave some negative space on your shelves; not every inch needs to be filled, allowing the eye to rest and appreciate individual items.
Vary Orientation: Mix horizontal stacks with vertical rows of books.
Incorporate Decor: Add plants, photos, and small sculptures.
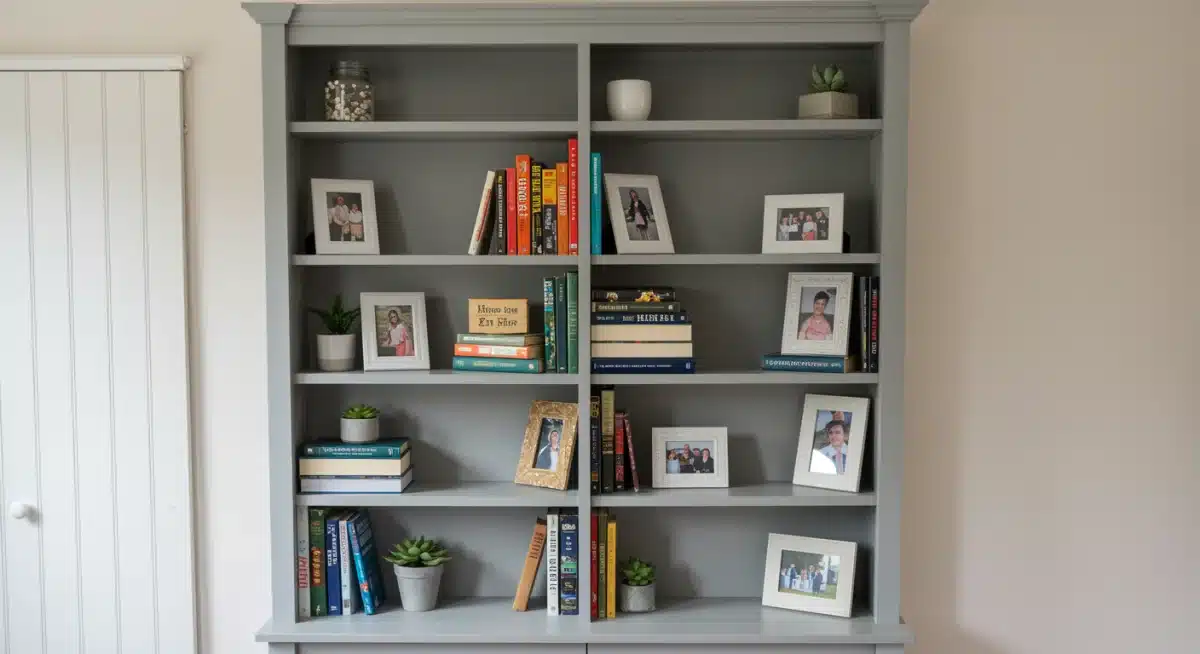
Color Coordination: Arrange books by color for a cohesive look, or by genre for practicality.
Balance: Distribute visual weight evenly across shelves.
Consider color coordinating your books for a sophisticated look, or arrange them by genre or author for easy access.
Remember that your bookshelf is a reflection of you, so let your personality shine through. Don’t be afraid to experiment with different arrangements until you find a style that feels right.
The goal is to create a display that is both functional for organizing your books and aesthetically pleasing, serving as a true decorative asset to your home.
Maintaining and adapting your budget bookshelf
Building a bookshelf for under $60 is a fantastic achievement, but ensuring its longevity and continued relevance requires a bit of maintenance and a willingness to adapt.
A well-cared-for DIY piece can serve your organizational and decorative needs for many years, proving its value far beyond its initial low cost. Regular attention will prevent minor issues from becoming major problems.
Dusting regularly is the simplest yet most effective way to maintain your bookshelf’s appearance. Use a soft cloth or a duster to gently clean shelves and books.
For painted or stained surfaces, occasional wiping with a damp cloth (followed by a dry one) can remove grime without damaging the finish. Avoid harsh chemical cleaners, as they can strip finishes and dull the wood over time.
Ensuring longevity and flexibility
Over time, you might find that your book collection grows, or your decorative style evolves. A well-built DIY bookshelf can often be adapted to these changes.
If you initially built fixed shelves, consider if you can add or modify them to be adjustable. You might also want to repaint or restain the bookshelf to match a new room aesthetic, giving it a fresh lease on life.
Regular Cleaning: Dust and wipe down surfaces to keep it looking fresh.
Weight Distribution: Avoid overloading shelves to prevent bowing or structural stress.
Inspect Regularly: Check for loose screws or joints and tighten as needed.
Adapt and Refresh: Consider repainting or restaining for a new look.
Periodically inspect the bookshelf for any signs of wear and tear, such as loose screws, wobbly joints, or scratches. Address these issues promptly to prevent further damage.
Tighten any loose fasteners and touch up paint or stain as needed. By taking these proactive steps, your budget-friendly bookshelf will remain a functional and beautiful part of your home for years to come, truly embodying the spirit of smart home hacks and DIY ingenuity.
| Key Aspect | Brief Description |
|---|---|
| Budget Focus | Achieve a stylish bookshelf for under $60 by smart material sourcing and DIY labor. |
| Design & Planning | Careful measurements and material selection are crucial for success and cost efficiency. |
| Assembly Process | Step-by-step construction, emphasizing precision and structural integrity with basic tools. |
| Finishing & Styling | Personalize with paint/stain and creative decoration for aesthetic enhancement. |
Frequently asked questions about DIY bookshelves
For a budget-friendly bookshelf, pine is an excellent choice due to its affordability and ease of workability. Common pine boards, often available at local hardware stores, offer good strength for books when properly supported.
Plywood can also be a cost-effective option, particularly for larger shelves or the back panel, providing stability and a smooth surface for finishing.
Absolutely. A sturdy bookshelf can be built using basic hand tools such as a hand saw, tape measure, pencil, hammer or screwdriver, and sandpaper. While power tools can speed up the process, they are not strictly necessary.
Precision in measuring and cutting, along with the correct use of wood glue and fasteners, is more important than specialized equipment for a durable result.
To ensure stability, always use wood glue in addition to screws or nails at every joint. Ensure all cuts are square, and assemble the frame on a flat surface.
Attaching a thin plywood or hardboard back panel significantly increases rigidity and prevents wobbling. Additionally, consider anchoring taller bookshelves to the wall for added safety, especially in homes with children or pets.
Decorate your budget bookshelf by mixing horizontal and vertical book stacks. Incorporate small decorative items like potted plants, framed photos, or unique trinkets.
Vary textures and colors, and don’t be afraid to leave some empty space for a cleaner look. You can also paint the back panel a contrasting color or add peel-and-stick wallpaper for an extra pop of style.
Yes, making adjustable shelves is entirely possible and adds great versatility. You can drill a series of evenly spaced holes along the inside edges of the side panels using a shelf pin jig.
Then, simply insert shelf pins into the desired holes, and rest your shelves on top. This allows you to reconfigure shelf heights as your storage needs change over time.
Conclusion
Embarking on a DIY project to build a bookshelf for under $60 is more than just a cost-saving endeavor; it’s an opportunity to infuse your home with personal style and functional organization.
From meticulous planning and smart material sourcing to the satisfaction of assembly and creative decoration, every step of this process contributes to a unique piece that reflects your ingenuity.
Not only will you conquer clutter and display your cherished books beautifully, but you’ll also gain valuable skills and a deep sense of accomplishment.
This project proves that with a little effort and creativity, anyone can achieve significant home improvements on a budget, creating spaces that are both practical and profoundly personal.


