Build a Deck: Construct a 10×12 Deck for Under $1,500
Dreaming of a beautiful outdoor space without breaking the bank? You can absolutely build a 10×12 deck for under $1,500 with the right plans and a bit of elbow grease. This guide will walk you through every step, proving that an inviting backyard oasis is within reach for any DIY enthusiast.
Planning Your Budget-Friendly 10×12 Deck
Before you even think about swinging a hammer, meticulous planning is the cornerstone of a successful and affordable deck project.
This initial phase dictates everything from material costs to the timeline, ensuring you stay within your $1,500 budget for a 10×12 deck.
Understanding local building codes and obtaining necessary permits are non-negotiable steps that prevent future headaches and costly rectifications.
Careful consideration of your deck’s location, ensuring it complements your home’s architecture and maximizes sunlight or shade, is also crucial.
Sketching out a detailed design, even a simple one, helps visualize the final product and identify potential challenges early on. This preparation saves time and money by avoiding mid-project changes.
Understanding Local Codes and Permits
Every municipality has specific regulations governing deck construction. These codes dictate everything from foundation depth and ledger board attachment to railing height and stair dimensions.
Ignoring these can lead to fines, demolition orders, or even safety hazards. Before purchasing any materials, visit your local building department.
Jurisdiction Review: Confirm local building codes and zoning requirements.
Permit Application: Submit detailed plans to obtain the necessary building permits.
Inspection Schedule: Understand the required inspection points throughout construction.
Safety First: Adhering to codes ensures the structural integrity and safety of your deck.
Designing for Affordability and Functionality
A 10×12 deck is a practical size, offering enough space for a small dining set or a couple of lounge chairs without overwhelming a typical backyard.
To keep costs down, opt for a simple, rectangular design. Complex shapes, multiple levels, or intricate railing systems significantly increase material and labor expenses.
Focus on functionality. Consider how you will use the deck. Is it for grilling, relaxing, or entertaining? A straightforward design allows you to allocate more of your budget to quality structural components, ensuring longevity and safety.
Remember that simplicity often translates to elegance, especially in a budget-conscious project.
In summary, thorough planning, adherence to local regulations, and a smart, simple design approach are paramount.
These initial steps, though seemingly tedious, are vital for ensuring your 10×12 deck project remains affordable, safe, and ultimately, enjoyable.
Sourcing Materials: Maximizing Value for Your 10×12 Deck
One of the most significant factors in keeping your 10×12 deck project under $1,500 is strategic material sourcing.
The choices you make here will directly impact your budget. Opting for cost-effective yet durable materials is key.
Pressure-treated lumber is often the go-to for its resistance to rot and insects, offering excellent value for money.
Exploring local lumberyards, big-box stores, and even reclaimed material options can yield substantial savings. Don’t underestimate the power of comparison shopping and looking for sales or clearance items. Every dollar saved on materials directly contributes to staying within your ambitious budget.
Choosing Cost-Effective Lumber
For a budget-friendly deck, pressure-treated pine is your best friend. It’s affordable, widely available, and designed to withstand outdoor elements.
While composite decking offers low maintenance, its initial cost can be three to five times higher than pressure-treated lumber, pushing you well over the $1,500 mark.
When selecting pressure-treated lumber, look for grades that offer a good balance between appearance and strength.
Standard grades are usually sufficient for framing. For decking boards, you can choose between common grades, which might have some knots or imperfections, or select grades for a cleaner look, often at a slightly higher price. Consider:
Pressure-Treated Pine: Excellent rot and insect resistance at an affordable price.
Dimensional Lumber: Standard sizes (2×6, 2×8, 4×4) are more economical.
Bulk Purchases: Buying larger quantities from lumberyards can sometimes offer discounts.
Local Availability: Source from suppliers close to you to minimize delivery costs.
Hardware and Fasteners on a Budget
While lumber is the biggest expense, don’t overlook the cost of hardware and fasteners. Using galvanized or stainless steel screws, bolts, and connectors is essential for outdoor durability.
Skimping on these can compromise the structural integrity of your deck.
Look for bulk packs of screws and connectors; these are often more cost-effective than buying smaller quantities.
Deck screws are specifically designed for outdoor use and provide superior holding power compared to standard wood screws.
Also, consider using joist hangers and post bases to reinforce connections, ensuring your deck is robust and safe.
To summarize, smart material choices, focusing on pressure-treated lumber for its affordability and durability, coupled with economical yet robust hardware, are crucial for staying under budget.
Always prioritize structural integrity and safety when making material decisions, even on a tight budget.
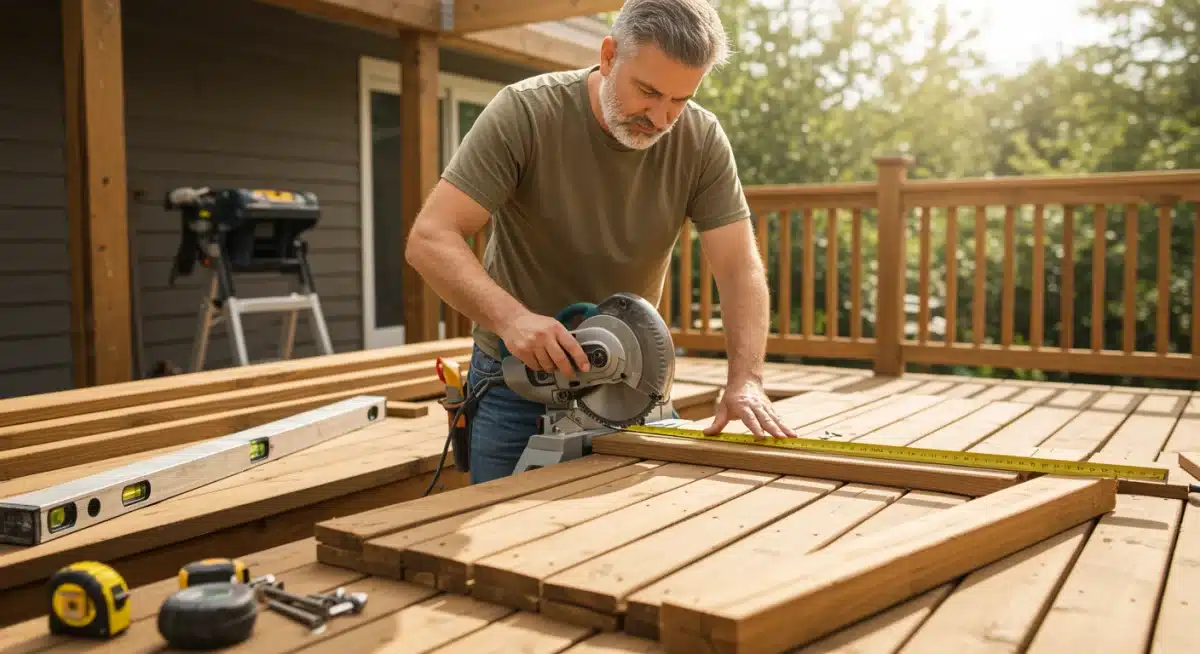
Essential Tools and Site Preparation for Your Deck
Having the right tools is crucial for any DIY project, and building a 10×12 deck is no exception. While you don’t need a professional-grade workshop, a few key tools will make the job much easier and safer.
For a budget-conscious project, consider borrowing tools from friends or renting specialized equipment that you won’t use frequently. This approach helps keep your initial investment low.
Site preparation is the unsung hero of deck building. A properly prepared site ensures a stable foundation, good drainage, and a level surface, all of which contribute to the longevity and safety of your new outdoor space.
Rushing this stage can lead to significant problems down the line, so take your time and do it right.
Must-Have Tools for Deck Construction
You’ll need a mix of hand tools and power tools. For measuring and marking, a tape measure, carpenter’s square, and chalk line are indispensable.
For cutting, a circular saw will be your primary power tool for lumber, while a miter saw can offer more precision for decking boards if available. A drill/driver is essential for fastening.
Measuring & Marking: Tape measure, carpenter’s square, chalk line, level.
Cutting: Circular saw (essential), miter saw (highly recommended for precision).
Fastening: Cordless drill/driver, impact driver (for heavy-duty screws).
Digging: Post-hole digger, shovel.
Safety Gear: Safety glasses, gloves, ear protection.
Consider renting a post-hole digger if you have many footings to install, as this can save your back and significant time. Always prioritize safety; wear appropriate personal protective equipment (PPE) for every task.
Preparing the Site for Foundation Installation
Site preparation begins with clearing the area where your deck will sit. Remove any vegetation, rocks, or debris. Once cleared, mark out the exact dimensions of your 10×12 deck.
Use stakes and string to create a clear outline, ensuring it’s square and level. This step is critical for accurate foundation placement.
Next, assess the drainage. You want to ensure water will flow away from your house and deck foundation.
If the area tends to collect water, you might need to grade the soil slightly. Finally, dig the footings according to your local building codes.
These typically involve digging holes below the frost line and filling them with concrete to support the deck posts.
In conclusion, a well-equipped toolkit, combined with meticulous site preparation, lays a solid groundwork for your 10×12 deck. By borrowing or renting tools and carefully preparing your site, you ensure a smoother, safer, and more efficient construction process, all while staying within your budget.
Building the Foundation and Frame for Your 10×12 Deck
The foundation and frame are the backbone of your 10×12 deck, providing the structural integrity and support for everything else.
This stage requires precision and adherence to building codes to ensure a safe and long-lasting structure.
Even with a budget of under $1,500, quality cannot be compromised here. Taking the time to accurately measure, cut, and secure each component will pay dividends in the deck’s stability and your peace of mind.
The process generally involves installing concrete footings, attaching a ledger board to your house (if applicable), and then constructing the main support beams and joists. Each step builds upon the last, so accuracy at every turn is paramount.
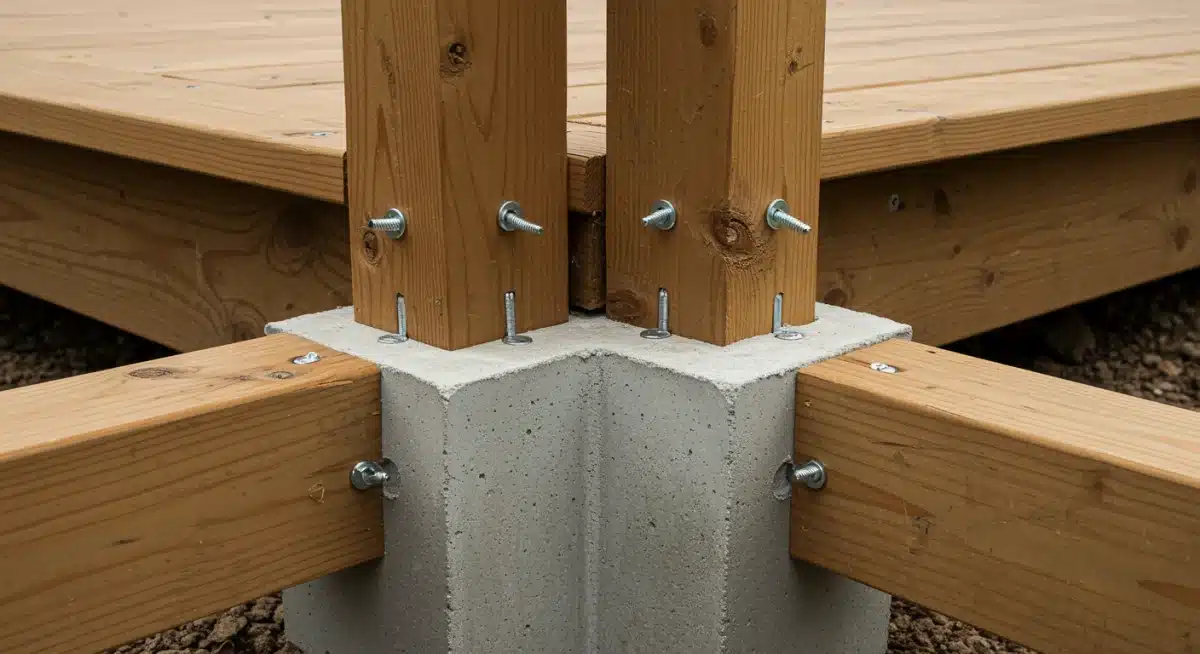
Installing Footings and Posts
After your site is prepared and footing holes are dug, it’s time to pour the concrete. Ensure the concrete footings extend below the frost line in your region to prevent frost heave, which can damage your deck over time.
Once the concrete is set, attach post bases to the footings and then secure your pressure-treated 4×4 or 6×6 posts.
Make sure all posts are plumb and at the correct height. You’ll likely need to cut them to size after they are secured in place, ensuring the top of the posts creates a level plane for your beams. Use a string line and a level extensively during this phase to maintain accuracy.
Remember that the posts directly support the weight of the deck, so their stability is critical.
Constructing the Ledger Board and Beams
If your deck is attached to your house, the ledger board is the first and most critical framing member. This heavy-duty board (typically 2×10 or 2×12 pressure-treated lumber) must be securely fastened to the house’s rim joist using lag screws or structural screws, with flashing installed above it to prevent water intrusion into your home’s structure. This connection is vital for the deck’s stability.
Next, install the main support beams. These beams typically run perpendicular to the ledger board and rest on top of or are attached to the posts.
Use joist hangers or appropriate connectors to secure the beams to the posts and to each other, creating a robust framework. Double-check all measurements and ensure the beams are perfectly level and square.
Framing the Deck Joists
With the ledger board and beams in place, you can now install the deck joists. Joists are typically 2×8 or 2×10 lumber, spaced 16 or 24 inches on center, depending on your decking material and local codes.
Attach joist hangers to the ledger board and beams, then fit the joists into these hangers, securing them with appropriate nails or screws.
Ensure all joists are level and parallel. A properly framed deck will have a slight slope (typically 1/4 inch per foot) away from the house to allow for water runoff, preventing puddling on your deck surface.
This slope is usually achieved by setting the ledger board slightly higher than the outer beam or by using shims. The framing provides the essential support for your decking, so precision is key here.
In essence, building a sturdy foundation and frame requires patience and meticulous attention to detail. By carefully installing footings, securely attaching the ledger board, and precisely framing the beams and joists, you establish a safe and durable base for your affordable 10×12 deck.
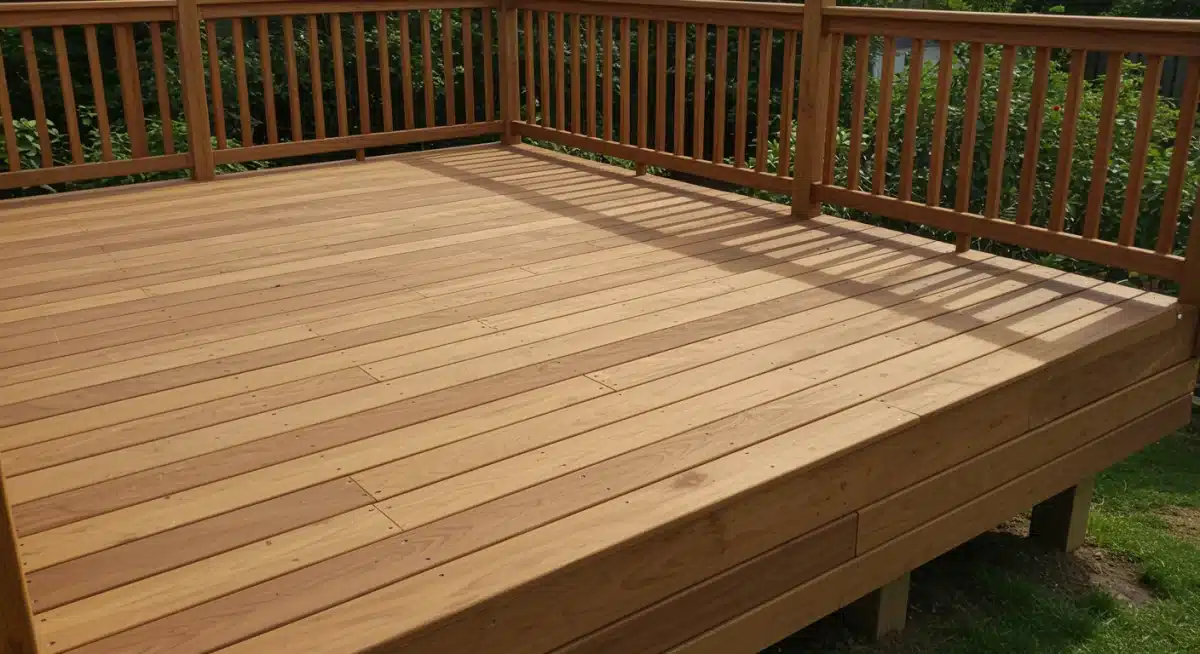
Installing Decking and Railings on Your 10×12 Deck
With the foundation and frame complete, the exciting part begins: installing the decking and railings. This is where your 10×12 deck starts to take its final shape and become a functional outdoor living space.
Choosing the right decking material, even on a budget, is important for both aesthetics and longevity. Similarly, a well-constructed railing system is not just for looks; it’s a critical safety feature.
Patience and precision remain key during this stage. While it might be tempting to rush, taking your time to properly space boards and secure railings will ensure a professional-looking and safe finish that will last for years.
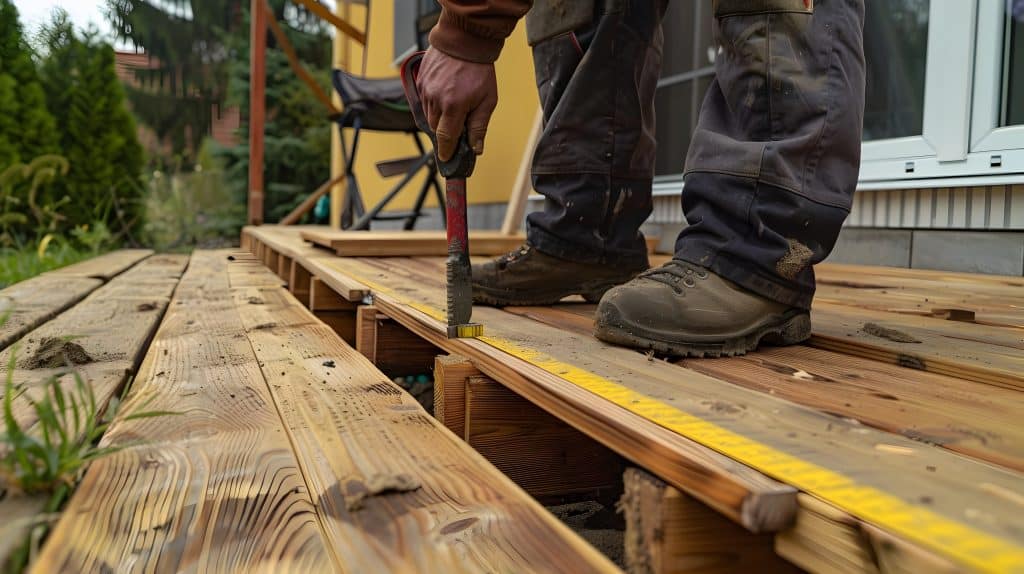
Laying the Decking Boards
For a budget-friendly deck, pressure-treated pine decking boards are the most common choice. Start by laying your first board perfectly straight and parallel to the house, leaving a small gap (usually 1/8 inch) for expansion and drainage.
Use deck screws to fasten the boards to each joist. Pre-drilling pilot holes can prevent splitting, especially near the ends of the boards.
Maintain consistent spacing between boards using spacers or even a spare nail. This ensures proper drainage and allows for the natural expansion and contraction of the wood.
When you reach the end of a board, ensure it lands on a joist for proper support. Stagger end joints across different joists for a stronger and more visually appealing surface.
Consider using hidden fasteners for a cleaner look, though these can add to the cost. For a budget approach, visible deck screws are perfectly functional and secure. Ensure all screws are driven flush with or slightly below the surface to prevent tripping hazards and water pooling.
Building and Installing Railings
Deck railings are a mandatory safety feature for most decks, especially if they are elevated. Local codes typically specify minimum height requirements (often 36 or 42 inches). For a budget-friendly approach, use simple pressure-treated 2x4s and 4x4s for posts, top rails, and balusters.
Post Installation: Secure 4×4 posts to the deck frame using through-bolts or specialized post-to-frame connectors. Ensure they are plumb and sturdy.
Top and Bottom Rails: Attach 2×4 rails horizontally between the posts, typically with the top rail at code-mandated height and a bottom rail a few inches above the deck surface.
Baluster Spacing: Install balusters (vertical pickets, usually 2x2s) between the top and bottom rails. Code usually requires that a 4-inch sphere cannot pass through any opening.
Gate Considerations: If your deck requires a gate, plan for its construction and hardware.
Always double-check local codes for specific railing requirements, including load-bearing capacity.
Constructing a simple, sturdy railing system with pressure-treated lumber is an excellent way to meet safety standards without exceeding your $1,500 budget.
A well-built railing not only provides safety but also defines the perimeter of your 10×12 deck, enhancing its overall appearance.
In summary, installing the decking and railings transforms your framed structure into a usable space. By carefully laying decking boards and constructing a code-compliant railing system with cost-effective materials, you bring your affordable 10×12 deck project to a safe and satisfying completion.
Finishing Touches and Maintenance for Longevity
Once your 10×12 deck is built, the work isn’t quite over. The finishing touches and ongoing maintenance are crucial for protecting your investment, enhancing its appearance, and ensuring its longevity.
These final steps, while often overlooked, play a significant role in how well your budget deck stands up to the elements and everyday use.
Proper sealing, staining, or painting not only makes your deck look great but also creates a barrier against moisture, UV rays, and mildew. Regular cleaning and inspection will catch minor issues before they become major problems, saving you money in the long run.
Sealing, Staining, or Painting Your Deck
After your pressure-treated lumber has had time to dry out (usually a few weeks to several months, depending on climate and lumber moisture content), it’s time to apply a protective finish.
This step is vital for extending the life of your deck and maintaining its appearance. There are generally three options:
Clear Sealer: Protects the wood from moisture while allowing its natural grain to show through.
Semi-Transparent Stain: Adds a touch of color while still revealing some wood grain, offering good UV protection.
Solid Stain or Paint: Provides opaque color and maximum UV protection, covering the wood grain entirely.
For a budget project, a good quality clear sealer or semi-transparent stain offers excellent protection without a high cost.
Always clean the deck thoroughly before applying any finish to ensure proper adhesion and a smooth result. Follow manufacturer instructions for application and drying times.
Regular Cleaning and Inspection Routine
Even with a protective finish, your deck will require regular cleaning and inspection. Dirt, debris, and mildew can accumulate, making the deck slippery and accelerating wear.
A simple cleaning routine can make a huge difference in its lifespan.
Periodically inspect your deck for loose fasteners, cracked boards, or signs of rot, especially in areas prone to moisture.
Address any issues promptly. Tighten screws, replace damaged boards, and reapply sealant as needed. Catching problems early prevents them from escalating into more expensive repairs.
Regular maintenance ensures your 10×12 deck remains a safe and attractive feature of your home for many years.
It’s an investment of time that protects your initial financial investment, showcasing that even a budget-friendly deck can offer lasting value and enjoyment.
Budget Management and Cost-Saving Tips for Your Deck Project
Sticking to a $1,500 budget for a 10×12 deck requires diligent budget management and smart cost-saving strategies.
This isn’t just about finding the cheapest materials; it’s about making informed decisions at every stage of the project to maximize value without compromising safety or structural integrity.
Every dollar saved on one aspect can be reallocated to another, or simply kept in your pocket.
From material sourcing to tool acquisition, there are numerous opportunities to cut costs.
Being flexible, resourceful, and patient will be your best allies in achieving your financial goal.
Smart Shopping and Material Alternatives
Comparison shopping is your most powerful tool. Get quotes from multiple lumberyards and big-box stores.
Don’t be afraid to ask for discounts on bulk purchases or inquire about damaged but usable lumber at reduced prices. Sometimes, a slightly imperfect board can be cut around or used in a less visible area.
Consider reclaimed materials for non-structural elements like railing infill, if local codes permit.
While not always easy to find, reclaimed wood can offer unique character at a fraction of the cost.
Always prioritize pressure-treated lumber for structural components due to its essential protective qualities.
DIY Labor and Tool Management
The biggest cost-saver for this project is undoubtedly your own labor. By doing the work yourself, you eliminate significant contractor fees.
If you’re new to DIY, watch tutorials, read guides, and don’t hesitate to ask for advice from experienced friends or local hardware store experts.
Borrow Tools: Ask friends or family if you can borrow tools you’ll only use once or twice.
Rent Specialized Equipment: For tasks like digging post holes, renting equipment is more cost-effective than buying.
Plan Efficiently: Minimize waste by carefully planning cuts and layouts before you start sawing.
Recycle/Sell Scraps: Don’t just throw away usable lumber scraps; they might be useful for smaller projects or could be sold.
By taking on the labor yourself and managing your tools wisely, you significantly reduce the overall project cost.
This hands-on approach not only saves money but also provides a deep sense of accomplishment once your beautiful, budget-friendly 10×12 deck is complete.
To conclude, successful budget management for your 10×12 deck involves strategic material sourcing, embracing DIY labor, and smart tool management.
These practices ensure you achieve a functional and attractive outdoor space without exceeding your $1,500 financial target.
| Key Aspect | Brief Description |
|---|---|
| Budget Planning | Crucial for staying under $1,500; includes material costs, permits, and tool considerations. |
| Material Sourcing | Choose pressure-treated lumber and compare prices from various suppliers for savings. |
| DIY Labor | Performing the construction yourself significantly reduces overall project costs. |
| Maintenance | Regular cleaning and sealing extend the deck’s lifespan and protect your investment. |
Conclusion
Building a 10×12 deck for under $1,500 is an ambitious yet entirely achievable goal for the dedicated DIYer.
This comprehensive guide has walked you through each critical phase, from meticulous planning and strategic material sourcing to robust construction and essential maintenance.
By embracing cost-effective lumber, utilizing your own labor, and adhering to local building codes, you can transform your backyard into a functional and inviting outdoor sanctuary without excessive financial strain.
The satisfaction of stepping onto a deck you built yourself, knowing you stayed within budget, is an invaluable reward. Remember, patience, precision, and a commitment to safety are your most important tools throughout this exciting home improvement journey.


