Maximize Natural Light: 5 DIY Window Treatment Ideas for 2026

 Are you looking to brighten up your living space and create a more inviting atmosphere? Learning how to maximize natural light: 5 DIY window treatment ideas for your home in 2026 can transform any room, making it feel larger, more vibrant, and more energy-efficient. This guide will walk you through creative and achievable DIY projects to harness the power of the sun in your home.
Understanding the Benefits of Natural Light
Before diving into specific DIY projects, it’s essential to appreciate why maximizing natural light is so beneficial. Beyond simply making a room brighter, natural light has profound impacts on our well-being, our homes’ energy consumption, and even our daily productivity. In 2026, with an increasing focus on sustainable living and personal wellness, optimizing natural light is more relevant than ever.
Natural light, particularly sunlight, is a natural disinfectant and mood booster. Exposure to natural light helps regulate our circadian rhythms, improving sleep quality and overall mood. Studies have shown that ample natural light can reduce symptoms of seasonal affective disorder (SAD) and increase productivity in workspaces. For homeowners, this translates to a healthier and happier living environment.
Health and Wellness Advantages
The human body thrives on natural light. Our internal clocks are largely synchronized by the light and dark cycles of our environment. When we spend too much time in artificially lit spaces, these cycles can be disrupted, leading to fatigue, irritability, and even long-term health issues. Maximizing natural light exposure can:
Improve mood and reduce stress.
Enhance cognitive function and alertness.
Boost vitamin D synthesis, crucial for bone health and immunity.
Regulate sleep patterns, leading to more restful nights.
These benefits extend beyond individual well-being, contributing to a more harmonious household dynamic. A well-lit home feels more welcoming and conducive to positive interactions.
Energy Efficiency and Cost Savings
One of the most tangible benefits of maximizing natural light is its impact on energy consumption. By allowing more sunlight into your home, you naturally reduce the need for artificial lighting during the day. This can lead to significant savings on your electricity bills, a crucial consideration for any budget-conscious homeowner in 2026.
Furthermore, strategic use of natural light can also influence your home’s heating and cooling needs. During colder months, sunlight can provide passive solar heating, reducing reliance on your furnace.
In warmer months, certain window treatments can filter intense sunlight, preventing excessive heat gain and easing the load on your air conditioning system. This dual benefit makes natural light a powerful tool for sustainable living.
Understanding these comprehensive benefits sets the stage for appreciating the value of DIY window treatments designed to enhance natural light. It’s not just about aesthetics; it’s about creating a healthier, more efficient, and more enjoyable home.
DIY Idea 1: Sheer Curtains and Drapes
Sheer curtains and drapes are perhaps the simplest yet most effective DIY window treatments for maximizing natural light while maintaining a degree of privacy. Their translucent fabric allows sunlight to filter through, softening its intensity and diffusing it evenly across a room, creating a gentle and inviting ambiance. This approach is highly versatile and can be adapted to almost any home decor style.
Choosing the right sheer fabric is crucial. Opt for lightweight materials like linen, cotton voile, or synthetic blends that offer durability and easy maintenance.
The color also plays a significant role; white and light-colored sheers will reflect more light, further brightening the space, while slightly tinted sheers can add a subtle wash of color without blocking much light.
Selecting the Perfect Sheer Fabric
When embarking on this DIY project, consider the specific needs of your room. For instance, a living room might benefit from a more decorative sheer, while a bedroom might require a slightly denser weave for added privacy in the evenings.
The key is balance – you want enough transparency to let the light in, but enough opacity to prevent a completely exposed feeling.
Fabric weight: Lighter fabrics allow for maximum light penetration and a graceful drape.
Color: White, cream, and very light pastels are ideal for reflecting light.
Texture: A subtle texture can add visual interest without compromising light.
Maintenance: Choose fabrics that are easy to wash and care for at home.
Measuring accurately is paramount for a professional finish. Ensure your curtains are wide enough to cover the window when closed, with enough extra fabric for a pleasing gather. For length, decide whether you prefer them to just skim the floor, puddle slightly, or end at the windowsill, each offering a different aesthetic.
Installation Tips for an Airy Feel
The way you hang your sheer curtains can significantly impact the amount of light that enters your room. To truly maximize natural light, consider hanging your curtain rod wider and higher than the window frame. This allows the curtains to be drawn back completely, revealing the full window and preventing any fabric from obstructing the light.
Mounting the rod several inches above the window frame and extending it beyond the frame on both sides creates the illusion of a larger window and ensures that when the curtains are open, they stack neatly against the wall, not over the glass. This simple technique can make a dramatic difference in how much natural light your room receives.
Furthermore, using lightweight curtain rods and decorative finials can enhance the airy feel. For a truly DIY approach, you can even craft your own curtain rods from reclaimed wood or metal pipes, adding a unique, personal touch to your window treatments. Sheer curtains are a fantastic starting point for any homeowner looking to brighten their space efficiently and stylishly.
DIY Idea 2: Custom-Fit Cafe Curtains

Cafe curtains offer a charming and practical solution for homeowners seeking to maximize natural light while maintaining lower-level privacy.
These curtains typically cover only the bottom half of a window, leaving the top half exposed to let in unobstructed sunlight and views of the sky. This style is particularly effective in kitchens, bathrooms, and dining areas where privacy is needed for eye-level activities, but upper light is still desired.
The beauty of cafe curtains lies in their simplicity and the ease with which they can be customized. As a DIY project, they allow for a wide range of fabric choices, patterns, and hanging methods, ensuring they perfectly complement your home’s aesthetic. You can use anything from crisp cotton to delicate lace, depending on the desired look and light filtration.
Designing Your Cafe Curtains
When designing your custom-fit cafe curtains, consider the overall style of the room. For a farmhouse look, opt for gingham or plaid fabrics. For a more minimalist or modern aesthetic, solid linen or cotton will work best. The length of the curtains is also important; they should ideally cover the bottom half of the window, extending just past the windowsill or to the bottom of the frame.
Fabric choice: Light-colored, semi-sheer fabrics are best for light maximization.
Pattern: Small patterns or solids can maintain a clean, uncluttered look.
Length: Measure from the midpoint of your window down to where you want the curtain to end.
Width: Allow for 1.5 to 2 times the width of your window for a nice gather.
The DIY aspect allows you to select fabrics that might be hard to find in pre-made options, giving your windows a truly unique character. Don’t be afraid to experiment with different textures and colors that resonate with your personal taste and decor.
Installation and Light Optimization
Installing cafe curtains is straightforward, usually involving a tension rod or a small decorative rod mounted halfway up the window frame. The placement of the rod is key to balancing light and privacy. For maximum light, ensure the rod is positioned exactly at the window’s midpoint or slightly below, leaving the upper pane completely clear.
For an even more customized look, consider adding a decorative trim or a contrasting border to the bottom edge of your cafe curtains. This small detail can elevate the entire look and make your DIY project feel professionally done. Cafe curtains are an excellent way to introduce natural light while adding a touch of charm and personality to your home without sacrificing essential privacy.
DIY Idea 3: Light-Filtering Roman Shades
Roman shades offer a sophisticated and clean aesthetic, and when crafted from light-filtering fabrics, they are an excellent DIY option for maximizing natural light. Unlike traditional blinds, Roman shades fold neatly into soft pleats when raised, creating a streamlined look that doesn’t obstruct the window. When lowered, light-filtering fabrics allow diffused light to enter the room, offering privacy without plunging the space into darkness.
The DIY aspect of Roman shades involves selecting your fabric, cutting it to size, and attaching it to a headrail mechanism. This project might be slightly more involved than sheer curtains but is highly rewarding, allowing for complete customization of color, pattern, and texture to match your interior design perfectly. The result is a tailored, elegant window treatment that significantly enhances light control.
Choosing the Right Fabric and Mechanism
For light-filtering Roman shades, prioritize fabrics that are neither too thin nor too thick. A medium-weight linen, cotton, or a blend will provide the ideal balance of light diffusion and structure. Avoid blackout fabrics if your goal is to maximize natural light. Instead, look for materials with a slight translucency that can soften harsh sunlight.
Fabric type: Linen, cotton, or poly-blends with a medium weight.
Color and pattern: Lighter colors enhance brightness; subtle patterns add character.
Mechanism: Consider corded or cordless systems for safety and ease of use.
Lining: An unlined or very light lining will allow more light to filter through.
The mechanism for Roman shades can be purchased as a kit, simplifying the DIY process. These kits typically include the headrail, cords, rings, and cleats needed to create the folding action. Familiarize yourself with the different types of Roman shade styles—flat, hobbled, or relaxed—to choose the one that best suits your aesthetic preferences.
Construction and Installation for Optimal Light
The construction of DIY Roman shades involves precise measurements and careful stitching to ensure the pleats fold uniformly. Detailed tutorials are widely available online, guiding you through each step, from cutting the fabric to attaching the rings for the cord system. Paying attention to detail during the sewing phase will result in a professional-looking finish.
For optimal light maximization, consider an outside mount installation. This means mounting the shade hardware above and outside the window frame, allowing the entire window to be exposed when the shade is fully raised. An inside mount, while providing a cleaner look, can slightly obscure the top portion of the window even when raised, reducing the overall natural light intake.
Light-filtering Roman shades are an excellent investment for homeowners who appreciate both style and functionality. They offer precise control over light and privacy, creating a refined atmosphere while harnessing the benefits of natural illumination.
DIY Idea 4: Frosted Window Film Designs
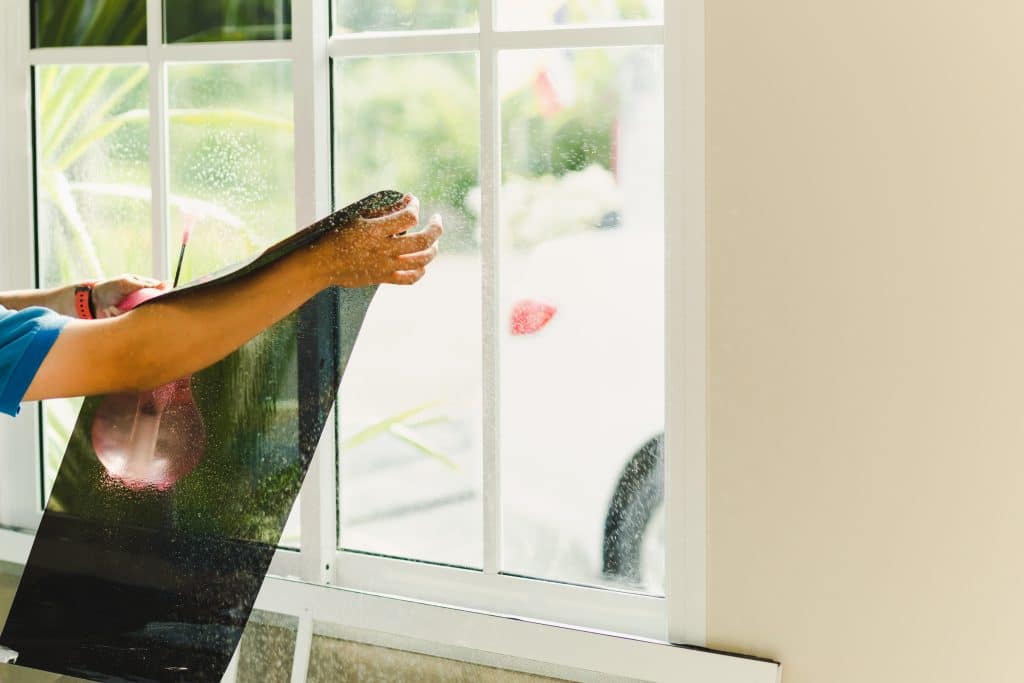
Frosted window film is an ingenious and cost-effective DIY solution for maximizing natural light while ensuring complete privacy. Unlike traditional curtains or blinds, frosted film adheres directly to the glass, allowing almost all natural light to pass through while obscuring views from both inside and out.
This makes it an ideal choice for bathrooms, ground-floor windows, or any area where privacy is a primary concern but natural light is still desired.
The DIY aspect comes in selecting the film’s pattern and applying it yourself. Frosted films come in a variety of designs, from simple matte finishes to intricate geometric patterns or even stained-glass effects. You can also cut the film into custom shapes or designs, adding a unique artistic touch to your windows without the need for specialized tools or extensive crafting skills.
Choosing and Cutting Your Film
When selecting frosted window film, consider the level of opacity and the desired aesthetic. Some films offer a denser frosting for maximum privacy, while others provide a lighter diffusion.
Think about how the pattern will interact with the light entering your room. Geometric patterns can create interesting shadow play, while a plain frosted film offers a clean, uniform look.
Opacity level: Match to your privacy needs and light requirements.
Design: Plain, geometric, floral, or custom-cut designs available.
Application method: Look for static cling films for easier application and removal.
Tools needed: Utility knife, ruler, spray bottle with soapy water, squeegee.
For custom designs, you can use a stencil or freehand cut shapes from the film before application. This allows for incredible personalization, turning a functional privacy solution into a decorative element. Remember to measure your windows precisely before purchasing the film to minimize waste and ensure a perfect fit.
Application Techniques for a Flawless Finish
Applying frosted window film is a straightforward DIY task that requires patience and a few simple tools. The key to a bubble-free, smooth finish is a clean window and liberal use of a soapy water solution during application. This solution allows you to reposition the film until it’s perfectly aligned.
Start by thoroughly cleaning your window glass. Then, spray the glass generously with the soapy water. Peel the backing from the film and apply it to the wet glass, adjusting its position as needed. Use a squeegee to smooth out any air bubbles and excess water, working from the center outwards. Trim any excess film with a sharp utility knife for a clean edge.
Frosted window film is a durable, long-lasting solution that provides privacy and light without the bulk of traditional window coverings. It’s an excellent way to maintain a minimalist aesthetic while maximizing the invaluable natural light in your home, making it a smart choice for any DIY enthusiast in 2026.
DIY Idea 5: Reflective Window Inserts
Reflective window inserts are an innovative and often overlooked DIY solution for controlling light and temperature while still harnessing natural illumination. These inserts are typically made from rigid panels covered with a reflective material, designed to fit snugly within your window frame.
Their primary function is to bounce light deeper into a room, making it feel brighter and more expansive, particularly in rooms with limited direct sunlight.
Beyond light amplification, reflective inserts can also offer significant energy savings. During colder months, they can help insulate windows, reducing heat loss. In warmer climates, some reflective materials can block a portion of solar heat while still allowing visible light to pass through, keeping interiors cooler. This dual functionality makes them a highly practical DIY project for any homeowner.
Materials and Construction
Creating reflective window inserts involves selecting the right materials for both the panel and the reflective surface. Common panel materials include foam core boards, thin plywood, or rigid insulation panels, chosen for their lightweight nature and ease of cutting. The reflective surface can be anything from high-quality reflective film to aluminum foil, carefully adhered to the panel.
Panel material: Foam core, thin plywood, rigid insulation board.
Reflective surface: Mylar film, reflective adhesive sheets, or even polished aluminum foil.
Adhesive: Spray adhesive or strong craft glue suitable for the chosen materials.
Edge finishing: Decorative tape or trim for a neat appearance.
The construction process involves precise measuring of your window panes to ensure a tight fit. Cut the chosen panel material to size, then carefully apply the reflective material, ensuring a smooth, wrinkle-free surface. You can finish the edges with tape or trim for a more polished look, making the inserts aesthetically pleasing even when visible.
Strategic Placement for Maximum Impact
The effectiveness of reflective window inserts largely depends on their strategic placement. They are most beneficial in rooms that receive indirect light or have windows facing north or east, where direct sunlight is less intense. By positioning the reflective side towards the interior, you can effectively bounce ambient light further into the room, illuminating darker corners and reducing the need for artificial lighting.
Consider creating inserts that are easily removable, allowing you to adjust their use based on the season or time of day. For instance, you might use them more frequently in winter to maximize daylight hours, or in specific rooms that always feel a bit dim. This adaptability makes them a highly versatile DIY solution for light management.
Reflective window inserts are a clever and eco-friendly way to enhance natural light and energy efficiency in your home. They demonstrate how simple DIY projects can lead to significant improvements in comfort and sustainability, proving that maximizing natural light is achievable for every homeowner.
Integrating Smart Home Technology for Light Control
While DIY window treatments provide excellent manual control over natural light, integrating smart home technology can elevate your light management to an entirely new level.
In 2026, smart home devices are more accessible and user-friendly than ever, offering automated solutions that optimize natural light throughout the day, enhance energy efficiency, and improve overall home convenience. This integration moves beyond simple manual adjustments to a dynamic system that responds to your needs and environmental conditions.
Smart home technology can automate the operation of your DIY window treatments, such as motorized blinds or shades. This means you can program your window coverings to open and close at specific times, respond to sunlight levels, or even adjust based on your presence in the room. The result is a home that intelligently manages natural light, ensuring optimal comfort and energy savings without constant manual intervention.
Automating Your Window Treatments
The core of integrating smart home technology for light control lies in motorizing your window treatments. While the DIY installation of motorized components might seem daunting, many kits are designed for easy integration with existing or newly crafted window coverings. These kits typically include a small motor, a remote control, and often compatibility with smart home hubs.
Motorized blinds/shades: Allows for remote and scheduled operation.
Smart home hubs: Connects various devices for centralized control (e.g., Amazon Echo, Google Home).
Light sensors: Automatically adjust treatments based on ambient light levels.
Timers and schedules: Program treatments to open/close at specific times of day.
Imagine your Roman shades automatically raising at sunrise to greet the day with natural light, or your sheer curtains gently closing in the evening for privacy. This level of automation not only adds convenience but also contributes to a more consistent and energy-efficient use of natural light, preventing excessive heat gain during peak sun hours and maximizing light when it’s most needed.
Advanced Light Management and Energy Savings
Beyond basic automation, smart home technology enables advanced light management strategies. For example, some systems can integrate with weather forecasts, adjusting window treatments to prepare for sunny or overcast days. Others can learn your preferences over time, creating a personalized light environment tailored to your daily routine.
This intelligent control contributes significantly to energy savings. By preventing unwanted solar heat gain in summer and maximizing passive solar heating in winter, smart window treatments can reduce the load on your HVAC system. Furthermore, by ensuring lights are only used when natural light is insufficient, you’ll see a noticeable reduction in electricity consumption.
Integrating smart home technology with your DIY window treatments represents the future of home light management. It combines the personal touch of DIY with the efficiency and convenience of modern technology, creating a home that is not only brighter and more comfortable but also smarter and more sustainable in 2026 and beyond.
Maintenance and Longevity of Your DIY Treatments
Once you’ve invested your time and creativity into DIY window treatments to maximize natural light, ensuring their longevity through proper maintenance is crucial. Regular care not only keeps your treatments looking their best but also ensures they continue to function effectively in filtering and directing light. Neglecting maintenance can lead to premature wear, reduced aesthetic appeal, and diminished performance, undermining your efforts to enhance your home’s natural illumination.
The specific maintenance routine will depend on the materials you’ve chosen. For fabric-based treatments like sheer curtains, cafe curtains, and Roman shades, routine cleaning is essential to prevent dust buildup and maintain their light-filtering properties.
For hard-surface treatments like frosted film and reflective inserts, cleaning the surface and ensuring a secure fit are key to their durability and effectiveness.
Cleaning and Care for Fabric Treatments
Fabric window treatments are susceptible to dust, allergens, and occasional stains. Regular cleaning is vital to keep them fresh and performing optimally. For most sheer curtains, cafe curtains, and Roman shades made from washable fabrics, a gentle machine wash or hand wash is usually sufficient. Always check the fabric care labels or research the specific material’s cleaning recommendations.
Dusting: Weekly dusting with a soft brush attachment or lint roller.
Washing: Follow fabric care instructions; typically gentle cycle with mild detergent.
Spot cleaning: Address stains immediately with a suitable fabric cleaner.
Drying: Air dry or tumble dry on low to prevent shrinkage or damage.
For Roman shades, pay attention to the cords and rings, ensuring they are free from dust and operate smoothly. If your fabric treatments are not easily removable or are made from delicate materials, professional dry cleaning might be the best option to preserve their integrity and appearance.
Maintaining Frosted Film and Reflective Inserts
Frosted window films and reflective inserts generally require less frequent cleaning than fabric treatments but still benefit from regular attention.
For frosted film, a simple wipe-down with a damp, soft cloth and mild soap is usually enough to remove dust and smudges. Avoid abrasive cleaners or harsh chemicals, as these can damage the film’s surface or adhesive.
Reflective inserts should be kept clean to ensure maximum light reflection. Dust can accumulate on the reflective surface, reducing its efficiency.
A gentle wipe with a microfiber cloth is often all that’s needed. Periodically check the fit of your inserts within the window frame; if they become loose, re-secure them to maintain their insulating and light-directing properties.
By establishing a consistent maintenance routine, you can significantly extend the life and effectiveness of your DIY window treatments. This commitment to care ensures that your efforts to maximize natural light continue to pay dividends in comfort, aesthetics, and energy efficiency for years to come, making your home a brighter and more inviting space in 2026.
| DIY Idea | Key Benefit for Light |
|---|---|
| Sheer Curtains | Diffuses harsh light, maintains privacy, creates soft ambiance. |
| Cafe Curtains | Offers lower-level privacy while keeping upper window clear for light. |
| Roman Shades | Provides elegant light diffusion and privacy with a clean, tailored look. |
| Frosted Film | Ensures privacy while allowing maximum light; customizable designs. |
Frequently Asked Questions About Natural Light Maximization
Maximizing natural light offers numerous benefits, including improved mood and well-being, enhanced cognitive function, better sleep quality, and significant energy savings by reducing the need for artificial lighting. It also makes rooms feel larger and more inviting.
Absolutely. DIY window treatments like sheer curtains, cafe curtains, and light-filtering Roman shades are specifically designed to allow more natural light to enter your home while still offering privacy and style. Strategic choices can significantly brighten a room.
Consider the room’s function. For high privacy with light, frosted film is excellent. For diffused light and moderate privacy, sheer curtains or light-filtering Roman shades work well. Cafe curtains are ideal for lower-level privacy while keeping upper windows open.
Reflective window inserts are relatively easy to make with basic tools and materials like foam core and reflective film. The primary challenge is precise measurement for a snug fit. Installation usually involves simply placing them into the window frame.
Smart home technology allows for automated control of motorized window treatments based on schedules, light sensors, or voice commands. This optimizes light throughout the day, improves energy efficiency, and adds convenience, ensuring your home is always ideally lit.
Conclusion
In conclusion, harnessing the power of natural light in your home through thoughtful DIY window treatments is a rewarding endeavor that offers a multitude of benefits. From enhancing your mood and well-being to significantly reducing energy costs, the impact of a well-lit home is profound.
The five DIY ideas discussed—sheer curtains, cafe curtains, light-filtering Roman shades, frosted window film, and reflective window inserts—provide accessible and creative pathways to transform your living spaces.
Whether you’re seeking a subtle diffusion of light, targeted privacy, or a complete overhaul of your window aesthetics, there’s a DIY solution perfectly suited for your needs. Moreover, by integrating smart home technology, you can elevate these manual efforts into an automated system that intelligently manages light, further amplifying comfort and efficiency.
As we move through 2026, embracing these DIY projects means not just redecorating, but actively investing in a brighter, healthier, and more sustainable home environment. So, roll up your sleeves, unleash your creativity, and let the sunshine in!