DIY Furniture Upcycling: Modern Decor in One Weekend
 Are you looking to inject new life into your home without breaking the bank? DIY furniture upcycling offers a creative and sustainable solution, allowing you to transform tired, old pieces into modern, functional decor in just one weekend.
This guide will walk you through everything you need to know to get started, from finding the right pieces to applying the perfect finish, ensuring your home reflects your unique style and commitment to sustainable living.
The Allure of Upcycling: Why Give Old Furniture a Second Life?
Upcycling furniture isn’t just a trend; it’s a conscious choice that offers numerous benefits, both personal and environmental.
In a world increasingly focused on sustainability, breathing new life into existing items reduces waste and conserves resources.
This approach allows you to create truly unique pieces that reflect your personal style, often at a fraction of the cost of buying new furniture.
Beyond the environmental perks, upcycling provides a fulfilling creative outlet. The process of envisioning a new purpose for an old item and then bringing that vision to life can be incredibly rewarding.
It’s an opportunity to develop new skills, experiment with colors and textures, and ultimately craft something that tells a story, unlike mass-produced items.
Environmental Impact and Cost Savings
One of the most compelling reasons to embrace furniture upcycling is its positive environmental impact. Every piece of furniture you upcycle is one less item sent to a landfill.
This reduces the demand for new manufacturing, which in turn saves energy, raw materials, and reduces carbon emissions. It’s a small but significant way to contribute to a greener planet.
Reduces landfill waste and pollution.
Conserves natural resources like timber and metals.
Lowers your carbon footprint by avoiding new production.
Financially, upcycling is a smart move. You can often find quality, solid wood furniture for very little at yard sales, thrift stores, or even roadside discards.
A bit of paint, some new hardware, and a weekend’s worth of effort can transform these finds into pieces worth hundreds, if not thousands, of dollars. The savings can be substantial, allowing you to allocate your budget to other home improvement projects.
Unleashing Creativity and Personal Style
Upcycling is an art form. It allows you to break free from generic store-bought aesthetics and infuse your home with personality.
Do you love vintage chic, industrial modern, or bohemian comfort? Upcycling provides the canvas for you to express these styles authentically. You’re not just decorating a home; you’re curating a collection of pieces that tell your story.
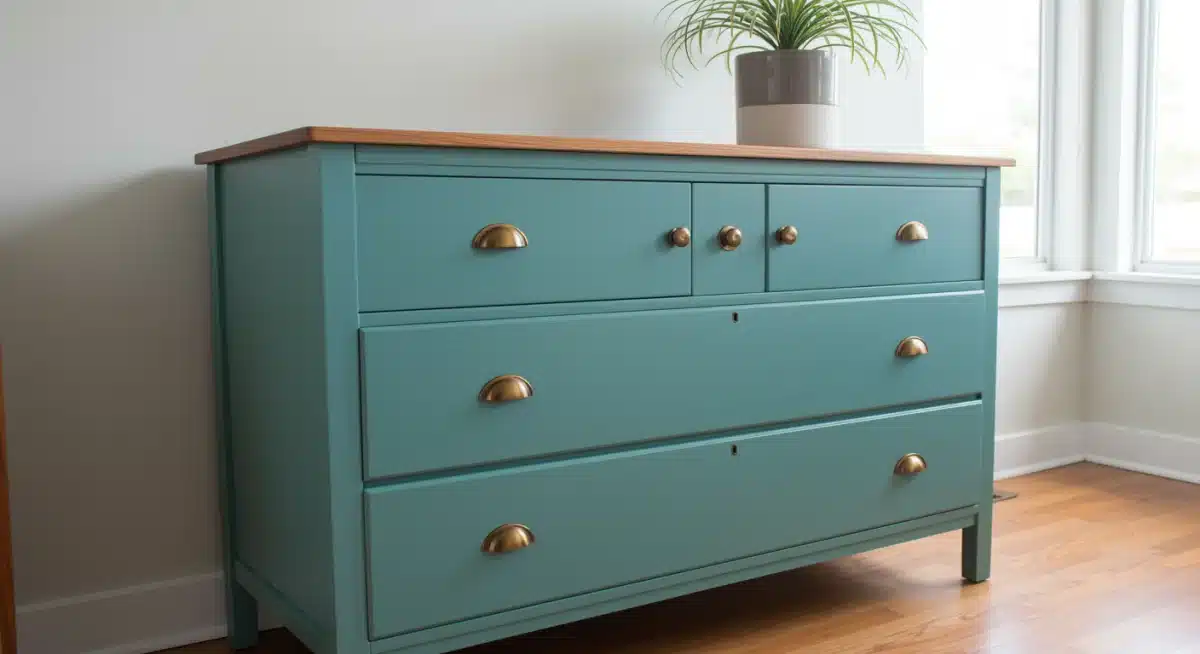
Imagine a plain wooden chest transformed into a vibrant statement piece with a bold geometric pattern, or a drab bookshelf becoming a charming display unit with a distressed finish.
Each upcycled item becomes a conversation starter, a testament to your ingenuity and taste. This personal touch is what truly makes a house a home, creating spaces that are both beautiful and meaningful.
Ultimately, upcycling furniture is a journey of discovery. It’s about seeing potential where others see junk, and having the courage to transform it.
The satisfaction of stepping back and admiring a piece you’ve personally rescued and reimagined is unparalleled. It’s a sustainable, economical, and deeply personal way to enhance your living environment.
Finding Your Treasure: Sourcing the Perfect Pieces
The success of any DIY furniture upcycling project begins with selecting the right piece. Not all furniture is created equal, and knowing what to look for can save you time, effort, and potential frustration. The goal is to find items with good bones that have the potential for a stunning transformation, even if they initially appear worn or outdated.
Start your hunt with an open mind and a critical eye. Think beyond the immediate appearance and try to visualize the piece in its transformed state. Consider its shape, size, and the quality of its construction. Sometimes, the most unassuming items hold the greatest potential for a beautiful makeover.
Where to Hunt for Hidden Gems
There are numerous places where you can uncover fantastic furniture for upcycling. Each source offers different advantages, from price points to the types of items available. Exploring a variety of locations will increase your chances of finding that perfect project.
Thrift Stores and Secondhand Shops: Often overflowing with affordable furniture, these stores are a treasure trove for upcyclers. Look for solid wood pieces that might be hidden beneath layers of old varnish or dated upholstery.
Yard Sales and Estate Sales: These are excellent for finding unique, often vintage, items directly from previous owners. You can frequently negotiate prices, and you might stumble upon rare finds that are perfect for a personalized touch.
Online Marketplaces (Craigslist, Facebook Marketplace): Many people are giving away or selling furniture for very low prices just to get rid of it quickly. Be prepared to act fast and arrange for pickup.
Curbside Finds: Keep an eye out on trash collection days! Many perfectly good pieces are discarded simply because they’re no longer wanted or have minor flaws that are easily fixable. Always check for structural integrity and pests before bringing them home.
Assessing Potential: What to Look For
Once you spot a potential candidate, it’s crucial to assess its condition and suitability for upcycling. A quick check can prevent you from investing time and money into a piece that’s beyond repair or too difficult to work with. Focus on the structural integrity and the type of material.
Prioritize pieces made from solid wood, as they are generally more durable and easier to sand, paint, and repair. Avoid particle board or MDF if possible, as these materials don’t hold up as well to sanding and can swell if they get wet.
Check for loose joints, wobbles, or significant cracks. Minor imperfections are fine, as these can often be incorporated into the design or easily fixed. However, extensive damage might require more advanced repairs than you’re prepared for in a weekend project.
Think about the piece’s original function and how you might adapt it. A dresser could become a bathroom vanity, a bookshelf could be transformed into a bar cart, or an old door could become a rustic headboard.
The possibilities are endless when you approach each item with a creative vision. Remember, beauty truly is in the eye of the beholder, especially when it comes to upcycling.
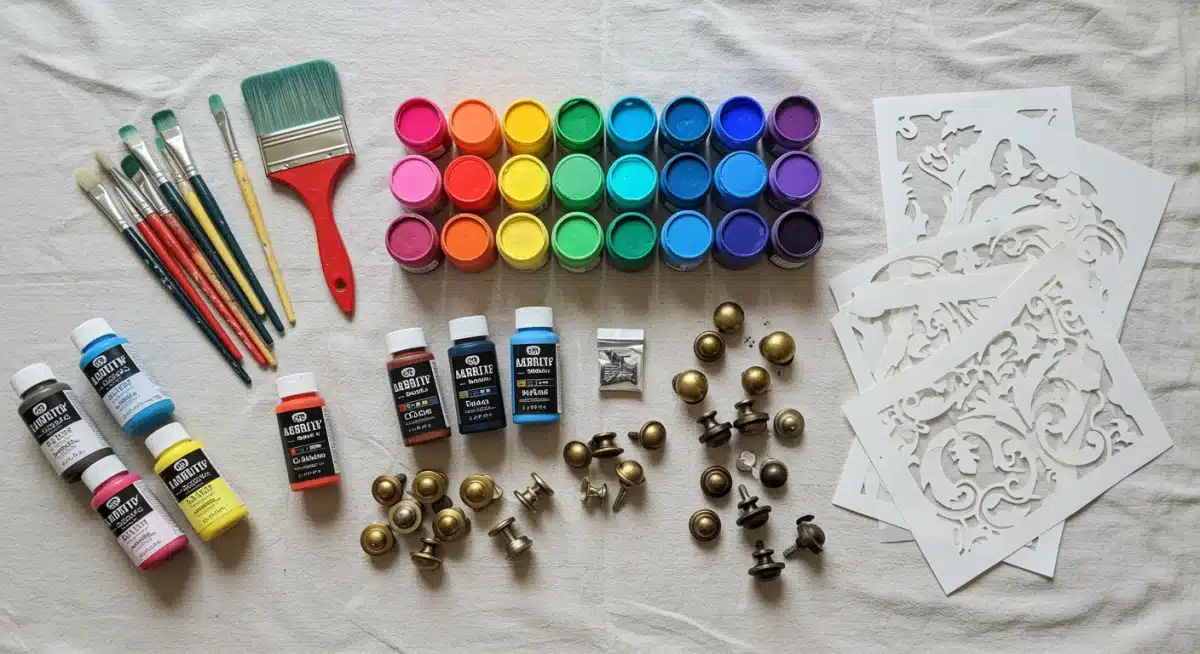
Essential Tools and Materials for Your Project
Before you dive into the exciting world of DIY furniture upcycling, having the right tools and materials on hand is crucial.
A well-prepared workspace not only makes the process smoother but also ensures a safer and more efficient transformation.
You don’t need a professional workshop, but a few key items will make all the difference in achieving a professional-looking finish.
Gathering your supplies beforehand prevents interruptions and allows you to maintain momentum throughout your weekend project. From basic hand tools to protective gear, each item plays a vital role in bringing your vision to life.
Let’s break down the essentials.
Basic Hand Tools and Power Essentials
Even for simple upcycling projects, a few fundamental tools are indispensable. These will help you with disassembly, preparation, and general repairs.
Investing in good quality basic tools will serve you well for many projects to come.
Screwdriver Set: For removing old hardware, hinges, and sometimes disassembling parts.
Hammer: Useful for minor repairs, tapping in nails, or gently prying apart stubborn joints.
Pliers: Handy for gripping, bending, or cutting small wires or nails.
Tape Measure: Essential for accurate measurements, especially if you’re adding new elements or cutting materials.
Utility Knife: For scoring, cutting, or trimming various materials.
For more efficient work, especially when dealing with larger pieces or multiple projects, some power tools can be a game-changer.
An orbital sander, for example, drastically cuts down on sanding time compared to manual sanding.
Preparation and Finishing Supplies
The secret to a long-lasting and beautiful upcycled piece lies in thorough preparation and quality finishing materials.
Don’t skimp on these steps; they are the foundation of your project’s success. Proper preparation ensures that your chosen finish adheres well and looks flawless.
Sandpaper: A variety of grits (coarse, medium, fine) will be needed for stripping old finishes, smoothing surfaces, and preparing for paint or stain. An orbital sander can make this process much faster.
Wood Filler/Putty: For repairing dents, scratches, and small holes.
Primer: Especially important for surfaces that are glossy, dark, or made of tricky materials like laminate. It helps paint adhere better and provides an even base.
Paint/Stain: Choose high-quality paints or stains specifically designed for furniture. Consider chalk paint for a distressed look, or a durable enamel for a sleek, modern finish.
Brushes, Rollers, and Applicators: Select appropriate tools for your chosen finish. Good quality brushes prevent streaks and shedding.
Sealer/Topcoat: A clear topcoat (polyurethane, wax, or lacquer) protects your finish from wear and tear, ensuring longevity.
Don’t forget safety gear! Always wear safety glasses when sanding or using power tools, and gloves to protect your hands from paints and chemicals.
Work in a well-ventilated area to avoid inhaling fumes. With these tools and materials at your disposal, you’re well-equipped to tackle your upcycling project with confidence and achieve stunning results in a single weekend.
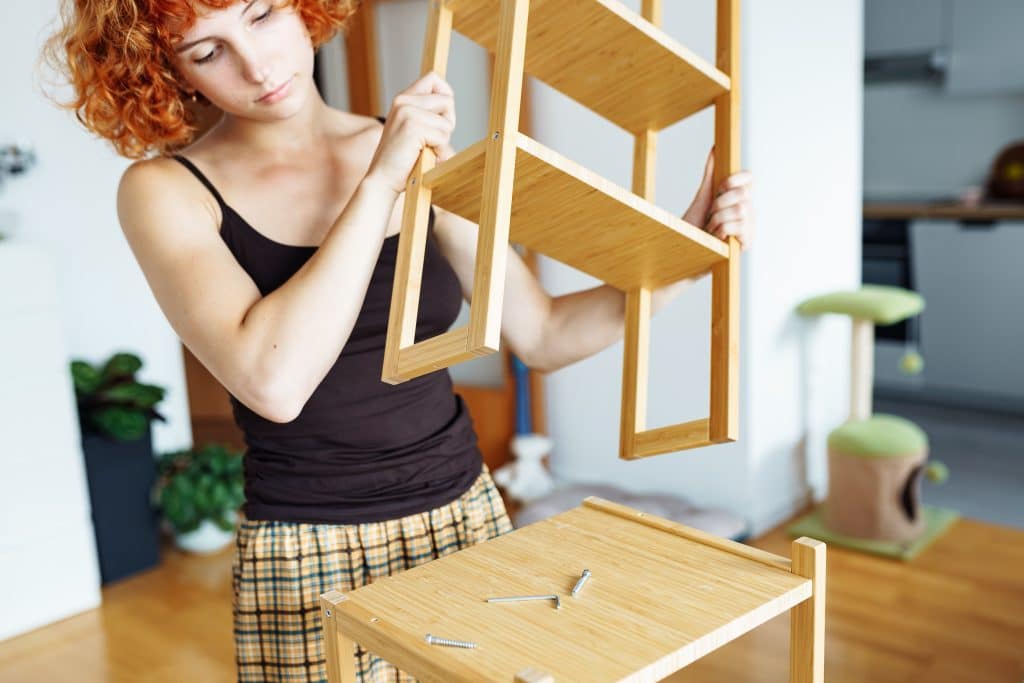
The Transformation Process: Step-by-Step Guide
Embarking on a DIY furniture upcycling project can feel daunting, but breaking it down into manageable steps makes the process enjoyable and achievable within a weekend.
Each stage is crucial for ensuring a durable and aesthetically pleasing result. Patience and attention to detail during preparation will pay off immensely in the final finish.
This systematic approach will guide you from the initial cleaning to the final protective coat, ensuring your upcycled piece not only looks fantastic but also stands the test of time. Remember, the key is not to rush, but to enjoy the creative journey.
Preparation is Key: Cleaning, Repairing, and Sanding
The foundation of any successful upcycling project is thorough preparation. Skipping these steps can lead to paint peeling, uneven finishes, and a less-than-professional look.
Dedicate ample time to this stage; it’s where the magic truly begins.
Clean Thoroughly: Start by cleaning the entire piece with a degreaser or a mixture of warm water and mild soap. Remove all dirt, grime, and old polish. Rinse well and allow it to dry completely.
Inspect and Repair: Check for any loose joints, wobbly legs, or damaged sections. Use wood glue to secure loose joints, clamps to hold them while drying, and wood filler for dents, scratches, or holes. Sand the repaired areas smooth once dry.
Sanding: This is arguably the most critical step. Lightly sand the entire surface to rough it up, allowing the primer and paint to adhere better.
If the old finish is peeling or heavily varnished, you might need to do more aggressive sanding or even strip the old finish entirely.
Start with a medium-grit sandpaper (120-150 grit) and finish with a finer grit (180-220 grit) for a smooth surface. Always sand in the direction of the wood grain.
After sanding, wipe down the piece with a tack cloth or a damp cloth to remove all dust. A clean, smooth surface is essential for the next steps.
Priming and Painting: Adding Color and Character
With the piece prepped, it’s time to bring your vision to life with color. Priming creates an ideal base, and painting is where the transformation truly takes shape.
Choose your colors and finishes carefully to match your desired aesthetic.
Apply a thin, even coat of primer. This step is especially important if you’re painting over a dark finish with a light color, or if the piece is made of a material that paint typically struggles to adhere to.
Allow the primer to dry completely according to the manufacturer’s instructions. A second coat of primer might be necessary for very dark or problematic surfaces.
Once the primer is dry, it’s time for paint. Apply thin, even coats, allowing each coat to dry thoroughly before applying the next.
This prevents drips and ensures a smoother finish. Two to three thin coats are usually better than one thick coat.
For a distressed look, you might sand certain edges or areas after the paint has dried to reveal the wood or previous finish underneath. Consider adding stencils, hand-painted details, or new hardware to enhance the piece’s character.
Sealing for Durability and Longevity
The final step in your upcycling journey is to protect your newly transformed piece with a durable topcoat.
This sealer will guard against scratches, moisture, and general wear and tear, ensuring your hard work lasts for years to come. The type of sealer you choose will depend on the paint you used and the desired finish.
Options include polyurethane (water-based for easy cleanup, oil-based for more durability), clear wax (often used with chalk paint for a matte finish), or lacquer (for a very hard, high-gloss finish). Apply the sealer according to the product instructions, usually in thin, even coats, allowing adequate
drying time between each. For high-traffic pieces like tabletops, multiple coats of a durable sealer are recommended.
Once the final coat is dry and cured, your upcycled masterpiece is ready to be enjoyed!
Creative Techniques to Elevate Your Upcycle
Beyond a simple paint job, there’s a world of creative techniques that can elevate your DIY furniture upcycling projects from good to truly exceptional.
These methods allow you to add unique textures, patterns, and finishes that reflect a higher level of craftsmanship and personal style. Experimenting with these techniques can unlock new possibilities for transforming your old pieces.
Whether you’re aiming for a rustic farmhouse look, a chic modern vibe, or something entirely whimsical, these creative approaches provide the tools to achieve your desired aesthetic. Don’t be afraid to try something new; sometimes the most unexpected combinations yield the most stunning results.
Distressing and Antiquing for Vintage Charm
If you’re drawn to the charm of aged furniture, distressing and antiquing techniques are perfect for you.
These methods create the illusion of wear and tear, giving a piece a history and character it might not originally possess. They’re particularly effective on solid wood furniture.
Wet Distressing: For chalk paint, you can use a damp cloth to gently rub away paint on edges and raised areas before it fully cures, revealing the layer underneath.
Sanding Distressing: After your paint has dried, use fine-grit sandpaper to strategically sand down edges, corners, and areas that would naturally see wear over time. This exposes the primer or original wood, creating an authentic aged look.
Antiquing Glaze: Apply a tinted glaze over your base paint. Wipe it back with a rag, leaving the glaze in crevices and carved details to create a darkened, aged appearance.
Crackling Medium: A crackling medium applied between two coats of paint will cause the top coat to crack as it dries, mimicking the look of old, flaking paint.
These techniques add depth and interest, making a brand-new finish appear wonderfully old and full of stories.
Practice on a scrap piece of wood first to get a feel for the technique before applying it to your main project.
Stenciling and Decoupage for Pattern and Detail
To introduce intricate patterns or unique visual elements, stenciling and decoupage are fantastic options.
These methods allow for a high degree of customization and can completely transform the aesthetic of a piece, making it truly one-of-a-kind.
Stenciling: Use stencils to add geometric patterns, floral motifs, or even custom text to your furniture.
Secure the stencil with painter’s tape and apply paint with a stencil brush or a foam roller, using very little paint to prevent bleeding under the edges.
Multiple colors can be used for a layered effect. This is particularly effective on tabletops, drawer fronts, or cabinet doors.
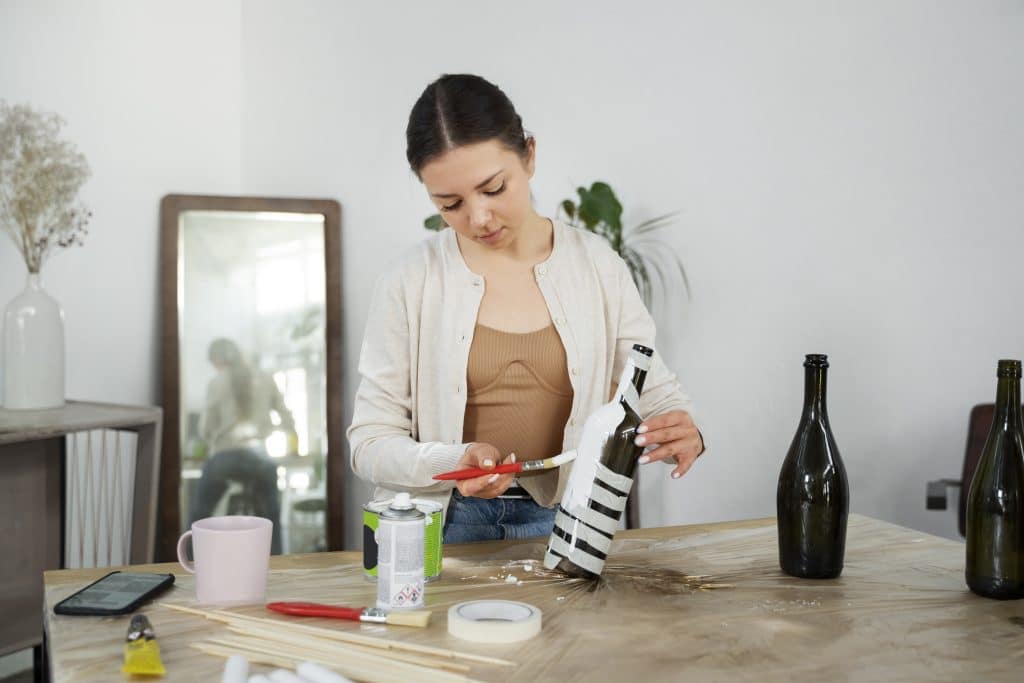
Upcycling with Decoupage: Adding Personality and Detail
Upcycling with decoupage is a creative technique that involves gluing paper cutouts—such as magazine pages, vintage book sheets, decorative paper, or fabric—onto a furniture surface and sealing them with multiple layers of varnish.
This method is ideal for adding personalized imagery, artistic patterns, or a layered collage effect to your upcycling projects.
Decoupage is especially useful in upcycling because it can easily cover surface imperfections while creating a smooth, durable finish.
It works beautifully on drawer interiors, tabletops, cabinet doors, or even entire furniture pieces when you want to make a bold design statement.
Whether subtle or dramatic, decoupage allows your upcycling project to stand out with character and charm.
Both stenciling and decoupage play an important role in advanced upcycling techniques. While they require patience, precision, and careful sealing, the results are highly rewarding.
These methods allow you to infuse creativity into every detail, transforming ordinary furniture into truly unique upcycling pieces that reflect your personal style and artistic vision.
ions
While DIY furniture upcycling is a rewarding endeavor, it’s not without its potential challenges. Encountering unexpected issues is part of the process, but knowing how to troubleshoot them can save you time, frustration, and ensure your project stays on track for a successful weekend completion. Many common problems have straightforward solutions.
Addressing these challenges proactively or as they arise will help you maintain momentum and achieve the high-quality finish you’re aiming for.
Don’t let minor setbacks deter you; consider them opportunities to learn and refine your skills.
Dealing with Stubborn Finishes and Imperfections
One of the most frequent hurdles is dealing with old, stubborn finishes or significant imperfections on the furniture piece.
Old varnish, peeling paint, or deep scratches can seem daunting, but there are effective ways to tackle them.
Sticky Old Finishes: If the existing finish is particularly sticky or gummy, sometimes a thorough cleaning with mineral spirits or a dedicated degreaser can help.
If not, chemical paint strippers might be necessary, but always use them in a well-ventilated area with appropriate safety gear.
Deep Scratches and Dents: For deeper imperfections, wood filler is your best friend. Apply it in thin layers, allowing each to dry completely before sanding smooth.
For very large holes or missing pieces, you might need to cut and glue in a small piece of matching wood, then use filler to blend it in.
Peeling Paint: All peeling paint must be removed. Use a paint scraper or an orbital sander to get rid of any loose flakes.
Sand the edges of remaining paint smooth so there are no visible lines under the new finish.
Remember, thorough preparation is paramount. Rushing these steps almost always leads to a compromised final product. Patience here will save you rework later.
Achieving a Smooth, Professional Finish with Upcycling
One of the most common challenges in upcycling furniture is achieving a smooth, professional-looking finish. Many beginners encounter issues such as visible brush strokes, paint drips, or uneven coverage. In most cases, these problems come down to technique and product selection—both of which can be easily corrected.
To reduce brush marks in upcycling projects, always use the right tools. High-quality synthetic brushes work best for water-based paints, while natural bristle brushes are ideal for oil-based finishes.
Apply paint in thin, even layers and resist the urge to overwork the surface once the paint is applied. For large, flat areas, a foam roller designed for smooth finishes can deliver streak-free, professional results.
Paint drips and runs usually happen when too much product is applied at once. A key upcycling rule is to use multiple thin coats rather than a single thick layer.
Allow each coat to dry to the touch before adding the next. If drips appear, let the paint fully dry, then lightly sand the area before continuing.
For an ultra-smooth upcycling finish, lightly sand between coats using very fine-grit sandpaper (around 400 grit).
Always wipe away dust with a clean cloth before applying the next layer. This extra step creates a polished, high-end look that rivals professionally refinished furniture.
By understanding these common upcycling challenges and applying proven techniques, you can approach each project with confidence.
As your skills improve, every upcycling piece becomes more refined—making the process not only more successful, but far more enjoyable.
Showcasing Your Upcycled Masterpiece
Once your DIY furniture upcycling project is complete and the final coat has cured, the most exciting part begins: integrating your transformed piece into your home decor.
A beautifully upcycled item deserves to be showcased, becoming a focal point that enhances the overall aesthetic of your space.
Thoughtful placement and styling can truly bring your creation to life.
Consider how your new piece interacts with existing furniture, color schemes, and lighting. The goal is to create a harmonious and inviting environment where your upcycled masterpiece shines, reflecting your personal style and creative effort.
Strategic Placement and Styling Tips
The placement of your upcycled furniture can dramatically impact a room’s feel. Think about its function, its size, and how it contributes to the room’s flow.
A bold, brightly painted dresser might work best as a statement piece in a minimalist entryway, while a subtly distressed side table could perfectly complement a cozy reading nook.
Focal Point: Position your most striking upcycled piece where it naturally draws the eye, such as against a prominent wall or at the end of a hallway.
Balance: Ensure your upcycled item balances the room’s overall design. If it’s a large, dark piece, balance it with lighter elements elsewhere in the room.
Functionality: Beyond aesthetics, consider its practical use. Does an upcycled console table provide much-needed storage in your living room, or does a repurposed cabinet serve as a unique bar?
Accessorize Thoughtfully: Enhance your piece with complementary accessories. A vintage vase, a stack of interesting books, or a small plant can add character without overpowering the furniture itself.
Don’t be afraid to move things around until you find the perfect spot. Sometimes, a piece looks entirely different when viewed from various angles or in different lighting conditions.
Integrating Upcycling with Existing Decor
The beauty of upcycling furniture lies in its versatility—it can blend seamlessly with your existing decor or stand out as a deliberate statement piece.
Successful upcycling integration depends on a thoughtful balance of color, texture, and style. The goal is to create a space that feels cohesive and intentional, not accidental or cluttered.
When an upcycling project features a bold color or finish, echo that shade in smaller accents around the room, such as throw pillows, wall art, rugs, or decorative objects. This repetition creates visual harmony.
On the other hand, neutral upcycling pieces work beautifully as grounding elements, allowing vibrant textiles, plants, or artwork to take center stage.
Mixing styles is another powerful upcycling strategy.
Pairing a rustic upcycled dresser with modern lighting or contemporary art can create an eclectic, designer-inspired look.
The key is identifying a unifying element—whether it’s a consistent color palette, shared textures like wood or metal, or a complementary design era—to tie everything together effortlessly.
Ultimately, showcasing upcycling furniture is about celebrating creativity and sustainability while making your home feel personal and authentic.
Each upcycled piece tells a story, and when thoughtfully placed, it enhances your living space, sparks conversation, and reflects your unique design vision.
| Key Aspect | Brief Description |
|---|---|
| Sourcing Furniture | Look for solid wood pieces at thrift stores, yard sales, or online marketplaces. |
| Preparation | Clean, repair, and sand thoroughly. Essential for lasting finish. |
| Creative Techniques | Explore distressing, stenciling, or decoupage for unique character. |
| Finishing Strong | Apply primer, multiple thin coats of paint, and a durable topcoat for protection. |
Frequently Asked Questions About Furniture Up Cycling
What kind of furniture is best for up cycling?
For upcycling projects, solid wood furniture is the best option thanks to its durability and ease of sanding, repairing, and refinishing.
Focus on pieces with strong structural integrity, even if they show surface damage or outdated finishes.
For beginners, it’s best to avoid particle board or MDF, as these materials are less forgiving during sanding and painting.
How long does a typical furniture up cycling project take?
Most beginner to intermediate furniture up cycling projects can be completed in a single weekend. With proper planning and materials prepared in advance, the process becomes much more efficient.
The key is managing drying times for paint, primer, and sealers while focusing on one piece at a time.
Do I need to sand furniture before up cycling and painting?
Yes, light sanding is almost always recommended when upcycling furniture. Sanding helps remove old finishes and creates texture for primer and paint to adhere properly.
Even when using “no-sand” paints, a quick scuff sanding greatly improves adhesion, durability, and the final look.
What are the essential safety precautions for furniture up cycling?
Safety is essential during any upcycling project. Always work in a well-ventilated area to reduce exposure to fumes.
Wear safety glasses when sanding or cutting, gloves to protect your hands, and a dust mask to avoid inhaling wood dust or old paint particles—especially when working with older furniture.
How can I make my up cycled furniture last longer?
To extend the life of your upcycled furniture, apply a high-quality protective topcoat after painting. Options like polyurethane, wax, or lacquer help guard against moisture, scratches, and everyday wear.
Proper preparation—cleaning, sanding, and priming—also plays a major role in ensuring a long-lasting finish.
Conclusion: Embrace the Art of Upcycling
DIY furniture upcycling is more than just a craft; it’s a sustainable lifestyle choice that empowers you to transform your home and express your creativity.
By giving old, overlooked pieces a new lease on life, you contribute to a healthier planet, save money, and infuse your living spaces with unique character and charm.
The journey from a forgotten find to a modern decor statement is incredibly rewarding, proving that with a little vision, preparation, and effort, stunning transformations are achievable in just one weekend.
So, gather your tools, unleash your imagination, and get ready to create pieces that tell your story and make your home truly your own.


